iOS Programming: The Big Nerd Ranch Guide, 3/e (Big Nerd Ranch Guides) (50 page)
Read iOS Programming: The Big Nerd Ranch Guide, 3/e (Big Nerd Ranch Guides) Online
Authors: Aaron Hillegass,Joe Conway
Tags: #COM051370, #Big Nerd Ranch Guides, #iPhone / iPad Programming

On the iPhone or iPod touch, a modal view controller takes over the entire screen. This is the default behavior and the only possibility on these devices. On the iPad, you have two additional options: a form sheet style and a page sheet style. You can change the presentation of the modal view controller by setting its
modalPresentationStyle
property to a pre-defined constant –
UIModalPresentationFormSheet
or
UIModalPresentationPageSheet
.
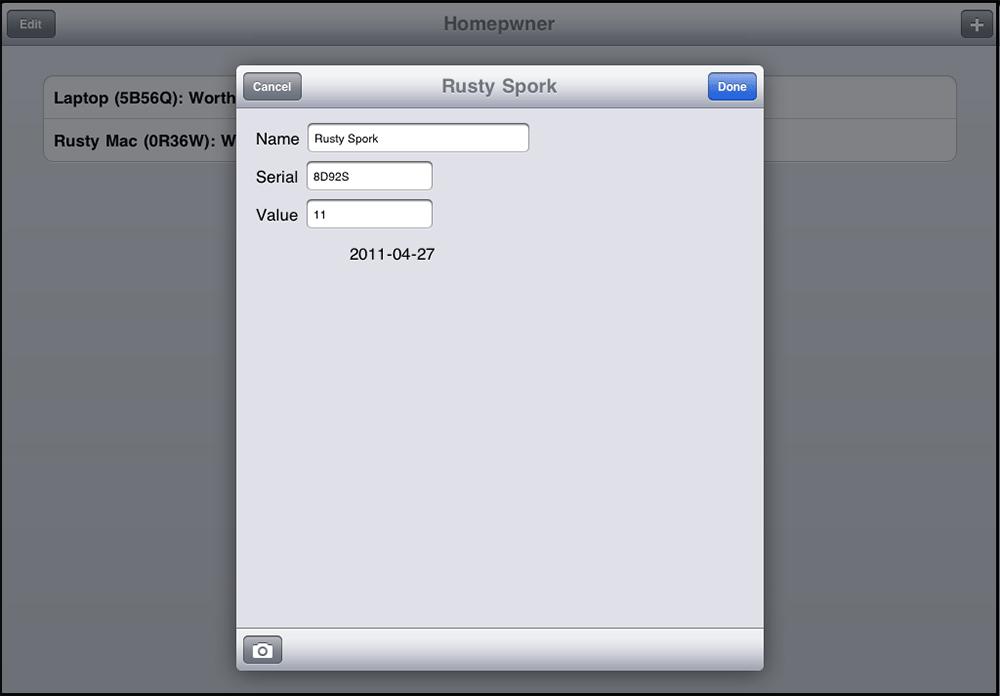
The form sheet style shows the modal view controller’s view in a rectangle in the center of the iPad’s screen and dims out the presenting view controller’s view (
Figure 13.5
).
Figure 13.5 An example of the form sheet style
The page sheet style is the same as the default full-screen style in portrait mode. In landscape mode, it keeps its width the same as in portrait mode and dims the left and right edges of the presenting view controller’s view that stick out behind it.
In
ItemsViewController.m
, modify the
addNewItem:
method to change the presentation style of the
UINavigationController
that is being presented.
initWithRootViewController:detailViewController];
[navController setModalPresentationStyle:UIModalPresentationFormSheet];
[self presentViewController:navController animated:YES completion:nil];
Notice that we change the presentation style of the
UINavigationController
, not the
DetailViewController
, since it is the one that is being presented modally.
Build and run the application on the iPad simulator or on an iPad. Tap the button to add a new item and watch the modal view controller slide onto the screen. Add some item details and then tap the
Done
button. The table view reappears, but your new
BNRItem
isn’t there. What happened?
Before you changed its presentation style, the modal view controller took up the entire screen, which caused the view of the
ItemsViewController
to disappear. When the modal view controller was dismissed, the
ItemsViewController
was sent the messages
viewWillAppear:
and
viewDidAppear:
and took this opportunity to reload its table to catch any updates to the
BNRItemStore
.
With the new presentation style, the
ItemsViewController
’s view doesn’t disappear when it presents the view controller. So it isn’t sent the re-appearing messages when the modal view controller is dismissed, and it doesn’t get the chance to reload its table view.
We have to find another opportunity to reload the data. The code for the
ItemsViewController
to reload its table view is simple. It looks like this:
What we need to do is to package up this code and have it executed right when the modal view controller is dismissed. Fortunately, there is a built-in mechanism in
dismissViewControllerAnimated:completion:
that we can use to accomplish this.
In both
dismissViewControllerAnimated:completion:
and
presentViewController:animated:completion:
, we’ve been passing
nil
as the last argument. Take a look at the type of that argument in the declaration for
dismissViewControllerAnimated:completion:
.
completion:(void (^)(void))completion;
Looks strange, huh? This method expects a
block
as an argument, and passing a block here is the solution to our problem. So we need to talk about blocks. However, the concepts and syntax of blocks can take a while to get used to, so we’re just going to introduce them briefly. We will return to blocks in
Chapter 27
, which is entirely dedicated to blocks.
A block is both a chunk of code and an object at the same time. Blocks are a lot like C functions, but they are defined inside another method. Once defined, you can have a variable point at that block – just like a variable points at an object. Because you have this variable, you can pass a pointer to a block as an argument to a method or keep it as an instance variable – just like you can pass a pointer to an object as an argument to a method or keep a pointer to an object as an instance variable.
Here’s the important part to understand right now: We can put the code to reload the table view into a block and pass it to
dismissViewControllerAnimated:completion:
. Then, that code will be executed right after the modal view controller is dismissed.
In
DetailViewController.h
, add a new property for a pointer to a block.
This says
DetailViewController
has a property named
dismissBlock
that points to a block. Like a C function, a block has a return value and a list of arguments. These function-like characteristics are included in the declaration of a block. This particular block returns
void
and takes no arguments.
Synthesize this property in
DetailViewController.m
.
@synthesize dismissBlock;
We can’t create the block itself in
DetailViewController
, though. We have to create it in
ItemsViewController
because the
ItemsViewController
is the only object that knows about its
tableView
.
In
ItemsViewController.m
, create a block that reloads the
ItemsViewController
’s table and pass the block to the
DetailViewController
. Do this in the
addNewItem:
method in
ItemsViewController.m
.
{
// Create a new BNRItem and add it to the store
BNRItem *newItem = [[BNRItemStore sharedStore] createItem];
DetailViewController *detailViewController =
[[DetailViewController alloc] initForNewItem:YES];
[detailViewController setItem:newItem];
[detailViewController setDismissBlock:^{
[[self tableView] reloadData];
}];
UINavigationController *navController = [[UINavigationController alloc]
initWithRootViewController:detailViewController];
Now when the user taps a button to add a new item, a block that reloads the
ItemsViewController
’s table is created and set as the
dismissBlock
of the
DetailViewController
. The
DetailViewController
will hold on to this block until the
DetailViewController
needs to be dismissed.
At that point, the
DetailViewController
will pass this block to
dismissViewControllerAnimated:completion:
. In
DetailViewController.m
, modify the implementations of
save:
and
cancel:
to send the message
dismissViewControllerAnimated:completion:
with
dimissBlock
as an argument.
{
completion:dismissBlock];
}
- (IBAction)cancel:(id)sender
{
[[BNRItemStore sharedStore] removeItem:item];
completion:dismissBlock];
}
Build and run the application. Tap the button to create a new item and then tap
Done
. The new
BNRItem
will appear in the table.
Once again, don’t worry if the syntax or the general idea of blocks doesn’t make sense at this point. Hold on until
Chapter 27
, and we will hit all the gory details there.
In addition to changing the presentation style of a modal view controller, you can change the animation that places it on screen. Like presentation styles, there is a view controller property (
modalTransitionStyle
) that you can set with a pre-defined constant. By default, the animation will slide the modal view controller up from the bottom of the screen. You can also have the view controller fade in, flip in, or appear underneath a page curl (like in the
Maps
application).
In
ItemsViewController.m
, update the
addNewItem:
method to use a different transition.
[navController setModalTransitionStyle:UIModalTransitionStyleFlipHorizontal];
[self presentViewController:navController animated:YES completion:nil];
Build and run the application and notice the change in animation. Try out some of the other options, but make sure to read the fine print in the documentation. For instance, you can’t use the page curl transition unless the presentation style is full screen. Also, note that these transitions will still work if you switch back to deploying on an iPhone. The presentation style, however, will always be full screen.
Go back to
Chapter 5
and universalize
Whereami
. Make sure its interface appears just right on both the iPad and iPhone.
Have the
DetailViewController
be presented with the
UIModalTransitionStylePartialCurl
style when creating a new item.
You can change the appearance of a
UIPopoverController
. Do this for the popover that presents the
UIImagePickerController
. (Hint: check out the
popoverBackgroundViewClass
property in
UIPopoverController
.)