iOS Programming: The Big Nerd Ranch Guide, 3/e (Big Nerd Ranch Guides) (63 page)
Read iOS Programming: The Big Nerd Ranch Guide, 3/e (Big Nerd Ranch Guides) Online
Authors: Aaron Hillegass,Joe Conway
Tags: #COM051370, #Big Nerd Ranch Guides, #iPhone / iPad Programming

At this point, you can start thinking about the tradeoffs between the common ways that iOS applications can store their data Which is best for your application? Use
Table 16.1
to help you decide.
Table 16.1 Data storage pros and cons
| Technique | Pros | Cons |
|---|---|---|
| Archiving | Allows ordered relationships (arrays, not sets). Easy to deal with versioning. | Reads all the objects in (no faulting). No incremental updates. |
| Web Service | Makes it easy to share data with other devices and applications. | Requires a server and a connection to the Internet. |
| Core Data | Lazy fetches by default. Incremental updates. | Versioning is awkward (but can certainly be done using an NSModelMapping ). No real ordering within an entity, although to-many relationships can be ordered. |
On the iPad, present the
AssetTypePicker
in a
UIPopoverController
.
Make it possible for the user to add new asset types by adding a button to the
AssetTypePicker
’s
navigationItem
.
In the
AssetTypePicker
view controller, create a second section in the table view. This section should show all of the assets that belong to the selected asset type.
Localization
The appeal of iOS is global – iOS users live in many different countries and speak many different languages. You can ensure that your application is ready for this global audience through the processes of internationalization and localization.
Internationalization
is making sure your native cultural information is not hard-coded into your application. (By cultural information, we mean language, currency, date formats, number formats, and more.)
Localization
, on the other hand, is providing the appropriate data in your application based on the user’s
Language
and
Region Format
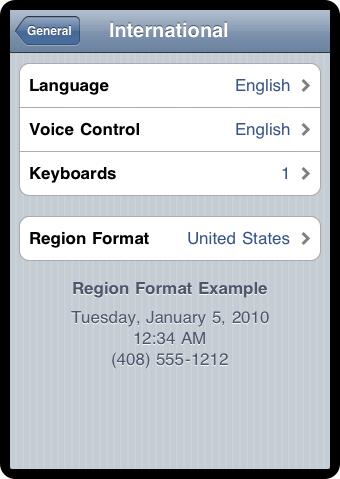
settings. You can find these settings in the
Settings
application. Select the
General
row and then the
International
row.
Figure 17.1 International settings

Apple makes these processes relatively simple. An application that takes advantage of the localization APIs does not even need to be recompiled to be distributed in other languages or regions. In this chapter, you’re going to localize the item detail view of
Homepwner
. (By the way, internationalization and localization are big words. You will sometimes see people abbreviate them to
i18n
and
L10n
, respectively.)
In this first section, you will use the class
NSLocale
to internationalize the currency symbol for the value of an item.
NSLocale
knows how different regions display symbols, dates, and decimals and whether they use the metric system. An instance of
NSLocale
represents one region’s settings for these variables. In the
Settings
application, the user can choose a region like United States or United Kingdom. (Why does Apple use
“
region
”
instead of
“
country?
”
Some countries have more than one region with different settings. Scroll through the options in
Region Format
to see for yourself.)
When you send the message
currentLocale
to
NSLocale
, the instance of
NSLocale
that represents the user’s region setting is returned. Once you have a pointer to that instance of
NSLocale
, you can ask it questions like,
“
What’s the currency symbol for this region?
”
or
“
Does this region use the metric system?
”
To ask one of these questions, you send the
NSLocale
instance the message
objectForKey:
with one of the
NSLocale
constants as an argument. (You can find all of these constants in the
NSLocale
documentation page.)
Let’s internationalize the currency symbol displayed in each
HomepwnerItemCell
. Open
Homepwner.xcodeproj
and, in
ItemsViewController.m
, locate the method
tableView:cellForRowAtIndexPath:
. When the text of the cell’s
valueLabel
is set in this method, the string
"$%d"
is used, which makes the currency symbol always a dollar sign. Replacing that code with the following will get and display the appropriate currency symbol for the user’s region.
objectForKey:NSLocaleCurrencySymbol];
[[cell valueLabel] setText:[NSString stringWithFormat:@"%@%d",
currencySymbol,
[p valueInDollars]]];
[[cell thumbnailView] setImage:[p thumbnail]];
return cell;
}
Build and run the application. If the currency symbol is the dollar sign in your region, you’ll need to change your region format in order to test this code. Exit the
Homepwner
application and kill it in the dock. Then, in the
Settings
application, change
Region Format
to
United Kingdom
(
General
→
International
→
Region Format
).
Run your application again. This time, you will see values displayed in pounds (£). (Note that this is not a currency conversion from dollars to pounds; you’re just replacing the symbol.)
While your region format is set to the UK, check out the date format of the date an item was created: it is
Day Month Year
. Now exit and kill
Homepwner
and change your region to US. Relaunch
Homepwner
and navigate to an item’s details. The date format is now
Month Day, Year
. The text for the date label has already been internationalized. When did this happen?
In
Chapter 11
, you used an instance of
NSDateFormatter
to set the text of the date label of
DetailViewController
.
NSDateFormatter
has a
locale
property, which is set to the device’s current locale. Whenever you use an
NSDateFormatter
to create a date, it checks its
locale
property and sets the format accordingly. So the text of the date label has been internationalized from the start.
When internationalizing, you ask the instance of
NSLocale
questions. But the
NSLocale
only has a few region-specific variables. This is where localization comes into play: Localization is the process by which application-specific substitutions are created for different region and language settings. Localization usually means one of two things:
- generating multiple copies of resources like images, sounds, and interfaces for different regions and languages
- creating and accessing
strings tables
to translate text into different languages
Any resource, whether it’s an image or a XIB file, can be localized. Localizing a resource puts another copy of the resource in the application bundle. These resources are organized into language-specific directories, known as
lproj
directories. Each one of these directories is the name of the localization suffixed with
lproj
. For example, the American English localization is
en_US
: where
en
is the English language code and
US
is the United States of America region code. (The region can be omitted if you don’t need to make regional distinctions in your resource files.) These language and region codes are standard on all platforms, not just iOS.
When a bundle is asked for the path of a resource file, it first looks at the root level of the bundle for a file of that name. If it does not find one, it looks at the locale and language settings of the device, finds the appropriate
lproj
directory, and looks for the file there. Thus, just by localizing resource files, your application will automatically load the correct file.
In this section, you’re going to localize one of
Homepwner
’s interfaces: the
DetailViewController.xib
file. You will create English and Spanish localizations, which will create two
lproj
directories that will each contain a version of
DetailViewController.xib
. Select
DetailViewController.xib
in the project navigator. Then, show the utilities area.
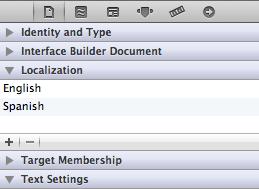
Click the icon in the inspector selector to open the file inspector. Find the section in this inspector named
Localization
and click the
+
button at the bottom. This signifies to
Xcode
that this file can be localized, automatically creates
en.lproj
, and moves the
DetailViewController.xib
file to it.
Click the
+
button again and select
Spanish
. This creates an
es.lproj
folder and adds a copy of
DetailViewController.xib
to it. The file inspector should look like
Figure 17.2
.
Figure 17.2 Localizing DetailViewController.xib

Back in
Xcode
, look in the project navigator. Click the disclosure button next to
DetailViewController.xib
(
Figure 17.3
) and then Control-click on each of these XIB files and select
Show in Finder
to show that file in its
lproj
directory. Keep these windows open; you’ll need them shortly.
Figure 17.3 Localized XIB in the project navigator

In the project navigator, click the
Spanish
version of
DetailViewController.xib
. When this file opens, the text is not in Spanish. You have to translate localized files yourself;
Xcode
isn’t
that
smart.
One option is to manually edit each string in this XIB file in
Xcode
. However, this approach does not scale well if you’re planning multiple localizations. What happens when you add a new label or button to your localized XIB? You have to add this view to the XIB for every language. This is not fun.
Instead, you can use a command-line tool named
ibtool
to suck the strings from your native language XIB file into a file. Then, you can translate these strings and create a new XIB file for each language. To get started, open
Terminal.app
in the
Applications/Utilities
directory.
Once
Terminal
launches, you’ll need to navigate to the location of
en.lproj
. If you are familiar with Unix, have at it. If not, you’re about to learn a cool trick. In
Terminal
, type the following:
followed by a space. Drag the
en.lproj
folder’s icon from the
Finder
onto the
Terminal
window.
Terminal
will fill out the path for you. Hit return. The current working directory of
Terminal
is now this directory. For example, my terminal command looks like this:
Next, you will use
ibtool
to suck the strings from this XIB file. Enter the following terminal command and enter it all on the same line. (We only broke it up so that it would fit on the page.)
DetailViewController.xib
This will create a
DetailViewController.strings
file on your desktop that contains all of the strings in your XIB file. Edit this file according to the following text. The numbers and order may be different in your file, but you can use the
text
field in the comment to match up the translations.
"4.text" =
"Nombre";
/* Class = "IBUILabel"; text = "Serial"; ObjectID = "5"; */
"5.text" =
"Numéro de serie";
/* Class = "IBUILabel"; text = "Value"; ObjectID = "6"; */
"6.text" =
"Valor";
/* Class = "IBUILabel"; text = "Label"; ObjectID = "7"; */
"7.text" =
"Label";
Notice that we do not change the
Label
text because it will be created at runtime. Save this file.
Now you will use
ibtool
to create a new Spanish XIB file. This file will be based on the English version of
DetailViewController.xib
but will replace all of the strings with the values from
DetailViewController.strings
. To pull this off, you need to know the path of your English XIB file and the path of your Spanish directory in this project’s directory. Remember, you opened these windows in
Finder
earlier.
In
Terminal.app
, enter the following command, followed by a space after
write
. (But don't hit return yet!)
Next, find
DetailViewController.xib
in
es.lproj
and drag it onto the terminal window. Then, find
DetailViewController.xib
in the
en.lproj
folder and drag it onto the terminal window. Your command should look similar to this:
/iphone/Homepwner/Homepwner/es.lproj/Homepwner.xib
/iphone/Homepwner/Homepwner/en.lproj/Homepwner.xib
This command says,
“
Create
DetailViewController.xib
in
es.lproj
from the
DetailViewController.xib
in
en.lproj
, and then replace all of the strings with the values from
DetailViewController.strings
.
”
Hit return. (You might see some sort of warning where
ibtool
complains about
GSCapabilities
; you can ignore it.)
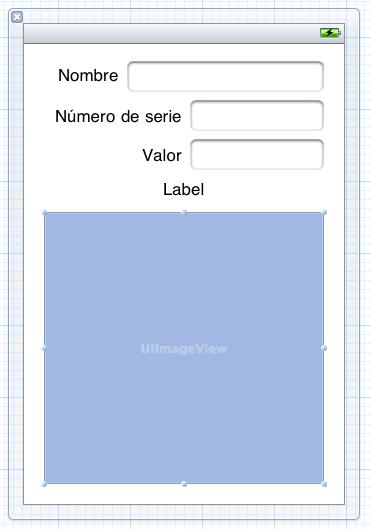
Open
DetailViewController.xib (Spanish)
in
Xcode
. This XIB file is now localized to Spanish. To finish things off, resize the label and text field for the serial number, as shown in
Figure 17.4
.
Figure 17.4 Spanish DetailViewController.xib

Now that you have finished localizing this XIB file, let’s test it out. First, there is a little
Xcode
glitch to be aware of: sometimes
Xcode
just ignores a resource file’s changes when you build an application. To ensure your application is being built from scratch, first delete the application from your device or simulator. Then, choose
Clean
from the
Product
menu. This will force the application to be entirely re-compiled, re-bundled, and re-installed.
