Just in Case (52 page)

• Always wash any food prior to canning to remove surface contaminants. Cut away any area of discoloration.
• Use only top-quality, fresh produce. Canning only preserves. It does not improve.
• Use only canning jars. Commercial jars such as the ones that spaghetti sauce comes in may look like canning jars, but they are not designed for home canning. They can crack or shatter under the high heat and pressure.
• Don’t use any jar larger than one quart. You can’t get the interior temperature high enough to safely process foods in bigger jars.
• Use modern recipes adapted for current canning standards. Do not experiment with your grandmother’s recipes.
• Know which foods need to be canned in a water bath and which need to be canned in a pressure canner. Keep good references on hand to give you this information, such as those listed on the opposite page.
• Use new lids every time.
• Check every jar for nicks in the rim. Just run your finger around the edge to be sure it feels smooth.
• When filling jars, leave the recommended headspace or your seal may leak.
• Don’t fudge or guess on timing. If a recipe calls for twenty-five minutes, it means twenty-five minutes, not twenty-four and a half minutes. Don’t start timing until the water is boiling hard.
• Lift the jars from the canner one by one. Don’t try to lift out the whole rack, as it’s both heavy and very hot.
• If you think a jar may not have sealed (if its lid is not depressed), use its contents right away or put on a new lid and reprocess it. If a jar has leaked, either freeze the contents or use them right away.

TWO-PART CANNING JAR LIO
PROJECT
WATER-BATH CANNING
The process can vary a bit from one food to another. Some delicate foods such as peaches can be cold packed, or packed in jars without being cooked first. Most foods must be cooked first and ladled while still hot into hot jars before being processed. After that, the basic steps of water-bath canning are the same.
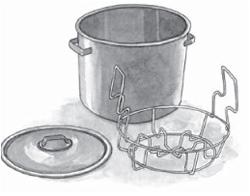
1. Assemble all your equipment.
2. Wash the jars, even if they are new, in hot, soapy water and rinse well. Keep the jars hot by holding them in a I50°F oven. You can save time by running them through the dishwasher and keeping them in there while you prepare the food.
3. Fill your canner with water and, with the rack in place inside the canner, begin to heat to a boil.
4. Place the lids in a small pan of water. Bring almost to a boil, then remove the pan from the heat. Leave the lids in the hot water until you need them.
5. Prepare food for the canner according to your recipe instructions.
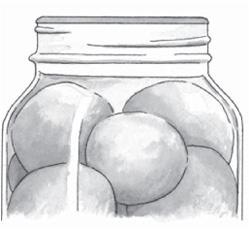
6. Fill the jars with the food, leaving about an inch of headspace at the top of the jar.
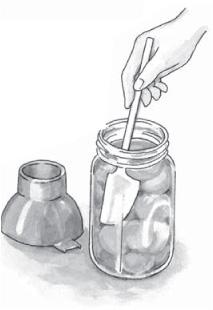
7. Poke gently through the food with a chopstick or nonmetal spatula to release any air bubbles. Wipe the rims with a clean, damp cloth, and then put on the lids.
KEEP THE JARS HDT
As you’re filling and loading the canning jars, work quickly enough so that your jars are still quite hot when they are placed into the canner. Otherwise, they may crack when they hit the boiling water.
8.
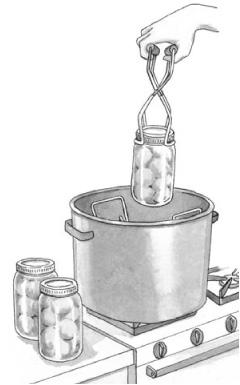
Now it’s time to load the jars into the canner’s rack. You can either load the jars into the rack after it’s already immersed in boiling water inside the canner or remove the rack and load it outside the canner. If you load the rack outside the canner, lower it gently into the canning kettle, taking care to avoid splashing the boiling water. (I usually put the rack in the canner before loading it, because it is far too easy to drop a fully loaded rack as you’re trying to set it into the canner.) Add more water, if necessary, so that the water rises to at least two inches above the tops of the jar lids.
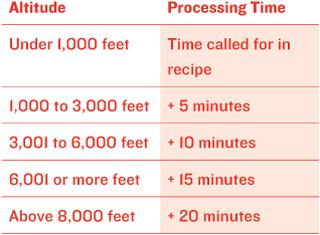
9. When the water in the kettle returns to a full, rolling boil, start timing. Boil the jars for the recommended processing time, being careful that the water never drops below a boil, in which case you’ll have to start your timing all over again. The table below shows how many minutes to boil a range of foods. (If you live more than I,000 feet above sea level, adjust the processing time as indicated in “Altitude Adjustments for Water Bath Canning.")
10. When it’s time to remove the jars, leave the rack inside the canner and use a jar lifter to take out the jars one by one. Set on a rack or other heatproof surface until cool.
11. Check every seal for tightness before storing the jars. (See page 185.)
ALTITUDE ADJUSTMENTS FOR WATER-BATH CANNING
If you live at a high altitude, you’ll need to process your canned food for longer than recipes call for. Make the following adjustments.
HOME-CANNED APPLESAUCE
It is helpful to begin canning with something that is fairly simple, such as applesauce. It takes a little time to can applesauce, but the results are so delicious and the savings so dramatic that you may never purchase another jar of sauce from the market again.
You need twenty to twenty-three pounds of apples for seven quarts of sauce, which is a one water-bath canner load. You don’t need perfect apples. Even though I use organic apples, I still wash them well to get rid of dirt, bugs, and whatever organic sprays the orchard may use.
I run my jars through my dishwasher on the sanitizing cycle just before I start. This keeps them hot while I work. I quarter the apples but don’t bother to peel them or remove the seeds. Then I simmer the apples in a bit of water or apple juice, stirring often to prevent the apples from sticking to the bottom of the pot. While the apples cook, I begin heating the water in my canner. I heat water in a teakettle as well, and when it is hot but not boiling, I pour that water over the jar lids in a pan.
When the apples are soft, I run them through a hand cranked strainer. I use a Squeezo, which does a wonderful job, but for many years I used a cone-shaped strainer with a wooden auger. It worked just fine and cost less than twenty dollars. A food mill would also work. You can add some sugar to the sauce if you want to, but this is a matter of taste.
Now I pack the hot sauce in the hot jars, leaving about an inch of headroom at the top. Using a wide mouthed funnel and a ladle makes this step a lot easier. I wipe the rims of the jars with a damp cloth, since any little bit of mess on the rim will keep the jars from sealing. Then I put on the lids and tighten just until I meet resistance.
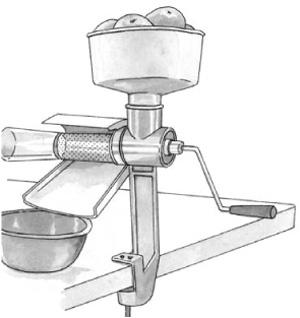
RUNNING APPLES THRDUGH A HAND CRANKED STRAINER
I use the jar lifter to set the jars in the rack in the canner. I put the top on the canner and wait until the water comes back to a rolling boil. Then I start timing, counting off twenty minutes for both pints and quarts. I use a timer for accuracy. When the time is up, I remove the jars with the jar lifter and set the jars to cool. The sound of a pop as the lids retract means they are well sealed. After several hours, I check the seals on the jars. If any jar has a lid that has not retracted (see box at right), I refrigerate that jar and use up the sauce over the next few days.