Just in Case (53 page)

When the sealed jars have cooled, I put them in my storage pantry.
This whole thing may sound like a lot of work, but once you do it a few times you won’t even need to look at the instructions. In a weekend you can put up a three- to six-month supply of the best applesauce you can imagine.
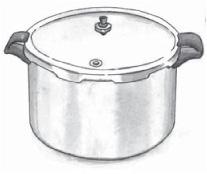
PRESSURE CANNING
High-acid food does well in a water bath canner, but if you want to can vegetables or meat you need to use a pressure canner. Botulism is a nasty, potentially deadly toxin that loves an oxygen-free, low-acid environment. Its spores are not killed until temperatures reach 240°F. Since that is higher than the boiling point of water, you need pressure to get the temperature up to the appropriate level.
A lot of the pressure-canning horror stories come from the 1940s, when there was a resurgence in pressure canning because of the war. Low-quality materials and shoddy workmanship in equipment were common at the time, because the higher quality materials were being used in the war effort. This did lead to some disasters, but such events are uncommon today. Excellent-quality canners and readily available information have made pressure canning a safe procedure as long as you follow the rules.
I am a pretty frugal person, but I would not recommend borrowing or buying a secondhand pressure canner. You want to have full confidence in your equipment, and buying new in this case is a good idea.
TESTING SEALS FOR TIGHTNESS
After the jars have cooled, you can test the seals for tightness in one of three ways. First, remove the screw band. Then:
• Press the middle of the lid with your finger. There should be no give. If the lid springs back up when you remove your finger, the seal may not be tight.
• Tap the lid with the bottom of a metal spoon. It should make a high-pitched ringing sound. If it makes a dull sound, the seal may not be tight.
• Bring the jar to eye level and examine the lid. It should have retracted, so that it is concave (curving down slightly in the middle). If it is fiat or convex (bulging slightly in the middle), the seal may not be tight.
If the seal is tight, replace the screw band and store the jar. If the seal is not tight, you can reprocess the jar, first checking the lid pieces for defects. But I usually don’t bother; instead I store the jar in my refrigerator and make sure it gets consumed in the next couple of days.
PROJECT
PRESSURE CANNING
Before you begin, be sure your canner is clean and working properly. Follow the safety checklist that comes in your canner’s instruction book. Then follow these steps for successful pressure canning.
Pressure canners today are available with either a dial gauge or a weighted gauge. The dial gauge allows you to increase pressure in increments of one pound, which is helpful for canning at high altitudes, but it must be checked for accuracy once a year. (Most county extension services can check your gauge for you.) Weighted gauges, on the other hand, do not need to be checked annually for accuracy, and they are less fragile than dial gauges.
WEIGHTED GAUGE DIAL GAUGE
1. Assemble all your equipment.
2. Wash the jars, even if they are new, in hot, soapy water and rinse well. Keep the jars hot by holding them in a I50°F oven. You can save time by running them through the dishwasher and keeping them in there while you prepare the food.
3. Place the lids in a small pan of water. Bring almost to a boil, then remove the pan from the heat. Leave the lids in the hot water until you need them.
4. Prepare food for the canner according to your recipe instructions.
5. Fill the jars with the food, leaving about an inch of headspace at the top of the jar. Poke gently through the food with a chopstick or nonmetal spatula to release any air bubbles. Wipe the rims with a clean, damp cloth, and then put on the lids.
6. Fill the canner with two to three inches of hot water (or follow the instructions in your recipe). Place the rack in the canner and place over your burner.
7 Place the filled jars in the rack, using a jar lifter. Then fasten the canner lid securely.
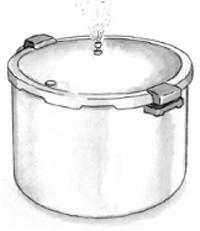
8. Leave the weight off the vent port or open the petcock. Heat the canner at the highest setting until steam flows from the petcock or vent port. (See next page.)
9. Maintain the high heat setting and exhaust steam for ten minutes. Then place the weight on the vent port or close the petcock. The canner will pressurize during the next three to five minutes.
STEP 8: STEAM FLDWING FRDM A PETCDCK
10. Start timing the process when the pressure reading on the dial gauge indicates that the recommended pressure has been reached, or when the weighted gauge begins to jiggle or rock (you might have to tap it slightly).
11. Regulate the heat under the canner to maintain the pressure at or slightly above the level called for in your recipe. You don’t want the pressure to rise and fall during the canning process, as such pressure variations may cause unnecessary liquid losses from jars. On a canner with a weighted gauge, the pressure regulator should rock gently throughout the process. Different canner models work a little differently, so check your owner’s manual to find out how to be sure you are maintaining adequate pressure. Follow the instructions for exactly how much and how long pressure should be applied.
12. When the timed process is completed, turn off the heat, remove the canner from the heat if possible, and let the canner depressurize. Do not force-cool the canner. Forced cooling may result in food spoilage. Cooling the canner with cold running water or opening the vent port before the canner is fully depressurized will cause loss of liquid from jars and seal failures. Forced cooling may also warp the lid of older model canners, causing steam leaks. It’s best to time the depressurization of older models; standard-size heavy-walled canners require about thirty minutes to depressurize when loaded with pints and forty-five minutes with quarts. Newer, thin-walled canners cool more rapidly and are equipped with vent locks. These canners are depressurized when their vent-lock piston drops to a normal position.
13. About ten minutes after the canner is depressurized, remove the weight from the vent port or open the petcock. Wait another two minutes, then unfasten the lid and remove it carefully. Lift the lid away from you so that the steam does not burn your face. (Since I generally do my canning at night, after the kids go to bed and the kitchen is cooler, I do away with this step altogether by leaving my jars in the canner overnight. By morning, everything is cool.)
14. Remove the jars with a lifter and place them on a towel or rack to cool.
15. Test every seal for tightness before storing jars. (See page 185.)
HDME-CANNED TDMATD-ZUCCHINI SAUCE
We always have more zucchini than we know what to do with. It isn’t great frozen, so I developed this sauce recipe to use it up. The amounts are not exact. It depends on what the garden is producing and what looks good at the farmers’ market. My tomatoes are never ripe as soon as the squash, so I use a #10 can of diced tomatoes instead of fresh tomatoes.
Olive oil
2-3
onions, chopped
2
garlic cloves, minced
1 cup diced green pepper
2 summer squash, cut into chunks
A potful of tomatoes, either canned or fresh and chopped
Basil or oregano
• Warm the oil in a pan, then add the onion, garlic, and green pepper, and saute. When the onions are soft but not brown, add the squash. Cook until the squash starts to lose some liquid. Now add the tomatoes and basil or oregano to taste. Simmer for about twenty minutes. Altogether you want to end up with about 5
1
/a quarts of sauce. (This is a bit too much sauce for the jars, but it is so good that I keep out the extra and eat it the next day for lunch.)
• Fill five hot quart jars with the sauce. Following the general directions for pressure canning, process the quart jars for 40 minutes at 10 pounds of pressure.
DEHYDRATING
I
AM A CONVERT
to dehydrating. The finished product is so convenient and the process so simple. It is especially good for families with limited time and storage space. You can make do with little equipment beyond a dehydrator, and if you live in a warm, sunny, and dry climate, even the dehydrator is optional. You can also dry in your oven if you don’t mind tying it up for twelve hours.
I dry a lot of fruit and several vegetables, including mushrooms and some herbs. Dried apples are my family’s favorite, although dried blueberries run a close second. (I plump up the blueberries in a cup of boiling water before adding them to pancakes or muffins.) I used to store all of my berries in my freezer, but then my power went out for three days and I lost about twenty quarts of blueberries. I freeze only a couple of quarts now and dehydrate or can the rest.
Most home dehydrators come with instructions for drying a wide range of foods. You can also find good instruction in many food-preservation books.
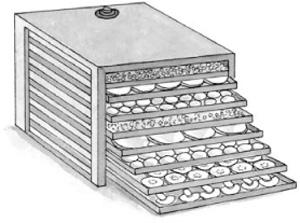
DEHYDRATDR
THE BASIC PROCEDURE
While you should follow the instructions in your manufacturer’s instruction manual or a food-preservation book for individual fruits and vegetables, these general instructions for using a dehydrator are useful to know.
1.
Set up your work area.
You need a selection of sharp knives, a vegetable peeler, a cutting board, bowls and pots for blanching, and a dehydrator. Pull out your fruits and vegetables and sort out any that are of poor quality; they will not be improved by the drying process.
2.
Wash.
Prepare your fruits or vegetables by washing them well and letting them dry on absorbent towels.