Just in Case (57 page)

Bread dough is very forgiving. You can add some soy flour, rolled oats, uncooked hot cereal, or leftover cooked cereal. The substitution is usually measure for measure; just don’t substitute for more than a cup of flour. (Soy flour should not account for more than a quarter cup of the flour or the taste and texture will be adversely affected.) I have tossed in leftover oatmeal from breakfast, the final quarter cup of milk in a carton, or an egg without changing the taste much, although the amount of liquid needed to be adjusted.
Bread needs to be baked in a 425°F oven. I cook mine in my solar oven only if the weather is very sunny and I can get the temperature up that high. Even then I usually cook the dough as rolls or breadsticks rather than large loaves. Bread can also be baked on a stovetop in a well-greased, preheated, and covered Castiron pan. Bread can also be fried in oil.
With the basic ingredients, I can turn out a pizza crust, topping for a pot pie, or cinnamon rolls. Without yeast, I can make a variety of quick and flat breads, including tortillas, dense fruit breads, and dumplings (see
chapter 18
for these recipes). These easy-to-make breads can turn meals from stored foods into some of your family’s favorites.
BASIC YEAST BREAD
The amounts listed here will make two loaves of bread.
7
½ cups flour
¼ cup powdered milk (optional)
1
tablespoon salt
2
½ cups water
2
teaspoons yeast dissolved in V2 cup warm water
2
tablespoons oil
2
tablespoons sweetener (honey or sugar)
• Measure 6½ cups of flour into a large bowl. Add the powdered milk, if you’re using it, and the salt and mix well with a fork. In a small bowl, mix together the water, dissolved yeast, oil, and sweetener and then add it to the flour. Mix this all together by hand or with a mixer (electric or hand cranked) with a dough hook. You will end up with a soft, sticky ball of dough.
• Now you will adjust the consistency of the dough by kneading in the rest of the flour. A mixer will do the job in about 10 minutes. It will take about 15 minutes of real effort to do it by hand, !4 cup of flour at a time. You want the dough to feel firm and elastic. If it is too stiff, the loaf will be heavy and dense; if it is too soft, it won’t hold up. Too soft is better than too heavy, so don’t knead in more flour than you have to.
• Shape your dough into a ball. Cover it, set it in a warm place, and let it rise until it has about doubled in size. After the first rising, punch down the dough and then let it rise again. After the second rising, punch down the dough again, shape it into two loaves, place in loaf pans, and let them rise one last time. Then bake the loaves in a 325°F oven for 45 to 50 minutes. The loaves should be nicely browned and sound hollow when you tap on them. Let them cool on wire racks for ten minutes, remove them from the pans, and let them finish cooling. Cool loaves slice better than warm ones, if you can keep the kids out of them that long.
These are pretty basic directions. If you’re interested in playing around with different ingredients and baking techniques, I would recommend that you work with one of the many excellent bread-baking books that are now available.
The Laurel’s Kitchen Bread Book
by Laurel Robertson is one of my personal favorites.
BASIC PIZZA DDUGH
Basic pizza dough is a good recipe to have at your fingertips. You can shape any loaf of bread dough into a pizza crust, but for a really good crust, use olive oil as your oil and eliminate any milk or extras to the mix. I usually replace a cup of the water with a cup of flat beer for better flavor. Pizza dough can be frozen in a ball or flat disk. Let it thaw in the refrigerator, then bring to room temperature, shape into pies, and let rise.
Before putting any toppings on the pizza crust, brush the dough with oil to keep the crust from getting soggy. You can, of course, bake a pizza in a traditional oven range or bread oven. You can also bake a pizza right on a grill; just line the grill with aluminum foil and keep the top closed while the pizza’s baking. You can even bake pizza in a solar oven, but as you might expect, small pies cook better than large ones do. If all you have is a stovetop, you can let the dough rise a bit, then fry both sides in a greased pan. Heat the sauce and any vegetables in a pan before spreading them on the pizza. Add the cheese and cover the pan for a minute or two to melt the cheese.
BASIC SWEET BREAD
Every cook should have a basic sweet bread recipe in his or her repertoire. Doughnuts or cinnamon rolls will really cheer up kids who have been housebound for days in a storm, especially if they get to help with the mixing and frying. For information about kneading and rising, see page 200.
2
teaspoons yeast dissolved in ¼ cup warm water
½ cup scalded milk, cooled
2
eggs, beaten
⅔ cup vegetable shortening (preferably nonhydrogenated)
½ cup sugar
4
½ cups flour
1
teaspoon salt
1
teaspoon nutmeg
• Mix together the yeast, milk, eggs, shortening, and sugar. Add 3½ cups of the flour and the salt and nutmeg, stirring until well blended. Knead in the final cup of flour. Knead for 10 minutes, then let the dough rise for about an hour. Punch down.
•
For doughnuts:
Roll out the dough to M>-inch thickness. Cut the dough with a doughnut cutter. Carefully lift the doughnuts with a spatula to a greased cookie sheet. Let rise again for about 45 minutes. You can either bake the doughnuts at 425°F for 8 to 10 minutes or fry them in hot oil. As the doughnuts fry, they will rise to the surface. Turn and fry the other side until brown. These doughnuts can be sprinkled with cinnamon and sugar or glazed with a milk and confectioner’s glaze.
•
For sweet rolls:
Roll out the dough into a M>-inch-thick rectangle. Spread with melted butter, brown sugar, raisins, and cinnamon. Roll into a log and slice into 1-inch-thick rounds. Let rise for about 45 minutes, then bake in a 425°F oven.
SPRDUTING
I
CONSIDER SPRDUTING SEEDS
to be one of the cornerstones of the preparedness pantry. They are inexpensive, take up very little room, and do not need fancy equipment to process. After a diet of canned and dried food, our bodies will crave something green and alive. Sprouts will fill the bill nicely. Sprouts add crunch to sandwiches and a vitamin boost to scrambled eggs and casseroles. They are tasty eaten right out of hand and make a terrific addition to a stir fry. I have even added a handful to bread batter with excellent results.
Sprouts contain vitamins, proteins, minerals, enzymes, and fiber. All of these may be in short supply if you are eating for any length of time out of storage. If you have a bag of lentils in your panty, you have what you need to get started.
Most, although not all, seeds and beans are good for sprouting. The following is a list of the best.
• Alfalfa
• Amaranth
• Barley (hull-less)
• Broccoli
• Buckwheat
• Cabbage
• Clover
• Flax
• Lentils
• Oats (hull-less)
• Peas
• Pumpkin
• Radish
• Rye
• Soy
• Spelt
• Sunflower
• Wheat
Each sprout has a unique flavor. Lentils and alfalfa are mild, for example, while radish has a bite to it.
As is usually the case, you can purchase rather complicated equipment for sprouting. I have seen a couple of these, and while they look pretty impressive and do a fine job of sprouting seeds, I did not find that they did a better job than I was able to do with a few things I already had in my kitchen. I not only saved a bit of money, but also saved the space a sprouter would take up in my kitchen — and that’s just as important.
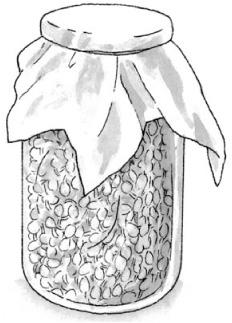
The equipment is as simple as a glass jar, a rubber band, a piece of cheesecloth, and some seeds.
Sort out any foreign matter from the seeds. Soak two tablespoons of seeds in warm water for an hour or two. Drain, then place in a quart jar. Secure a piece of cheesecloth around the top with a rubber band. Put the jar in a dark cabinet. Two or three times a day, rinse the seeds with warm water and drain through the cheesecloth. In two or three days you will have sprouts. If you leave them in the sun for a few hours, the sprouts will turn a lovely green and will increase their vitamin content. I have started to make my last rinse in very cold water, and the sprouts seem crisper. Harvest sprouts when they are about three times longer than the seed they came from.
There are a couple of things to know. Tomato and potato seed sprouts should never be eaten, as they are poisonous. Do not use any seeds that have been treated with fungicides or pesticides for agricultural use. Bean sprouts have the same protein-binding substance as beans, but they must be cooked for a couple of minutes to make it available.
The biggest challenge will be keeping your sprouts from going sour. You will know by the slimy texture and foul odor that a batch has gone bad and you need to dispose of it. You really have to be diligent about rinsing your seeds. The problem is that the jar of seeds should be kept in a dark cabinet. I used to forget about them until it was too late. I finally set up a system of rinsing my sprouts before each meal. After a few weeks it became a habit, and I rarely forget anymore.
SPRDUTS IN A JAR
I also had a problem of finding myself sprout deprived. Sometimes I wanted sprouts and they weren’t quite ready. I solved that problem by staggering my sprouts, beginning a new batch every other day.
Sprouts will store in a perforated plastic bag in your refrigerator or any other very cool, dark spot for a few days. You shouldn’t have to throw any out if you get in the habit of popping a few into whatever you are cooking.
CHAPTER 18 THE STORED FOOD COOKBOOK

Now that your pantry is looking pretty full and you have some experience with some basic recipes, it is time to put your stored food plan into service. All that lovely food will go to waste if you don’t follow through with the OAR principle of organizing, acquiring, and rotating. The logical way to rotate is to use your stored food on a regular basis, at least once or twice a week, then replace what you have used.
I cook from my food storage at least twice a week. That no one in my family is aware of this fact is a testament to how easy it is to eat well from food that keeps without refrigeration and can be cooked in a solar oven, on a grill, or on the top of a woodstove. The recipes that follow, all of which can be made at least primarily from stored foods, are things we eat often. Some of these come from an old family recipe collection, others from Depression-era cookbooks, and still others from friends and relatives who know the kind of recipes I am always on the lookout for. I always keep an eye out for Amish and Mennonite cookbooks, as their recipes are always prepared without using electricity, so the directions work well for me.
If you cook, and by cook I do not mean just opening a can but really cook, you will be several steps ahead. Cooking is all about improvising, substituting, and experimenting until you have the results that work for you. Crisis cooking will draw on those skills because, no matter how well prepared you are, you will likely find that there are things you have forgotten or just not had time to pick up.
