Mac Hacks (9 page)

. Quick Hacks for Mountain Lion
Every iteration of OS X introduces some annoyances, and Mountain
Lion is no different. This hack explains how to fix the little things that
bug you about Mountain Lion.
When
you’re poking through your Mac’s preference panes, you’ll
stumble on the Keyboard pane, which includes sliders for Key Repeat and
Delay Until Repeat. You will, naturally, assume these sliders control
the behavior of keys, specifically how fast the keys repeat if you
continue holding them.
Turns out that assumption is only partially correct. These sliders
do control how fast the keys repeat and so forth, but only for a
few
keys, such as the delete key when your cursor
is in a text box. But what if you drop a barbell on your toe and want to
type FFFFFFFFFFFFFFF by pushing and holding the F key in an angry
manner? Try it and you get F. Yep, that’s it—one F, hardly enough to
tell the world about the pain you’re currently feeling. Want to type an
assertive “no” as in NNNNNNOOOOOO!!!? Try it and you’ll get the pop-up
options shown in
Figure 2-12
.

expect. Getting your Mac to perform as you expect is a key reason to
hack it!
That’s right—as part of the system-wide Autocorrect feature first
seen in Lion, you can’t use repeating out of the box. Time for you to be
the boss. Type
the following command into Terminal to get your repeating
keys back:
defaults write -g ApplePressAndHoldEnabled -bool false
Then restart your Mac and you’ll be able to hold any key and watch
the letter repeat. As you can probably guess, you can turn the
nonrepeating keys behavior back on by entering that command again, but
replace the wordfalsewithtrue.
Sure,
nonrepeating keys are annoying, but not as vexing as
Autocorrect is to most folks. In trying to make OS X more iOS-ish, Apple
added an autocorrect feature that automatically replaces words with what
OS X feels is the correct choice. This isn’t always (or even usually)
the case.
To get rid of this unwanted behavior, head to the Language &
Text preference pane, click the Text button, and then uncheck “Correct
spelling automatically” as shown in
Figure 2-13
.
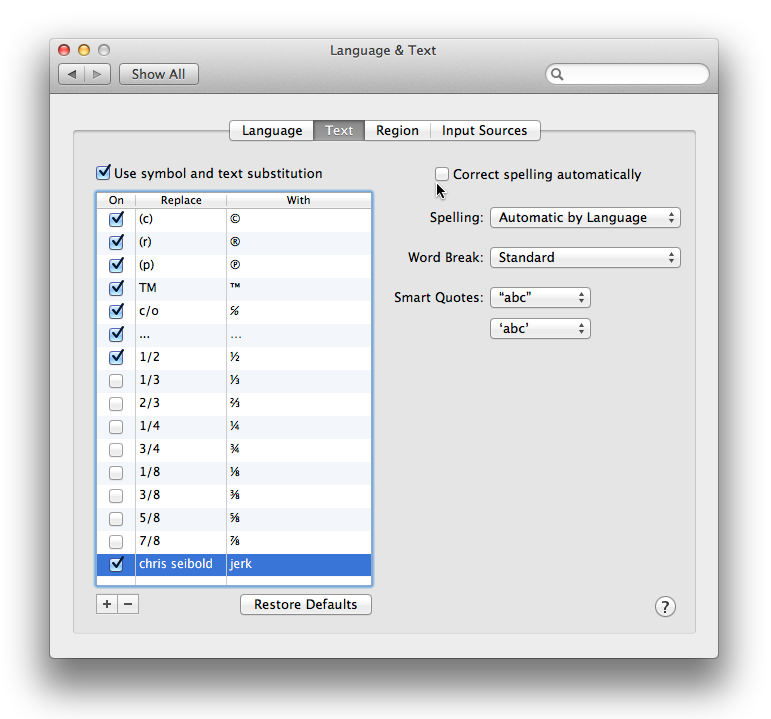
can also add text substitutions by clicking the + in the pane’s lower
left and then typing in your substitution.
Starting
with OS X Lion, the Library folder for your user account
disappeared. It still existed, you just couldn’t see it anymore. This is
kind of a shame because there are a lot of times that dedicated Mac
users want to poke around in the Library folder. Fortunately, it’s easy
to get to: open the Finder’s Go menu and then hold the Option key, and
the Library folder shows up as an option. (The world owes Dawn Mann a
big thank you for discovering that trick.)
But with that method, you have to remember to press the Option key
each time you want to access that folder. What you may want is a way to
permanently
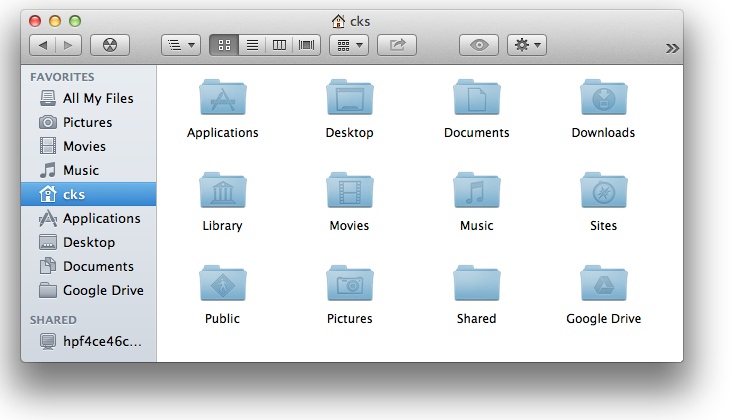
show the Library folder. No
problem! Fire up Terminal and type:
chflags nohidden ~/library/
Hit Return and your Library is revealed (
Figure 2-14
)!
delete corrupt preferences and such.
Want to hide your Library folder again? Undo the previous command
with
this:
chflags hidden ~/library/
The
Library folder isn’t the only hidden file on your
Mac—there are tons of them. There
are plenty of apps you can find on the Internet that
will toggle this setting for you, but you can do it easily with the
Terminal by typing:
defaults write com.apple.Finder AppleShowAllFiles True
That command tells OS X to show you all files, but the Finder
(the application responsible for actually displaying the files)
doesn’t get the memo. To actually make the files appear in the Finder,
you have to restart it. To do that, in the Terminal Type:
killall Finder
This restarts the Finder and the formerly invisible files will
be revealed.
To hide them again (if you decide they add too much clutter),
launch Terminal and type:
defaults write com.apple.Finder AppleShowAllFile False
Followed by (you guessed it):
killall Finder
That’s all there is to showing and hiding
all
the files in OS X.
In
Lion, the Save As command was replaced by Duplicate in
standard OS X File menus. Save As had been around forever, and some
programs (like Word) relied on their own File menus and kept the Save As
option. It was all so confusing that Apple restored Save As
functionality in Mountain Lion.
Unfortunately, the restored Save As feature isn’t the Save As
you’re used to from older versions of OS X. You invoke it with a
different keyboard shortcut than you used in the old days
(Shift-Command-S now invokes the Duplicate command instead) or by
pressing Option when the File menu is open. If you’re fine with the
Duplicate functionality or jumping through the extra hoop required to
invoke Save As, then you can stop reading. But if you, like millions of
others, want your classic Save As functionality back, time to head to
the Keyboard preference pane.
Once there, click the Keyboard Shortcuts button and prepare to get
your Save As back! Select Application Shortcuts in the left column and
then choose All Applications in the right column. This is where Apple
lets you create custom keyboard shortcuts that work in
all
your apps.
You can’t use the old keyboard shortcut for Save As
(Shift-Command-S) because that shortcut is being used by Duplicate. To
free up that shortcut for Save As, you first need to give Duplicate a
different shortcut. To do that, click the + button and then typeDuplicate(spelling counts) into
the Menu Title field. Finally, type your preferred shortcut into the
Keyboard Shortcut field (
Figure 2-15
) and then click
Add.
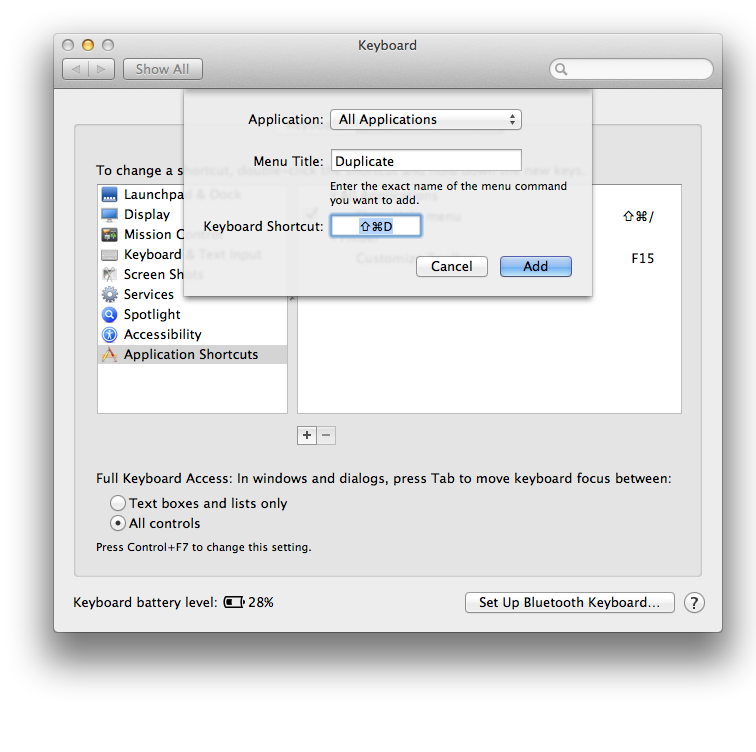
ambitious, you can come up with any number of useful keyboard
shortcuts for your Mac using this technique.
Since Duplicate is no longer using Shift-Command-S, that
combination is free for us to use as the Save As shortcut, just like the
old days! To assign that shortcut to Save As, simply click the + button,
typeSave As...(
with
the ellipsis) into the Menu Title box and
then set the keyboard shortcut to Shift-Command-S. Finally, click the
Add button and you’re done!
Figure 2-16
shows the command
looking right at home in its usual place.
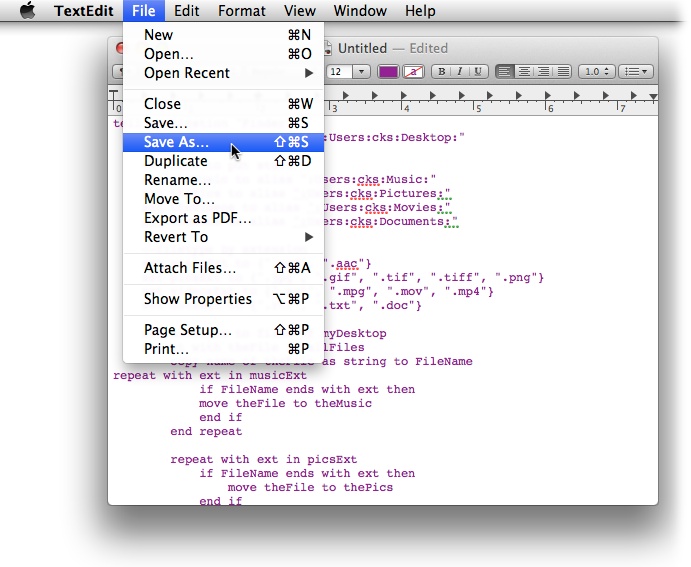
shortcut we expect!
Resume
doesn’t bother everyone—just those of us who occasionally
turn off our computers. The idea behind Resume is that all the apps that
you were using reopen when you restart your Mac. Seems like a great
idea—when you reboot, your computer will automatically be restored to
right where you left off. What’s not to like about that?
The problem is that OS X is really good at multitasking, so a lot
of people rarely bother to quit the apps they’re using; they just switch
to the next app they need. That means that when they shut down their
Macs, the next time they hit the power button, they’ll have to wait.
Why? Because OS X has to launch all fifty apps they were using when they
shut the Mac down. But they don’t want to
use
all
fifty apps right then—they just want to jump on their web browser and
get their morning news.
You can stop your Mac from opening all the apps you had open when
you quit using your Mac by heading to System Preferences and selecting
General. Once there, check the box next to “Close windows when quitting
an application.” Once you do that, Resume will be turned off globally and
your Mac will start with a clean slate—it won’t launch every app you had
open when you shut it down!
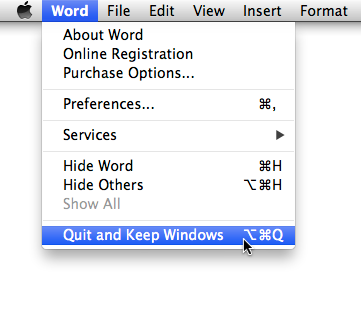
If you still want to use Resume’s saved state feature on an
individual basis (sometimes the feature is cool), hold the Option key
when you quit an application and you’ll see that Quit [application name]
will be replaced with “Quit and Keep Windows.” (Shift-Command-Q). Select
that option, as in
Figure 2-17
, and when you
launch that app anew, the windows will be exactly as they were when you
last used the
app!
remembering to hold the Option key does take some getting used
to.
