Mastering the Art of French Cooking, Volume 2 (30 page)
Read Mastering the Art of French Cooking, Volume 2 Online
Authors: Julia Child


Remove rolling pins or braces. |
|
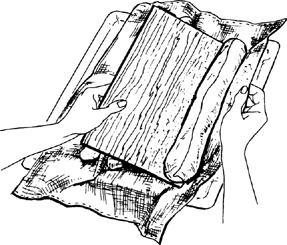
Dough is now lying along one edge of the unmolding board: rest this edge on the right side of a lightly buttered baking sheet. Gently dislodge dough onto baking sheet, keeping same side of dough uppermost: this is the soft smooth side, which was underneath while dough rose on canvas. If necessary, run sides of hands lightly down the length of the dough to straighten it. Unmold the next piece of dough the same way, placing it to the left of the first, leaving a 3-inch space. Unmold the final piece near the left side of the sheet.
9)
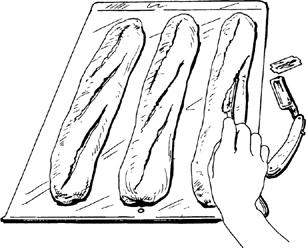
Slashing top of the dough—la coupe
The top of each piece of dough is now to be slashed in several places. This opens the covering cloak of gluten and allows a bulge of dough underneath to swell up through the cuts during the first 10 minutes of baking, making decorative patterns in the crust. These are done with a blade that cuts almost horizontally into the dough to a depth of less than half an inch. Start the cut at the middle of the blade, drawing toward you in a swift, clean sweep. This is not quite as easy as it sounds, and you will probably make ragged cuts at first; never mind, you will improve with practice. Use an ordinary razor blade and slide one side of it into a cork for safety; or buy a barber’s straight razor at a cutlery store.
For a 16- to 18-inch loaf make 3 slashes. Note that those at the 2 ends go straight down the loaf but are slightly off center, while the middle slash is at a slight angle between the two. Make the first cut at the far end, then the middle cut, and finally the third. Remember that the blade should lie almost parallel to the surface of the dough |
|
10)
Baking—about 25 minutes; oven preheated to 450 degrees
As soon as the dough has been slashed, moisten the surface either by painting with a soft brush dipped in cold water, or with a fine-spray atomizer, and slide baking sheet onto rack in upper third of preheated oven. Rapidly paint or spray dough with cold water after 3 minutes, again in 3 minutes, and a final time 3 minutes later. Moistening the dough at this point helps the crust to brown and allows the yeast action to continue in the dough a little longer. The bread should be done in about 25 minutes; the crust will be crisp, and the bread will make a hollow sound when thumped.
If you want the crust to shine, paint lightly with a brush dipped in cold water as soon as you slide baking sheet out of oven.
11)
Cooling—2 to 3 hours
Cool the bread on a rack or set it upright in a basket or large bowl so that air can circulate freely around each piece. Although bread is always exciting to eat fresh from the oven, it will have a much better taste when the inside is thoroughly cool and has composed itself.
12)
Storing French bread
Because it contains no fats or preservatives of any kind, French bread is at its best when eaten the day it is baked. It will keep for a day or two longer, wrapped airtight and refrigerated, but it will keep best if you freeze it—let the loaves cool first, then wrap airtight. To thaw, unwrap and place on a baking sheet in a cold oven; heat the oven to 400 degrees. In about 20 minutes the crust will be hot and crisp, and the bread thawed. The French, of course, never heat French bread except possibly on Monday, the baker’s holiday, when the bread is a day old.
13)
Canvas housekeeping
After each bread session, if you have used canvas, brush it thoroughly to remove all traces of flour and hang it out to dry before putting away. Otherwise the canvas could become moldy and ruin your next batch of dough.
DELAYED ACTION
Starting and stopping the dough process
As noted in the Master Recipe, there are numerous points at which you can slow down the action or stop it altogether, by setting the dough in a colder place, or refrigerating or freezing it. Exact timings for any of these delaying procedures are impossible to give because so much depends on what has taken place during the slow-down, how cold the dough is when it starts to rise again, and so forth. All you need to remember is that you are in complete control: you can always push down a partially risen dough; you can slow the action with cold; you can speed it with warmth. You will work out your own systems and the following chart will help you:
TO DELAY THE FIRST RISING, SET DOUGH IN A COLDER PLACE
| Approximate Hours of Rise | at Degrees F. |
| 5–6 | 65 |
| 7–8 | 55 |
| 9–10 | Refrigerator |
TO STOP ACTION ALTOGETHER AFTER FIRST OR SECOND RISE
Deflate, wrap airtight, and freeze.
Limit:
A week to 10 days, probably more for plain
French bread dough, and risky after 10 days for doughs with butter and eggs. (We shall not venture farther upon this uncertain limb.)
TO DELAY SECOND RISING
a) Set dough in a colder place.
b) Set a plate on top of dough and a 5-lb. weight; refrigerate.
TO DELAY OR FREEZE AFTER DOUGH IS FORMED
a) Set dough in a colder place.
b) Form dough on lightly oiled sheet; cover airtight and refrigerate or freeze, but note preceding time limit.
TO START ACTION AFTER THAWING
a) Thaw overnight in refrigerator; complete the rise at room temperature.
b) Set at 80 degrees until thawed; complete the rise at room temperature.