Pro Oracle Database 11g Administration (15 page)

44

CHAPTER 2 ■ IMPLEMENTING A DATABASE
Copy the file so you’re not modifying the original (so you always have a good original file): $ cp dbca.rsp mydb.rsp
Now, edit the mydb.rsp file. You minimally need to modify the following parameters: GDBNAME, SID, SYSPASSWORD, SYSTEMPASSWORD, SYSMANPASSWORD, DBSNMPPASSWORD, DATAFILEDESTINATION, STORAGETYPE, CHARACTERSET, and NATIONALCHARACTERSET. Shown next is an example of modified values in the mydb.rsp file:
[CREATEDATABASE]
GDBNAME = "ORC11G"
SID = "ORC11G"
TEMPLATENAME = "General_Purpose.dbc"
SYSPASSWORD = "foo"
SYSTEMPASSWORD = "foo"
SYSMANPASSWORD = "foo"
DBSNMPPASSWORD = "foo"
DATAFILEDESTINATION ="/ora01/ORC11G"
STORAGETYPE="FS"
CHARACTERSET = "AL32UTF8"
NATIONALCHARACTERSET= "UTF8"
Next, run the dbca utility in silent mode using a response file:
$ dbca -silent -responseFile /ora01/orainst/11.2.0.1/database/response/mydb.rsp You should see output such as
Copying database files
1% complete
...
Creating and starting Oracle instance
...
62% complete
Completing Database Creation
...
100% complete
Look at the log file
"/oracle/app/oracle/cfgtoollogs/dbca/ORC11G/ORC11G.log" for further details.
If you look in the log files, notice that the dbca utility uses the rman utility to restore the datafiles used for the database. Then, it creates the instance and performs post-installation steps. On a Linux server, you should also have an entry in the /etc/oratab file for your new database.
Many DBAs launch dbca and configure databases in GUI mode, but a few exploit the options available to them using the response file. With effective utilization of the response file, you can consistently automate the database-creation process. You can modify the response file to build databases on Automatic Storage Management (ASM) and even create RAC databases. In addition, you can control just about every aspect of the response file, similar to launching the dbca in graphical mode.
Dropping a Database
If you have an unused database that you need to drop, you can use the DROP DATABASE statement to accomplish this. Doing so removes all datafiles, control files, and online redo logs associated with the database.
46
CHAPTER 2 ■ IMPLEMENTING A DATABASE
Needless to say, use extreme caution when dropping a database. Before you drop a database, ensure that you’re on the correct server and are connected to the correct database. On a Linux/Unix system, issue the following OS command from the operating system prompt:
$ uname -a
Next, connect to SQL*Plus, and be sure you’re connected to the database you want to drop: SQL> select name from v$database;
After you’ve verified that you’re in the correct database environment, issue the following SQL
commands from a SYSDBA privileged account:
SQ> shutdown immediate;
SQL> startup mount exclusive restrict;
SQL> drop database;
■
Caution
Obviously, you should be careful when dropping a database. You aren’t prompted when dropping the database and, as of this writing, there is no UNDROP ACCIDENTALLY DROPPED DATABASE command. Use extreme caution when dropping a database, because this operation removes datafiles, control files, and online redo log files.
The DROP DATABASE command is useful when you have a database that needs to be removed. It may be a test database or an old database that is no longer used. The DROP DATABASE command doesn’t remove old archive redo log files. You must manually remove those files with an operating system command (such as rm in Linux/Unix or del at the Windows command prompt). You can also instruct RMAN to remove archive redo log files.
How Many Databases on One Server?
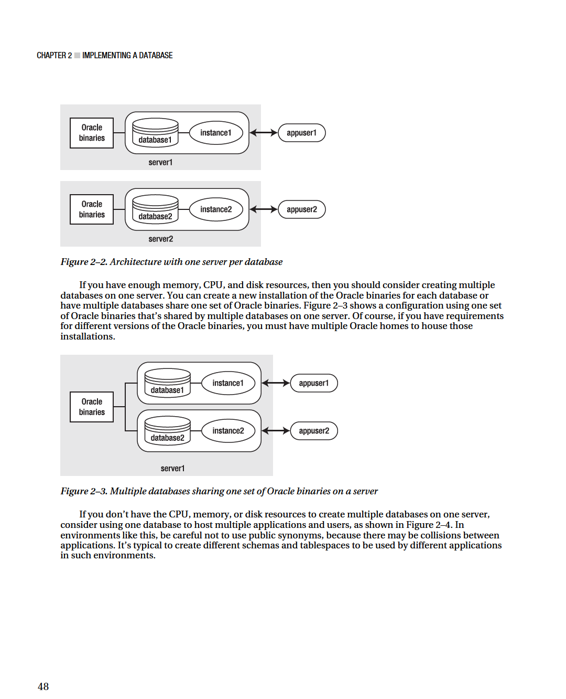
Sometimes, when you’re creating new databases, this question arises: How many databases should you put on one server? One extreme is to have only one database running on each database server. This architecture is illustrated in Figure 2–2, which shows two different database servers, each with its own installation of the Oracle binaries. This type of setup is profitable for the hardware vendor but in many environments isn’t an economical use of resources.
47

CHAPTER 2 ■ IMPLEMENTING A DATABASE
Table 2–7.
Oracle Database Configuration Advantages and Disadvantages
Configuration Advantages Disadvantages
One database per server
Dedicated resources for the
Most expensive. Requires more
application using the database.
hardware.
Completely isolates applications
from each other.
Multiple databases and Oracle
Requires fewer servers.
Multiple databases competing
homes per server
for disk, memory, and CPU
resources.
Multiple databases and one
Requires fewer servers. Doesn’t
Multiple databases competing
installation of Oracle binaries on
require multiple installations of
for disk, memory, and CPU
the server
the Oracle binaries.
resources.
One database and one Oracle
Least expensive.
Multiple databases competing
home serving multiple
for disk, memory, and CPU
applications
resources. Multiple applications
dependent on one database.
One single point of failure.
Summary
After you’ve installed the Oracle binaries, you can create a database. Before creating a database, make sure you’ve correctly set the required operating system variables. You also need an initialization file and need to pre-create any necessary directories. You should carefully think about which initialization parameters should be set to a nondefault value. In general, I try to use as many default values as possible and only change an initialization parameter when there’s a good reason.
This chapter focused on using SQL*Plus to create databases. This is an efficient and repeatable method for creating a database. When you’re crafting a CREATE DATABASE statement, consider the size of the datafiles and online redo logs. You should also put some thought into how many groups of online redo logs you require and how many members per group.
I’ve worked in some environments where management dictated the requirement of one database per server. Usually that is overkill. A fast server with large memory areas and many CPUs should be capable of hosting several different databases. You have to determine what architecture meets your business requirements when deciding how many databases to place on one box.
After you’ve created a database, the next step is to configure the environment so you can efficiently navigate, operate, and monitor the database. These tasks are described in the next chapter.
50
CHAPTER 3 ■ CONFIGURING AN EFFICIENT ENVIRONMENT
■
Tip
Consistently use one operating system shell when working on your database servers. I recommend that you use the Bash shell; it contains all of the most useful features from the other shells (Korn and C), plus it has additional features that add to its ease of use.
Customizing Your Operating System Command Prompt
Typically, DBAs work with multiple servers and multiple databases. In these situations, you may have numerous terminals sessions open on your screen. You can run the following types of commands to identify your current working environment:
$ hostname -a
$ id
$ who am i
$ echo $ORACLE_SID
$ pwd
To avoid confusion about which server you’re working on, it’s often desirable to configure your command prompt to display information regarding its environment, such as the machine name and database SID. In this example, the command prompt name is customized to include the hostname, user, and Oracle SID:
$ PS1='[\h:\u:${ORACLE_SID}]$ '
The \h specifies the hostname. The \u specifies the current operating system user. $ORACLE_SID
contains the current setting for your Oracle instance identifier. Here is what the command prompt now looks like for this example:
[ora03:oracle:devdb1]$
The command prompt contains three pieces of important information about the environment: server name, operating system user name, and database name. When you’re navigating among multiple environments, setting the command prompt can be an invaluable tool for keeping track of where you are and what environment you’re in.
If you want the operating system prompt automatically configured when you log in, then you need to set it in a startup file. In a Bash shell environment, you typically use the .bashrc file. This file is normally located in your HOME directory. Place the following line of code in .bashrc: PS1='[\h:\u:${ORACLE_SID}]$ '
When you place this line of code in the startup file, then any time you log in to the server, your operating system prompt is set automatically for you. In other shells, such as the Korn shell, the .profile file is the startup file.
Depending on your personal preference, you may want to modify the command prompt for your particular needs. For example, many DBAs like the current working directory displayed in the command prompt. To display the current working directory information, add the \w variable: $ PS1='[\h:\u:\w:${ORACLE_SID}]$ '
As you can imagine, a wide variety of options are available for the information shown in the command prompt. Here’s another popular format:
$ PS1='[\u@${ORACLE_SID}@\h:\w]$ '
52
CHAPTER 3 ■ CONFIGURING AN EFFICIENT ENVIRONMENT
Table 3–1 lists many of the Bash shell variables you can use to customize the operating system command prompt.
Table 3–1.
Bash Shell Backslash-Escaped Variables Used for Customizing the Command Prompt
Variable Description
\a
ASCII bell character
\d
Date in “weekday month date” format
\h
Hostname
\e
ASCII escape character
\j
Number of jobs managed by the shell