Sew Birthday Fun (11 page)
Authors: Mandy Shaw

Binding
Making a double-bound edge
Cut your binding fabric into 6cm (2
1
⁄
2
in) fabric strips and join to form one continuous length. Press open the seams. Fold the joined strip in half lengthways and press. Working with the right side of the quilt facing you, lay the binding along one side, matching the raw edges. Start 7.5cm (3in) from the beginning of the binding, and sew using a generous 6mm (
1
⁄
4
in) seam.
Stitch until you reach one corner, stopping EXACTLY 6mm (
1
⁄
4
in) from the end. Pull the work away from the machine and fold the binding up so that it is aligned with the edge of the quilt, making sure it is straight. Holding the corner, fold the binding back down, aligning it with the raw edge and making sure that the folded corner is square. Pin and sew over the fold continuing down the next side as in
Fig. 1
.
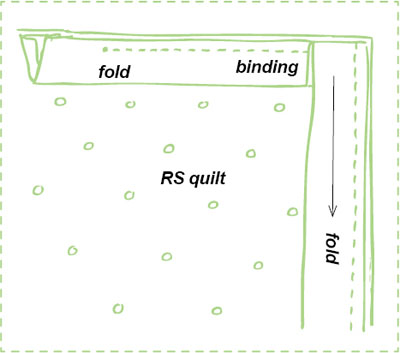
Fig 1
Continue to bind around the quilt until you return to the starting point. Turn under 6mm (
1
⁄
4
in) at the beginning of the binding. Place the end of the binding into the fold, trim to size and sew right over the top.
Fold the binding over to the back of the quilt and slip stitch in place. The corners will miraculously mitre for you on their own.
There is no substitute for making your own binding especially when quilt making, but for smaller craft projects like bunting, pennants and lampshades the ready-made binding bought in haberdashery shops, available in a wide variety of colours and sizes. is ideal. It comes pre- folded and in some cases you can just place the raw edges of your project into the fold, pin and sew; sometimes the sewn line misses the fold on the back and you may have to slip stitch by hand. You can also use it by opening out all the folds on the binding to use it in the normal way, but you will have the advantage of using the fold lines as a guide.
Perfect hand finishing stitches for a professional finish to your projects.
For closing a seam on a stuffed item or sewing two folded edges together. The stitches look like a ladder until they are pulled tight to close the seam. Knot the end of the thread and start from inside the opening to hide the knot. Take straight stitches into the folded fabric, stitching into each edge in turn. After a few stitches pull the thread taut to draw up the stitches and close the gap.
Also used to close gaps in seams. When worked neatly, it is almost invisible. Work from right to left, picking up a tiny piece of the fabric from one seam edge. Insert the needle into the other seam fold and move the needle along 3mm (
1
⁄
8
in). Push the needle out into the seam edge and repeat.
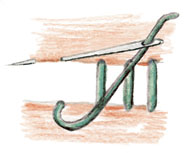
This technique is required to make the button loops on the table lampshades. Sew three stitches on top of each other to match the width of the button you are using to fasten your shade with. Picking up the stitches only, sew along them with blanket stitches very close to each other to form a bar. Fasten off the thread to complete the bar tack.
For quick small craft projects I use a good brand of temporary spray adhesive in the place of tacking (basting) as it is quick and you can easily reposition your work. If you choose to do the same, always only spray the wadding (batting), never the work. Work surfaces have to be protected and you must read and follow the instructions on the can.
It is often said that ‘quilting makes the quilt’ and preparation is key to your success, so take your time with this part. Carefully press all the seams and cut off any stray threads. Cut a piece of backing fabric and a piece of cotton wadding (batting) at least 5cm (2in) bigger all aroundn than the quilt top. Lay the backing fabric on a flat surface wrong side facing you; smooth it out and secure it to the surface with a low-tack tape, ensuring that the fabric is perfectly flat and under a little tension. Lay the wadding (batting) on top and smooth out flat. Now place on the quilt top and smooth it out. Pin the layers of the quilt together, using safety pins every 7.5cm (3in). Start in the middle and work your way out to the edges. Do not scrimp on pins as this will lead to rucks and creases. Once pinned, tack (baste) all the way around the edge of the border. To stabilize the layered quilt, machine stitch-in-the-ditch around each block and along the borders using an inviible or matching thread. Then quilt with a decorative quilt pattern of your choosing.
I love ric-rac braid and often use it to edge my projects. It is available in different widths and the edging technique used differs slightly according to the ric-rac width used. When edging with medium/wide ric-rac it is important to position and machine the ric-rac carefully to prevent the humps of the ric-rac from disappearing when the project is turned the right way out. Working on the right side of the fabric, line up the edge of the ric-rac with the raw edge of the fabric. Tack (baste) in place by machine stitching down the middle of the ric-rac. When starting and finishing the edging keep the ends out of the way by tucking them back on themselves to leave the seam allowance ric-rac free (
Fig. 2
).

Fig 2

Mandy Shaw describes herself as a maker of all things lovely, and she loves to share her inspirations with you. This will be her fourth book for David & Charles, and her ideas are still flowing. She lives in East Sussex in her homemade home with her large family and continues to teach and travel around the UK to share her passion for sewing crafts. She has appeared on Kirstie Allsopp’s TV shows and contributed to two of Kirstie’s books.
Mandy is a guest presenter on Create and Craft TV and frequently contributes to craft and patchwork magazines across the globe.
Without the support of all of my friends, students and wonderful family, these creative works would not be possible. They keep me on a steady track within my creative mess and muddle, and help me to produce these projects and words that the magical team at David & Charles turn into the most beautiful books, which make my designs shine. Thank you to you all. xxxx
UK
Supplier of Mandy’s patterns and kits and lots of fabric and haberdashery items related to Mandy’s books including tapes, ric-rac, Fast2Fuse, felt, coton à broder and other threads.
www.liberty.co.uk/lifestylefabrics
New range of art fabrics including Bloomsbury Garden English florals.
A good range of spots, checks and stripes.
Blackout curtain lining for pennants.
www.patchworkdogandbasket.co.uk
For patchwork and quilting fabrics, buttons, tapes and haberdashery.
Claim your FREE craft eBook from Stitch Craft Create!
Download a fabulous FREE eBook from our handpicked selection at:
www.stitchcraftcreate.co.uk/ideas
Then visit our bookstore to buy more great books like these...

Mandy Shaw
ISBN-13: 978-0-7153-3849-0
The perfect introduction to simple stitchery, with 11 specially-selected starter stitches. Make over 20 gorgeous projects, including beautiful bags, cute cushions and sweet little sewing accessories.
