Sew Birthday Fun (9 page)
Authors: Mandy Shaw

1. Trace the full tiara pattern (see
Templates
) onto the fusible webbing. Fuse the webbing to the felt and cut out, making sure you also cut out the heart shapes.
2. Peel off the backing paper from the fusible webbing. Cut two squares of pink check fabric large enough to cover the small cut-out hearts and place on the fusible webbing side of the tiara. Do not iron in place, but pin from the right side of the tiara. Cut a piece of vintage embroidery to cover the large heart in the same way.
3. Lay the tiara wrong side down onto the thick interfacing and iron in place. Place a cloth over the tiara while you iron so you do not scold the felt. Press firmly until the interfacing has fused. Trim the interfacing to the tiara’s shape.
4. To decorate the tiara, sew the decorative tape along the bottom edge, then sew the narrow ric-rac along the top edge of the tape and continue around the top edge to outline the tiara’s shape. Hand-stitch a running stitch border around the outer edge of the hearts using pink embroidery thread. Sew on the small pearl buttons using the photograph as a guide
5. Finally attach the elastic to the side edges of the tiara, adjusting the length to fit the birthday girl’s head.
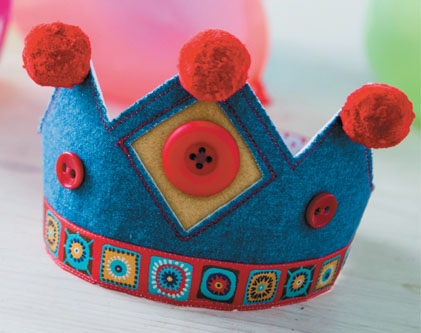
1. Trace the full crown pattern (see
Templates
) onto the fusible webbing. Fuse the webbing to the denim and cut out, making sure you also cut out the diamond shape.
2. Peel off the backing paper from the fusible webbing. Use the yellow felt to cover the cut-out diamond and place on the fusible webbing side of the crown. Do not iron in place, but pin from the right side of the crown.
3. Lay the crown wrong side down onto the thick interfacing and iron in place. Press firmly until the interfacing has fused. Trim the interfacing to the crown’s shape.
4. To decorate the crown, sew the decorative tape along the bottom edge. Using red thread, machine stitch around the outside edge of the crown and to create a border around the diamond.
5. Sew the large red button in the middle of the diamond and the two small buttons on either side of the diamond. Glue the pom poms to the tips of the points of the crown.
6. Finally attach the elastic to the side edges of the crown, adjusting the length to fit the birthday boy’s head.
This sweet little house-shaped wall hanging is the ideal way to help small children anticipate their big day. Bertie the bear moves bed every night to count down how many more sleeps there are to go, then on the day itself the double doors at the base of the hanging are opened to reveal a traditional birthday party scene which Bertie can be poppered into.

You will need
- 50cm (20in) of 107cm (42in) wide denim for the background
- 25.5cm (10in) of 107cm (42in) white cotton for the bed sheets
- 60cm x 84.5cm (24in x 33in) printed fabric for the lining
- Seven pieces of assorted printed fabrics each measuring 11.5cm x 6.5cm (4
1
⁄
2
in x 2
1
⁄
2
in) for the bedspreads - 48.5cm x 16.5cm (19in x 6
1
⁄
2
in) green striped fabric for the birthday party scene - 60cm x 84.5cm (24in x 33in) cotton mix wadding (batting)
- 46cm x 23cm (18in x 9in) fusible webbing
- 25.5cm x 15.5cm (10in x 6in) thick interfacing
- 15.5cm x 15.5cm (6in x 6in) white felt
- 20cm x 15.5cm (8in x 6in) gold felt
- 30cm x 9cm (12in x 3
1
⁄
2
in) yellow felt - Scraps of printed cotton fabrics for the appliqué
- Small handful of polyester stuffing
- 1.5m (1
3
⁄
4
yd) red and yellow narrow ric-rac for buntings - 2.25m (2
1
⁄
2
yd) green wide ric-rac - 2.25m (2
1
⁄
2
yd) ready-made binding - Buttons: four black micro, six yellow small, one yellow large, two gold small, two red heart-shaped and six balloon-shaped in assorted colours
- One large popper
- Embroidery threads: yellow, black, red, white, green
- Seven lengths of 5mm (
1
⁄
4
in) wide assorted braids each measuring 11.5cm (4
1
⁄
2
in) - Two pieces of transparent plastic measuring 7cm x 5.5cm (2
3
⁄
4
in x 2
1
⁄
4
in) - Two pieces of card measuring 7cm x 5.5cm (2
3
⁄
4
in x 2
1
⁄
4
in) - 25.5cm (10in) length of wooden dowel
Finished size:
49.5cm x 73.7cm (19
1
⁄
2
in x 29in)
Note:
It is important when making the wall hanging to cut and sew very accurately to ensure it fits together well. Use a rotary cutter, mat and ruler if you have them. Use 6mm (
1
⁄
4
in) seams throughout: to keep your seams accurate, use a quarter-inch foot on your sewing machine if possible. All measurements given have had seam allowances added. Lightly spray starch all your fabrics before starting work to make the folding nice and sharp.
1. Cut white cotton fabric into seven pieces measuring 11.5cm x 24.2cm (4
1
⁄
2
in x 9
1
⁄
2
in) for the bed sheets.
2. Cut the denim background fabric into the following pieces:
Four pieces 5.1cm x 14cm (2in x 5
1
⁄
2
in)
Four pieces 29.4cm x 5.1cm (15
1
⁄
2
in x 2in)
Two pieces 8.8cm x 16.5cm (3
1
⁄
2
in x 6
1
⁄
2
in)
Two pieces 15.3cm x 14cm (6in x 5
1
⁄
2
in)
Two pieces 6.5cm x 70cm (2
1
⁄
2
in x 27
1
⁄
2
in)
Two pieces 11.5cm x 16.5cm (4
1
⁄
2
in x 6
1
⁄
2
in)
One piece 49.5cm x 5cm (19
1
⁄
2
in x 2in)
3. Cut the green striped fabric into the following pieces:
One piece 25.5cm x 16.5cm (10in x 6
1
⁄
2
in)
Two pieces 11.5cm x 16.5cm (4
1
⁄
2
in x 6
1
⁄
2
in)
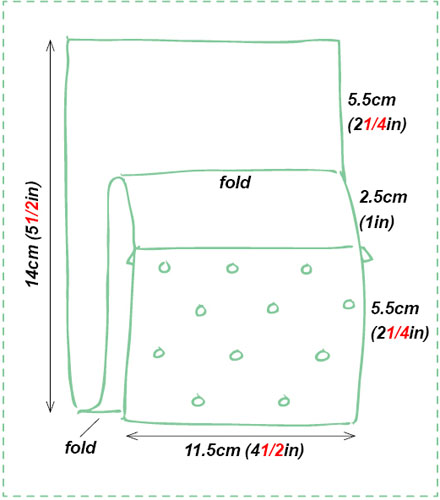
Fig 1
1. To make a little bed refer to
Fig. 1
as you work. Sew one piece of the bedspread fabric to one piece of the sheet fabric. Press the seam towards the bedspread fabric. Fold over and press 2.5cm (1in) of the sheet at the top of the bedspread. Where the sheet meets the bottom of the bedspread, fold and press it back up to make the bottom sheet. Repeat to make the six other beds.
2. Lay the beds out in two rows of three with one at the top, adjusting the arrangement until you are happy the colours go together well.
3. Unfold the beds ready to add the bedspread decorations. Working on the front of the fabric, add decorative tapes, ribbon or ric-rac of your choosing to decorate the edge of the sheet turnover where it meets the bedspread. Trace the numbers 1 to 7 (see
Templates
) onto the fusible webbing (note the numbers are reversed). Fuse the numbers onto the wrong side of the white felt following the instructions for working with fusible webbing (see
Get Ready to Stitch
). Appliqué the numbers onto the bedspreads starting with 7 on the top bed. Refold the beds and pin the fold. Lay the beds back out in number order.
4. Starting with the two rows of three beds, sew the beds together with a 5.1cm x 14cm (2in x 5
1
⁄
2
in) denim strip in between each bed. Press the seams to one side.
5. For the single bed row, sew the two 15.3cm x 14cm (6in x 5
1
⁄
2
in) rectangles to either side of the number 7 bed.
6. Join the three bed rows together with two of the 29.4cm x 5.1cm (15
1
⁄
2
in x 2in) denim strips. Sew the remaining 29.4cm x 5.1cm (15
1
⁄
2
in x 2in) strips to the top of the hanging and to the bottom bed row.
When working through several layers, pin well and sew slowly, using a walking foot attachment for your machine if you have one.
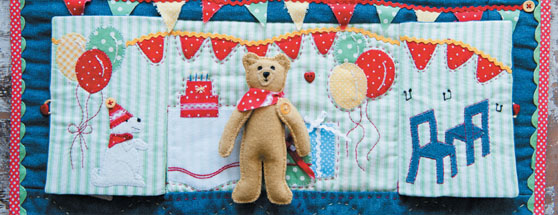
1. Following the open-door photograph as your guide, appliqué the central birthday party scene to the large piece of green stripe fabric. (For the tablecloth, birthday cake, balloons and bunting, see
Templates
; for the presents cut two rectangles from your fabric scraps; note the birthday scene will be completed when you add the doors later.) Secure the appliqué with hand or machine blanket stitch. Sew on the narrow yellow ric-rac to join the bunting flags. The remaining stitching will be added later when quilting the wall hanging.
2. Sew the two denim pieces measuring 8.8cm x 16.5cm (3
1
⁄
2
in x 6
1
⁄
2
in) to either side of the birthday party scene. Press the seams to one side and then sew this strip to the bottom of the beds.
3. Sew the two denim strips measuring 6.5cm x 70cm (2
1
⁄
2
in x 27
1
⁄
2
in) to either side of the wall hanging; press the seams to one side and then add the final 49.5cm x 5cm (19
1
⁄
2
in x 2in) strip to the bottom of the hanging; press well.