The Art of Manliness: Classic Skills and Manners for the Modern Man (16 page)
Read The Art of Manliness: Classic Skills and Manners for the Modern Man Online
Authors: Brett Mckay,Kate Mckay
Tags: #Etiquette, #Humor, #Psychology, #Reference, #Men's Studies, #Men, #Men - Identity, #Gender Studies, #Sex Role, #Masculinity, #Personal & Practical Guides, #Array, #General, #Identity, #Social Science

1. Raise the victim to a standing position. This is no easy task when they’re dead to the world. Start by rolling them on their stomach and kneel by their head. Stick your arms under their armpits and around their back. Raise the victim to his feet. Lift with your legs, not with your back.
2. Shift your weight to your right leg and stick it between the victim’s legs. Grab the victim’s right hand with your left, and drape it over your shoulder. With your head under the victim’s right armpit, wrap your arm around the back of his right knee. Squat down and position his body on your shoulders. Try to equally distribute his body weight on each side.
3. Grab the victim’s right hand with your right hand. Your left hand is free to judo chop would-be assailants.
4. Transport your victim.
Save a Drowning Person
You’re at the lake with your friends and family. You’re grilling some tasty man burgers and taking in the beautiful sunny day. As you gaze over the water, you see a man thrashing his arms around and gasping for air. It’s time to get your David Hasselhoff on and save this drowning person. Your golden brown hairy chest was made for a moment like this. You start to run towards the lake.
Unfortunately, since you’re at the lake and not the ocean, your fantasy of being the Hoff ends here. Contrary to what you see on television and in movies, your best move is not to dash into the water after the person. Drowning people aren’t only a danger to themselves; they’re a danger to the people rescuing them, too. Panicked and flailing about, they can pull and push you under when you try to help.
If the person is near the shore or you’re in a boat, try these two methods first:
1. Pull the person to safety with a stick. Grab a long tree limb or pole and extend it out to the victim. Tell them to grab on. Pull them to safety.
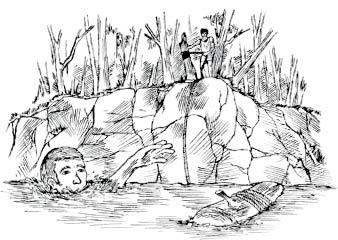
2. Throw an object out to them attached to a rope. If you’re near a body of water, it’s always good to have a safety ring close by. If you don’t have one, improvise by tying a rope to an object and throwing it out to the person.
Figure 3.9 Save a drowning person by throwing an object out to them attached to a rope.
If the person is too far away to rescue with either of these methods, you’ll need to get in the water to save them. When rescuing a person from the water, take these precautions to avoid getting drowned yourself.
1. Calm the person down. As you approach the person, talk to them and let them know that everything is going to be fine. It makes getting them out of the water much easier.
2. If you have a floatation device and the victim is simply too far off for you to throw it from shore, swim out close enough to be able to toss it to them. If the floating object is tethered to a rope, pull them to shore. If not, simply have them grab on.
3. Approach the person from the back. You want to be out of the reach of the victim’s arms and legs. As mentioned above, your victim will probably try to grab on to you and thus will pull you down to the murky depths. So approach the person from behind and wrap your arm around his chest. Keep his head above the water.
4. If the victim does try to pull you down, ignore your instinct to fight it and instead sink and/or swim downward on purpose. The victim’s primal instinct to stay above water will kick in, and he’ll release you.
5. Swim back to safety. Using your free arm, swim back to safety. Tell your victim to stay calm and float on his back.
Treat a Snakebite
You and your buddies are on a camping trip reconnecting with nature and your masculinity. You’re taking a day hike to see some ancient Indian hieroglyphs, when your friend cries out in pain as two razor sharp fangs sink into his ankle. He’s just been bitten by a snake. Do you know what to do?
You better. Getting bitten by a venomous snake is serious business. While the reactions vary from snake to snake, all venom is essentially designed to immobilize the victim and start the process of digestion. Venom is basically toxic snake saliva, ready to turn your friend into dinner. Seek medical attention immediately, even if you don’t think the snake is poisonous. Here’s what to do while you wait for medics to arrive or if you’re in a remote locale, far from civilization.
The Dos
Do
wash the bite with soap and water as soon as possible. You want to remove as much of the snake’s spit as you can.
Do
keep the bitten area below the victim’s heart. This is done to slow the flow of the venom.
Do
take off any rings or watches. The venom is going to make your friend swell and jewelry might cut off his circulation.
Do
tightly wrap a bandage 2 to 4 inches above the bite. If you can’t reach medical care within thirty minutes, wrap a bandage around the bitten appendage. This is to assist in reducing the flow of venom. You want to make it tight, but not too tight as to completely cut off the appendage’s circulation. That will only cause tissue damage.
Do
try to draw the venom out of the wound. If you have a snake bite kit, place the suction device over the bite to help draw the venom out. Leave on for a maximum of ten minutes. If used properly, a suction device can remove up to 30 percent of the venom.
The Don’ts
Don’t
cut the wound. While watching an old Western, you might have seen a cowboy making an incision above the snakebite in order to “drain” the venom. This isn’t a smart move because you increase the chances of infection in the area.
Don’t
suck the venom. Another remedy we all have seen in the movies is people sucking out the venom with their mouth. You don’t want the venom in your mouth where it can get into your bloodstream.
Don’t
apply ice to the wound. Ice can cause tissue and skin damage and inhibits the removal of venom when using a suction device.
Don’t
panic. Try to keep your friend from freaking out. The more he moves and the faster his hearts beats, the quicker the venom is going to circulate through his body. So keep your buddy still and tell him the story of the time you stole your rival high school’s mascot and held it captive for a week.
Be a Hero on the Road
“A boy doesn’t have to go to war to be a hero; he can say he doesn’t like pie when he sees there isn’t enough to go around.”
—Edgar Watson Howe
It’s a familiar sight to anyone who has traveled this nation’s highways and byways: the desperate motorist stranded at the side of the road without either the proper tools or the necessary knowledge to fix their car’s malfunction. Will you drive on by because you also lack these things? Or will you play the role of the Good Samaritan and stop to help them on their way? Every man should know how to confidently perform two basic car repairs: jump-starting a car and changing a flat tire. Such acts may not be as dramatic as leaping tall buildings in a single bound, but you can bet someone will always be grateful you swooped in to save them.
How to Change a Flat Tire
Tools needed: Spare tire, jack, lug wrench.
1. Park the car on a flat surface. Be sure to put on the emergency brake. It’s also recommended to put a block on the tire opposite of the flat tire. Here’s a blocking example: If the right rear tire is flat, put the block on the front left tire.
2. Remove the hubcap. If the car has a hubcap, remove it so you can get to the lug nuts. Use the hubcap to hold the nuts, just like the dad in
A Christmas Story
. Just don’t let your kid hold the hubcap or he’ll lose the nuts and drop the F-bomb.
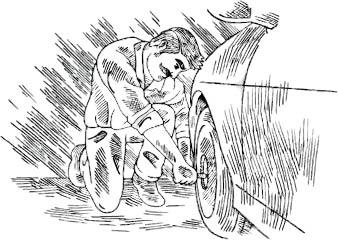
3. Loosen the nuts. Grab your lug wrench and place it on the flat tire’s lug nuts. Loosen them up by turning them counterclockwise. The nuts are probably on there really tight, so you’ll have to use all your man strength to unscrew them. Loosen the nuts a few turns, but don’t take any of them off yet!
(
Figure 3.10 Loosen the lug nuts up by turning them counterclockwise. Loosen the nuts a few turns, but don’t take any of them off yet!
4. Place the jack underneath the car. Check the owner’s manual for the correct placement of the jack. Turn the hand crank at the end of the jack to raise the jack until it comes into contact with the car’s frame. Make sure it’s touching a sturdy spot.
5. Jack it up! Start cranking the jack until the wheel is high enough above the ground to remove the tire.
6. Remove the flat. Remove the lug nuts from the wheel. You should be able to do it by hand because you’ve already loosened them. Remove the flat tire and lay it flat. You don’t want the wheel to roll into traffic during rush hour and cause a thirty car pileup.
7. Slap on the spare. Take your spare tire and line up the lugs, or bolts, with the holes in the wheel and slide the wheel on. Once the wheel is on, take your lug nuts and tighten them by hand until you meet firm resistance.
8. Lower the car. Lower the jack until the wheel is firmly on the ground.
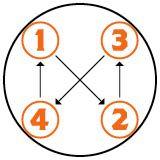
9. Finish tightening the lug nuts. These babies must be on super tight so the wheel doesn’t come flying off while driving to the tire shop to get the flat fixed. So you need to unleash the superpower of the star pattern to get those lugs on tighter than a deer tick. Start with any lug nut, then follow this pattern.
Figure 3.11 Use this tightening pattern if you have five bolts on your wheel. Figure 3.12 If your car has four bolts on the wheel, use this pattern