The Baking Answer Book (8 page)
Read The Baking Answer Book Online
Authors: Lauren Chattman
Tags: #Cooking, #Methods, #Baking, #Reference

Q
What effect will insulated baking sheets have on the way my cookies bake?
A
Cookies baked on insulated baking sheets, which have a cushion of air between two sheets of metal, are less likely to burn on the bottom. By the same token, they may not be as crisp and caramelized on their tops as you might like. Choosing insulation is a matter of what effect you are going for and, to some degree, personal preference. Cookies often take a minute or two longer to bake through on an insulated baking sheet, so if you are using one in a recipe that doesn’t specifically call for it, you may have to increase the baking time.
If you have two rimmed baking sheets, you can improvise an insulated sheet by nesting them one on top of the other. The thin pocket of air between the two sheets will result in the same type of baking.
Q
Will nonstick cake pans burn my cakes?
A
Cakes will darken when baked in nonstick pans, though not as dramatically as cookies will when baked on nonstick baking sheets. It’s really a matter of personal preference. If you like the caramelized flavor of a deep golden crust and appreciate a sturdier surface for applying frosting, then a nonstick pan may be right for you. If you don’t like such a marked difference in color between your cake and your crust, then go with a light-colored pan. The best are made of aluminum.
Q
Do nonstick pans need to be greased?
A
Manufacturers will tell you no, but to be safe you should always grease and flour even a nonstick cake pan to guarantee a clean release. If a recipe calls for lining a pan with parchment paper, do this also. There are few things more distressing than the sight of half of your cake stuck to the bottom of your pan after you have unsuccessfully attempted to flip it onto a wire rack or cardboard cake circle.
Q
What about glass and ceramic baking dishes? How do they rate on browning (or burning) baked goods?
A
Glass and ceramic are on opposite ends of the spectrum. Clear glass, like dark metal, absorbs heat rather than reflecting it, resulting in darker crusts. A glass pie plate is a good choice for a juicy fruit pie, because it promotes browning and crisping which will prevent the bottom of the pie from becoming damp and soggy. Glass is not a good choice for a crustless dessert like a crumble or crisp, because there is a risk that the fruit on the bottom would scorch and burn. In this case, ceramic, which is slower to absorb heat, is preferable, as it cooks the fruit more gently.
Nor is glass a good choice for quick breads, pound cakes, and bar cookies, because of the potential for burning. There are a lot of pretty ceramic and stoneware loaf pans and baking dishes out there that will do this job if you prefer them to metal. But be aware that ceramic and stoneware generally produce baked goods that are lighter in color than those baked in aluminum and especially nonstick pans.
Q
I’m intrigued by the flexible nonstick silicone bakeware I see everywhere. How does it compare to conventional metal and glass?
A
Manufacturers claim that bakeware made of silicone (the same flexible nonstick material used in Silpats) is easier to clean and offers a better nonstick surface than any other material. But in my experience there are some distinct disadvantages to using it in baking. First of all, the pans, which now come in every shape imaginable, from madeleine
molds to muffin tins to kugelhopf pans, are flexible to the point of floppiness. You will need to place your pan on top of a baking sheet and then carry the baking sheet to the oven to avoid spills, but be aware that baking anything on top of a baking sheet will lengthen baking time.
Dense, heavy batters such as fruitcake or gingerbread can cause the sides of a silicone baking dish to bulge, resulting in misshapen baked goods. It’s better to bake these batters in rigid pans that will give the finished cakes a good shape.
Silicone won’t produce a caramelized crust that’s so desirable on cakes and muffins. On the plus side, it’s good for items that require gentle heat in a cooler oven, such as crème brûlée. Also heed manufacturers’ instructions not to use these pans in an oven hotter than 425°F (220°C), at which point the silicone will begin to smoke and produce a foul odor.
Q
When a recipe specifies a pan size (9-inch pie plate, 8-by 4-inch loaf pan) how are the pans measured? My loaf pan, for example, is narrower on the bottom than the top.
A
All pans are measured across the top, not the bottom. In the case of fluted tart, Bundt, or brioche pans, measure from the outermost part of the top edge of one side to the outermost part of the top edge of the other side.
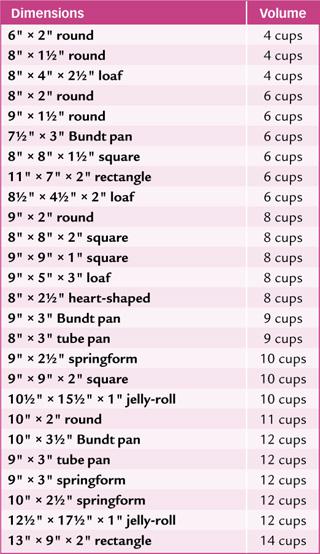
BAKING PAN VOLUME GUIDE
Consult the following list for pan substitutions and approximate metric equivalents. Make sure the pan you want to use is of the same volume as the pan specified in a recipe.
Q
My cake recipe calls for two 8-inch round baking pans but I have only two 9-inch round pans. Is it a mistake to bake the layers in bigger pans?
A
If you bake what are supposed to be 8-inch-round sponge cake layers in 9-inch pans, your layers will of course be thinner (which could be a problem if the recipe later calls for you to split them in two), and will bake more quickly than if they had been baked in smaller pans. Perhaps more important, your cake’s texture and rise may be affected, as changing pan size may alter these qualities. When baking a delicate cake, use the size of pan specified in the recipe for the best outcome.
Less delicate baked goods — butter and pound cakes, bar cookies, brownies, and quick breads — won’t suffer from the change as much. When substituting pans, do try to use one of equivalent volume (see
page 47
). You won’t be able to adequately fill a much larger pan, and a much smaller pan may overflow with excess dough or batter. You will also need to adjust the baking time, decreasing it if you are using a shallower pan and increasing it if you are using a deeper one.
Q
How many mini muffins will a recipe for regular size muffins yield?
A
Muffin tins come in a variety of sizes these days. Each cavity in a mini-muffin tin holds about 1½ tablespoons of batter. Each cavity in a standard-size muffin tin holds about
½ cup. There are also jumbo muffin tins, whose cavities hold 1 cup, and muffin-top tins with shallow craters that will hold ½ cup of batter. So a recipe for standard-size muffins with a yield of 12 will get you the same number of muffin tops, six jumbo muffins, or close to two dozen mini muffins. Remember to adjust baking times. Jumbo muffins will need an extra 10 to 12 minutes in the oven; mini muffins will bake 10 minutes faster; and muffin tops will be done 8 to 10 minutes sooner than standard-size muffins.
Q
What can I make if I own only a handheld mixer? Which baking tasks require a stand mixer?
A
A handheld mixer will whip egg whites or heavy cream and mix muffin and cake batters. The heavy-duty (and more expensive) handheld models are up to mixing stiff cookie doughs. These models have thin wire beaters rather than old-fashioned beaters with metal shafts down the center, which tend to get clogged with dough. A handheld mixer costs a fraction of the price of a stand mixer, so for bakers on a budget, forgoing a stand mixer can make good sense.
That said, devoted home bakers who invest in a good-quality stand mixer such as a KitchenAid rarely regret the decision over the course of the many years they enjoy their purchase. A stand mixer will whip egg whites or cream in half the time of a handheld mixer. It will blend ingredients with almost no effort on the part of the baker, its paddle clearing the sides and bottom of the bowl without the need to
stop the machine and scrape. Many stand mixers come with dough hooks for kneading stiff bread doughs, and are built with powerful motors that can run for upwards of 20 minutes without overheating or burning out.
Q
If I’m going to make the investment in a stand mixer, should I go for the largest one on the market?
A
KitchenAid mixers, which set the standard for all other stand mixers, come in several sizes, the smallest of which, the Artisan, has a 5-quart bowl and a power output of 325 watts, making it large and powerful enough to mix bread dough for two loaves or cake batter for 24 cupcakes. Most home bakers won’t need anything more. If you are thinking of starting a cupcake business out of your kitchen, you might take a look at the KitchenAid 6-quart, 575-watt Professional-series mixer that can handle recipes with up to 12 cups of flour. Whichever model you choose, make sure you like the color, because you will be living with it for a long time. My friend Roland Mesnier, who was the pastry chef at the White House for 25 years and used his machine for many hours a day during that time, ordered a backup mixer about 10 years into his tenure, thinking he’d be in trouble if the old one broke down. When he retired, both the old mixer and the new one were still going strong.
You can save yourself some money by buying the smallest (which is by no means cheap) rather than the largest KitchenAid mixer. But I do recommend investing in an extra mixing bowl, which comes in handy when you need your
mixer twice for one recipe (egg whites to be folded into cake batter, for example). This way you won’t have to stop to wash and dry your bowl in the middle of your baking.
Q
Can I use a food processor instead of a mixer to mix my doughs and batters?
A
Many bread and pastry doughs can be mixed in a food processor instead of a mixer, in seconds rather than minutes. But the food processor’s great power and speed can ruin dough as quickly as it can mix it if precautions aren’t taken. Here are some tips for adapting recipes.
Food Processor Mixing Tips
Bread recipes
often call for adding warm water or another liquid to the dry ingredients, but when using a food processor you might consider using a cooler liquid, because the powerful motor will heat the dough as it kneads it. Fully kneaded dough should be at a temperature between 77 and 82°F (25–28°C). Use an instant-read thermometer the first few times you make bread dough in the food processor to be sure you are in this range.
, or bread kneaded in a mixer with a dough hook attachment, usually requires minutes of kneading time, but a food processor will produce a smooth and elastic dough in a minute or less. Take care not to overknead your dough in the food processor,
which will destroy its elasticity and prevent it from rising to its full potential in the oven. Run the machine just until the dough forms into a ball. If you feel the dough requires more kneading, hand-knead it on the countertop for a minute or two to finish it off.