The Baking Answer Book (9 page)
Read The Baking Answer Book Online
Authors: Lauren Chattman
Tags: #Cooking, #Methods, #Baking, #Reference

The food processor motor
generates heat that can be an issue when making pie and pastry doughs. It is essential to begin with very cold butter or vegetable shortening (consider cutting it into bits and freezing it for 15 to 30 minutes before beginning) and to use ice water. The idea is to have tiny pieces of solid fat well-distributed throughout the dough, so as it bakes in the oven the fat will melt, creating air pockets that will give the crust a flaky texture. You don’t want the heat of the food processor to liquefy the fat before it is incorporated into the flour and heated in the oven.
carefully. There is a danger to adding it to the processor with the motor running. The water tends to clump together with just a portion of the flour and fat mixture, accumulating in a wet and sticky mass around the blade and leaving much of the flour at the bottom of the bowl. It’s better to open the bowl and evenly sprinkle the ice water over the fat and flour mixture before processing. Pulse a few times, just until the dough comes together instead of crumbling when pinched between your fingers. It should feel cool to the touch. Remove the dough from the bowl and press it into a disc. Work quickly, before the heat of your hands
can melt any of the fat. Wrap the disc in plastic and refrigerate it until it is well chilled and the gluten that has formed during mixing has had time to relax, making the dough easy to roll into a thin sheet.
Q
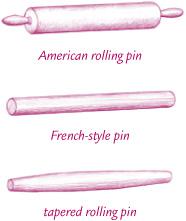
Which is better — a rolling pin with or without handles?
A
Either type of rolling pin will do the job. It’s really a matter of personal preference. Chances are if you learned to roll pie dough in your mother’s kitchen, you will feel comfortable with an American rolling pin, a hardwood cylinder with handles on either end and a steel shaft down the center that gives it a smooth rolling action. If you learned about dough at cooking school or a bakery, you probably will prefer the French-style pin, which is simply a hardwood cylinder with no handles and no shaft. Many professional bakers choose a French-style pin because it lets them feel the thickness of the dough as they roll. If you have small hands, you might consider a tapered rolling pin, a variation on the French-style pin but with slimmer ends that make it easy to grasp.
Food Processor Pizza Dough
Good pizza dough is wet and sticky. It’s difficult to knead by hand, and can take a toll on your electric mixer’s motor. But it comes together beautifully in the food processor.
MAKES TWO 14-INCH PIZZA CRUSTS
1 envelope (2½ teaspoons) active dry yeast
1¾ cups tepid water
1½ teaspoons salt
1.
Stir to dissolve the yeast in the water.
2.
Combine the flour and salt in the food processor and pulse once or twice to combine.
3.
With the motor running, pour the water, yeast mixture, and the olive oil into the feed tube and process until the dough forms a smooth ball, 30 seconds to 1 minute.
4.
Coat the inside of a large mixing bowl with olive oil. Shape the dough into a rough ball, cover the bowl with plastic wrap, and let stand in a warm, draft-free spot until it has doubled in size, 1 hour to 1 hour 30 minutes.
5.
Transfer the dough onto a work surface, cut in half with a bench scraper, lightly dust with flour, drape each piece with plastic wrap, and let it rest for 20 minutes.
6.
Use the dough as directed in any pizza recipe, or place each piece in an airtight container and freeze for up to 2 months. Defrost in the refrigerator overnight before using.
Food Processor Pie Dough
Keep your ingredients (including your flour!) as cold as possible, to ensure that the butter and shortening don’t melt as they are processed.
MAKES 1 DOUBLE OR LATTICE-TOP PIECRUST
2½ cups unbleached all-purpose flour, chilled
½ teaspoon salt
½ cup vegetable shortening, chilled
½ cup (1 stick) unsalted butter, cut into 1/4-inch pieces and chilled
6 tablespoons ice water, plus more if necessary
1.
Combine the flour and salt in the food processor and pulse several times to blend.
2.
Add the shortening and pulse 8 to 10 times until the mixture resembles coarse meal. Add the butter and pulse another 8 to 10 times until the mixture again resembles coarse meal.
3.
Sprinkle the water over the flour mixture. Pulse 5 to 7 times, until the dough just begins to come together in large clumps. If it doesn’t come together, sprinkle another tablespoon of water over the mixture and pulse again. Remove the lid of the food processor and press some dough between your fingers. If it is still very crumbly, process once or twice more.
4.
If it holds its shape, press it into two 5-inch discs. Wrap it in plastic and refrigerate for at least 2 hours and up to 2 days before using.
Q
Are there any other electronic items that are essential for baking?
A
A microwave oven is nice to have for melting chocolate and butter, but you can also do this on the stovetop. A blender is useful for puréeing fruit or grinding graham crackers, but a food processor will do almost everything a blender can. I would say that the only other electronic item that’s absolutely essential for serious baking is an electronic scale.
Professional bakers have always preferred weighing ingredients to measuring them by volume, to ensure uniform results batch after batch. Measuring by volume is necessarily imprecise. Ingredients like flour may settle. Small differences between sets of measuring cups may mean that your 1-cup measure holds slightly more flour than someone else’s measure. More and more frequently, cookbook authors and food writers are including weight along with volume measurements in ingredient lists, so that home cooks can get the same reliable results as professionals.
Mechanical scales, while less expensive, are less precise and more difficult to read than electronic scales. Look for an electronic scale that will hold at least 5 pounds, with a large digital display and an automatic shut-off to save batteries. Scales with a flat surface will allow you to place your own mixing bowl on top, rather than being limited to a bowl that comes with the scale. A scale with a switch that will allow you to weigh ingredients in both ounces and grams is nice for bread bakers, because so many bread recipes supply metric measurements in addition to English measurements for the sake of precision.
Q
What are dry and liquid measures and how should I use them?
A
Dry and liquid measures of less than a pint both hold the same quantities of ingredients by volume (a 1-cup dry measure will hold 1 cup of flour, as will a 1-cup liquid measure) but they are designed differently so as to measure either liquid or dry ingredients as precisely as possible. At the 1-pint point, a dry measure is larger than a liquid measure by a little over 16% (a liquid pint 473 milliliters and a dry pint is 551 milliliters).
Dry measuring cups are designed to be filled using the “dip and sweep” method. To accurately measure 1 cup of flour, dip a 1-cup dry measure into your flour canister and then use a knife to sweep any flour above the rim back into the canister. For an accurate measure, your cup should be filled to the brim.
Liquid measuring cups are made of clear glass or plastic, with pour spouts to neatly transfer measured liquids from cup to mixing bowl. Incremental measures are printed on the sides of the cup. To use one of these cups, pour your liquid into it and then look at the lines at eye level to be sure that you have filled it just to the right line.
By these descriptions, you can understand how difficult it would be to accurately measure a cup of flour in a 1-cup liquid measure (how would you smooth out the top surface evenly enough to know that you had exactly 1 cup?) or to measure 1 cup of milk in a dry measure (even if you dared to fill the measure to the brim, would you be able to transfer it to your
bowl without spilling?). Success in baking depends first of all on accurate measurements, so it is very important to have these two sets of measuring cups and to use them with care.
Q
How important is parchment paper for baking?
A
I personally could not bake without parchment, which is paper that has been impregnated with silicone to make it nonstick. Rolls of parchment are inexpensive and easy to find in any supermarket (look on the shelf next to the aluminum foil). Precut sheets can also be purchased in bulk from baking supply stores or online (see Resources). If you bake a lot, I highly recommend buying it this way so you don’t run out. Bleached parchment is better than unbleached, because it is more flexible and won’t become brittle at high temperatures and shatter when it comes out of the oven.
Primarily, parchment paper is used to line baking sheets and cake pans to prevent baked goods from sticking and to hasten cleanup. But there are dozens of other reasons to keep it handy in the kitchen.
Parchment Paper Uses
before shaping bread or pizza; then you can just slide the dough, still on the parchment, right onto your preheated baking stone without fear that it will stick to the peel.
for sifting confectioners’ sugar or cocoa powder over the top of cakes, cupcakes, and cookies.