Ukulele For Dummies (13 page)
Read Ukulele For Dummies Online
Authors: Alistair Wood

 The numbers at the bottom
tell you which finger to use to fret that particular string:
⢠1 = Index finger
⢠2 = Middle finger
⢠3 = Ring finger
⢠4 = Little finger
 Not all chord diagrams start at the nut. If you see a chord diagram that doesn't have a thick black line at the top, a number should appear at the top right (or sometimes left). In these cases you need to treat the top line as the fret given rather than the nut. You can see an example of this in the Csm chord in Figure 6-25.
Deciphering chord diagrams for lefties
Chord diagrams can be tricky for left-handed beginners. You need to create some way to interpret or âsee' the regular diagrams in a way that makes sense for you. I've heard of two ways that left-handers imagine chord diagrams:
 Picture the chords as a mirror image:
This method is definitely the best way of interpreting the chord charts when you're forming chords.
 See âthrough' the neck:
Imagine the neck of your ukulele is made of glass and you can see the frets and your fingers through it. So the standard chord diagram would be like holding the ukulele in front of you with the fretboard pointing away from you. You just need to mimic what you see in the chord diagram on your ukulele.
Playing a Song Using Two Chords
In this section, you get to work on your first song. It takes only two chords: C and F.
Creating a C chord
The first chord to tackle is the C chord. It uses only one finger and so is dead easy to play. Figure 4-3 shows the chord diagram.
On the diagram, the g-, C- and E-strings all have 0 at the top of them. That means you don't have to fret them at all.
Figure 4-3:
The C chord diagram.

But the A-string has a dot at the third fret. So take your third finger (ring finger) and hold down the A-string at the third fret (between the second and third fret wires), as shown in Figure 4-4.
Figure 4-4:
How your fingers look when you're playing the C chord.

Does it look right? If so, put your hand in the strumming position and strum down (with your nail hitting the string).
How does that sound? Can you hear all the strings? Do they create a pleasing harmony and sound right together?
If the sound isn't quite right, try plucking the A-string by itself. If the note doesn't ring out clearly, take a look at Chapter 3 to find out more about fretting and then play around until the note is sounding good.
If you've got the A-string ringing out clearly but the chord still doesn't sound right, double check that you're in tune (described in Chapter 2).
Fingering an F chord
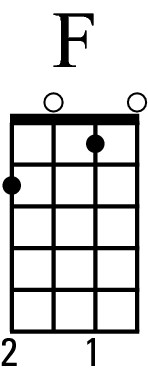
The F chord is a little trickier than the C chord. For one thing, you have to use two fingers to play it but, more importantly, you need to reach over other strings to fret. Figure 4-5 shows the F chord diagram.
Figure 4-5:
The F chord diagram.

Here, the C- and A-strings are open and so we don't need to do anything with those. Here's what you do:
1. Use your index finger to hold the E-string at the first fret.
2. Use your middle finger to fret the g-string at the second fret.
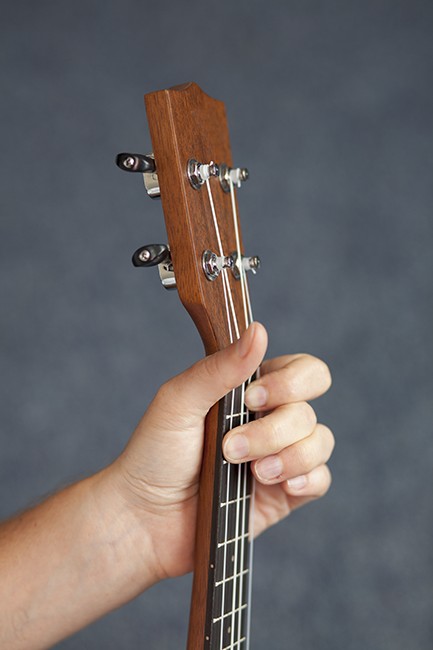
Your fingers need to look something like Figure 4-6.
3. Make sure that your fingers arch high over the strings that you're not fretting.
4. Strum the ukulele and listen to how it sounds.
5. Now check each string to see how it sounds by plucking each one individually:
⢠If either of the fretted strings doesn't ring out, go through the fretting checklist in Chapter 3.
⢠If either of the open strings sounds muted, take a look at your fingers. Check whether either of your fingers is touching the string. If it is, adjust your finger until you can hear the open string ring clearly.
Figure 4-6:
How your fingers look when playing the F chord.

Starting your first song: âLi'l Liza Jane'
When your uke is in tune, you have your chord shapes down and your strumming finger is primed (as described in the preceding two sections), the time is right to blast out your first tune. I'm going to show you how to put together the C and F chords into a
chord progression
(a series of chords played in sequence).
The first song is âLi'l Liza Jane', a traditional country song recently covered by The Hot Club of Cowtown and Alison Krauss. Like a lot of traditional songs, it has a very simple structure.
Figure 4-7 shows a simple chord chart for the verse. Just strum down once each time you see the chord above the word.
So you strum down on an F chord on the words
I
,
you
,
li'l
and so on.
 Play very slowly at first. I mean really slowly. Try for the pace of an elderly snail pushing a wheelbarrow. This advice goes for every piece you learn.
