Windows Server 2008 R2 Unleashed (238 page)
Read Windows Server 2008 R2 Unleashed Online
Authors: Noel Morimoto

1206
CHAPTER 29
System-Level Fault Tolerance (Clustering/Network Load Balancing)
FIGURE 29.11
Configuring a Services and Applications group’s failover threshold and failback
ptg
configuration.
NOTE
To reduce the chance of having a group failing back to a node during regular business
hours after a failure, configure the failback schedule to allow failback only during non-
peak times or after hours using settings similar to those made in Figure 29.11 based
on the organization’s work hours and backup schedule.
Testing Failover Clusters
After all the desired cluster nodes to the failover cluster are added and failover and fail-
back configuration options are set for each Services and Applications group, each group
should be verified for proper operation on each cluster node. For these tests to be
complete, failover and, when applicable, failback of cluster groups need to be tested. They
can be tested by simulating a cluster resource failure or by manually moving the Services
and Applications groups between nodes.
Testing Services and Applications Groups Using Manual Failover
To manually failover or move a Services and Applications group between failover cluster
nodes, perform the following steps:
1. Log on to one of the Windows Server 2008 R2 cluster nodes with an account with
administrator privileges over all nodes in the cluster.
2. Click Start, click All Programs, click Administrative Tools, and select Failover
Cluster Manager.
Deploying Failover Clusters
1207
3. When the Failover Cluster Manager console opens, if necessary type in the name of
the local cluster node to connect to the cluster.
4. In the tree pane, select the cluster name, expand it, and select Services and
Applications.
5. Expand Services and Applications and select the desired group. For this example, the
CLUSTERFS file server group will be used.
6. In the tasks pane, note the current owner of the group.
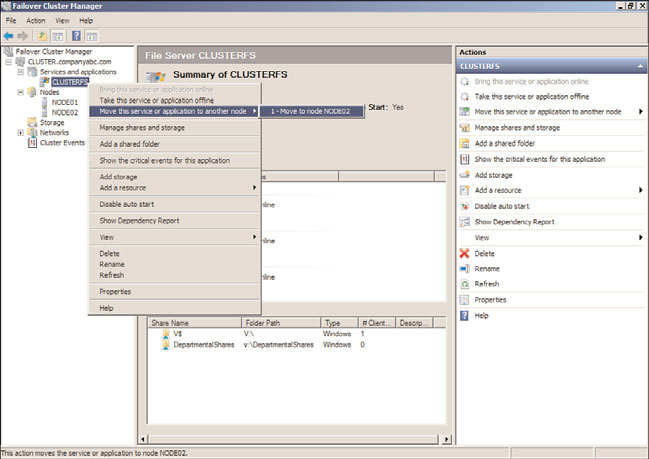
7. In the tree pane, right-click the desired group, select Move This Service or
Application to Another Node, and select any of the desired available nodes, as
shown in Figure 29.12, to move the group to NODE02. A confirmation dialog box
will open to confirm moving the group to the alternate node; confirm the move to
continue by pressing the Move CLUSTERFS to NODE02 button.
ptg
29
FIGURE 29.12
Moving a Services and Applications group to another available node.
8. The group will be moved to the chosen node and when the group is back online it
will be reflected as Status: Online in the tasks pane. Close the Failover Cluster
Manager console and log off of the server.
Simulating the Failure of a Cluster Resource
Simulating a cluster resource failure can be easily accomplished using the Failover Cluster
Manager console. Each resource has its own properties and simulating a failure usually
initiates the startup or restoration of the resource back to an online state. After the failure
threshold is reached, the Services and Applications group is taken offline, moved to
1208
CHAPTER 29
System-Level Fault Tolerance (Clustering/Network Load Balancing)
another available node, and brought back online. To simulate the failure of a cluster
resource and test the failover of a group, perform the following steps:
1. Log on to one of the Windows Server 2008 R2 cluster nodes with an account with
administrator privileges over all nodes in the cluster.
2. Click Start, click All Programs, click Administrative Tools, and select Failover
Cluster Manager.
3. When the Failover Cluster Manager console opens, if necessary type in the name of
the local cluster node to connect to the cluster.
4. In the tree pane, select the cluster name, expand it, and select Services and
Applications.
5. Expand Services and Applications and select the desired group. For this example, the
CLUSTERFS file server group will be used.
6. In the tasks pane, scroll down to locate the File Server cluster resource.
7. Right-click the File Server resource, and select Properties.
8. On the File Server Property page, select the Policies tab and review the resource
failure configuration. The default configuration allows for one service restart after
failure within a period of 15 minutes. If a second failure occurs within the threshold
of 15 minutes, the entire group is taken offline, moved to an alternate node, and
ptg
brought back online. This is controlled by checking the If Restart Is Unsuccessful,
Fail Over All Resources in This Service or Application check box.
9. Close the File Server Property pages.
10. Back in the tasks pane of the Failover Cluster Manager console, right-click the File
Server resource, select More Actions, and click Simulate Failure of This Resource, as
shown in Figure 29.13. The resource will be failed and the cluster will attempt to
automatically restart the File Server resource.
11. When the simulation is started, a confirmation is required; click the appropriate
button to allow for the resource failure simulation to be processed.
12. After the File Server resource is automatically restarted, perform the resource failure
simulation again within 15 minutes. This time, the entire group is taken offline and
moved to the other node where it will be brought back online.
13. When the simulation is started, a confirmation is required; click the appropriate
button to allow for the resource failure simulation to be processed.
14. If necessary, scroll up in the tasks pane to verify that the group has been moved to
the alternate cluster node.
15. Close the Failover Cluster Manager console and log off of the server.
Failover Cluster Maintenance
Services and applications are deployed on failover clusters based on the fact that they are
critical to business operations. The reliability of each cluster node is very important and
making any changes to the software or hardware configuration of each node can compro-

Deploying Failover Clusters
1209
FIGURE 29.13
Simulating a failure of the File Server cluster resource.
ptg
mise this reliability. Before any changes are implemented on a production failover cluster,
a few premaintenance tasks should be performed.
Premaintenance Tasks
Before maintenance is run on a cluster node or the entire failover cluster, several tasks
should be completed. To prepare a cluster node for maintenance, do the following:
1. Whether you’re planning a software or hardware upgrade, research to see whether
the changes will be supported on Windows Server 2008 R2 failover clusters.
2. Log on to one of the Windows Server 2008 R2 cluster nodes with an account with
administrator privileges over all nodes in the cluster.
3. Click Start, click All Programs, click Administrative Tools, and select Failover
Cluster Manager.
29
4. When the Failover Cluster Manager console opens, if necessary type in the name of
the local cluster node to connect to the cluster.
5. In the tree pane, select the cluster name, and in the tree pane, note the Current Host
Server. If the Current Host Server is the node that will be taken offline for mainte-
nance, the cluster will be automatically moved to an alternate node if the mainte-
nance node is rebooted.
6. In the tree pane, select and expand Services and Applications to reveal each of the
groups.
7. Select each group and in the tasks pane, note which node is the Current Owner of the
move. Manually move each group to the node that will remain online if any of the
groups are currently running on the node that will be taken offline for maintenance.
1210
CHAPTER 29
System-Level Fault Tolerance (Clustering/Network Load Balancing)
8. After all the groups are moved to a node that will remain online, in the tree pane,
expand Nodes to reveal all of the nodes in the failover cluster.
9. Locate the node that will be taken offline for maintenance, right-click the node, and
select Pause.
10. When the node is paused, resources cannot failover and come online and the system
can have the software and/or hardware configuration or updates applied and, if
necessary, rebooted.
11. After the maintenance tasks are completed, the node can be configured to be active
in the failover cluster by right-clicking the node in the Failover Cluster Manager
console and selecting Resume.
12. When the node resumes operation, if necessary, move the groups to this node and
perform the maintenance tasks on the remaining nodes in the cluster.
13. When the maintenance tasks have been completed on all of the failover cluster
nodes, close the Failover Cluster Manager console and log off of the server.
Removing Nodes from a Failover Cluster
Cluster nodes can be removed from a cluster for a number of reasons, and this process can
be accomplished quite easily.
ptg
NOTE
If you’re removing nodes from a cluster that utilizes the Node Majority Quorum model,
be sure that a majority of the nodes remain available; otherwise, the cluster might be
shut down. If this is not possible, the Quorum model might need to be changed before
a node is removed from the failover cluster.
To remove a node from a failover cluster, perform the following steps:
1. Log on to one of the Windows Server 2008 R2 cluster nodes with an account with
administrator privileges over all nodes in the cluster.
2. Click Start, click All Programs, click Administrative Tools, and select Failover
Cluster Manager.
3. When the Failover Cluster Manager console opens, if necessary type in the name of
the local cluster node to connect to the cluster.
4. In the tree pane, select the cluster name, expand it, and select Nodes.
5. Expand Nodes to reveal all of the cluster nodes.
6. Right-click on the node that will be removed from the cluster, select More Actions,
and click Evict.
7. A confirmation window opens. Select the option to evict the desired node from the
cluster. After the process starts, if the cluster and/or any Services and Applications
groups are running on this node, they will be moved to a remaining node before
this node is removed from the cluster.
Backing Up and Restoring Failover Clusters
1211
8. After the node is removed, close the Failover Cluster Manager console and log off of
the server.
Cluster Migration and Upgrades
If an organization currently supports Windows Server 2003 clusters, the nodes in the
cluster cannot be upgraded to Windows Server 2008 R2 failover cluster nodes. This is
mainly because the requirements of Windows Server 2003 server clusters and Windows
Server 2008 R2 failover clusters are very different. Even hardware requirements between
Windows Server 2008 and Windows Server 2008 R2 are different in terms of what actual
configurations have been tested and are certified for failover clusters on each operating
system version. Windows Server 2008 R2 does provide a tool that can be used to collect
data and migrate built-in Windows services between Windows Server 2003 server clusters
or other Windows Server 2008 or Windows Server 2008 R2 failover clusters to a destina-
tion Windows Server 2008 R2 failover cluster. For more information on migrating