Windows Server 2008 R2 Unleashed (94 page)
Read Windows Server 2008 R2 Unleashed Online
Authors: Noel Morimoto

ptg
wrong hands, the PIN would still need to be used to properly access the system. Smart
cards are fast becoming a more accepted way to integrate the security of certificates and
PKI into organizations.
Using the Encrypting File System (EFS)
Just as transport information can be encrypted via certificates and PKI, so too can the NT
File System (NTFS) on Windows Server 2008 R2 be encrypted to prevent unauthorized
access. The Encrypting File System (EFS) option in Windows Server 2008 R2 allows for this
type of functionality and improves on the previous EFS model by allowing offline folders
to maintain encryption sets on the server. EFS is advantageous, particularly for laptop
users who tote around sensitive information. If the laptop or hard drive is stolen, the file
information is worthless because it is scrambled and can be unscrambled only with the
proper key. EFS is proving to be an important part of PKI implementations.
Windows 7 and/or Windows Vista BitLocker go one step further than EFS, allowing for the
entire hard drive, aside from a few boot files, to be encrypted. This also requires PKI
certificates to be set up.
Integrating PKI with Non-Microsoft Kerberos Realms
Windows Server 2008 R2’s Active Directory component can use the Public Key
Infrastructure, which utilizes trusts between foreign non-Microsoft Kerberos realms and
Active Directory. The PKI serves as the authentication mechanism for security requests
across the cross-realm trusts that can be created in Active Directory.
Active Directory Rights Management Services
451
Active Directory Rights Management Services
Active Directory Rights Management Services (AD RMS) is a Digital Rights Management
(DRM) technology that allows for restrictions to be placed on how content is managed,
transmitted, and viewed. RMS uses PKI technology to encrypt content such as documents
and email messages, and only allows access to view said content if restrictions are placed on
the content, such as disabling the ability to print, cut/paste, and/or forward information.
AD RMS in Windows Server 2008 R2 is the next iteration of the Windows Rights
Management Server technology that has been developed over a period of several years. In
addition to retaining existing functionality, it adds tighter integration with Active
Directory Domain Services (AD DS) and greater scalability.
Understanding the Need for AD RMS
14
Many organizations are faced with the problem of defining how their intellectual property
can be managed after it has been distributed. Several high-profile leaks of sensitive inter-
nal emails from major corporations have exposed the need to manage and restrict how
email that contains sensitive corporate information is disseminated.
The problem stems from the fact that computer systems have historically been good at
restricting information to unauthorized individuals, but as soon as an authorized individ-
ptg
ual gains access to that data, those organizations have traditionally lost control over what
is done with the content. Authorized individuals have copied documents offsite, emailed
sensitive information, had their laptops stolen, and have found a myriad of other ways to
lose control of an organization’s confidential information.
Active Directory RMS was designed to give the control back to an organization. It allows
enforcement personnel the ability to restrict how a document is transmitted, printed,
copied, or when it expires. Integration with Active Directory Domain Services allows the
content to be only decrypted by individuals stipulated in the policies as well.
NOTE
Changes to RMS-protected documents are not reflected unless the document itself is
“republished” and the client does not have the use license cached in conjunction with
a local copy of the RMS-protected document. If the original use license has not expired,
users will continue to have access to protected documents that have either not been
republished or have been moved from the location of the newly published document.
AD RMS also includes a role service known as Identity Federation. Installing this service
allows an organization to share rights-protected content with other organizations.
Understanding AD RMS Prerequisites
Before installing AD RMS, the following prerequisites must be satisfied:
. Create a service account for RMS within AD DS. The service account must be differ-
ent from the account that is used to install RMS.
452
CHAPTER 14
Transport-Level Security
. The AD RMS server must be a domain member within the domain of the user
accounts that will use the service.
. An AD RMS root cluster for certification and licensing must be created.
. A fully qualified domain name resolvable from the locations where RMS files will be
consumed needs to be set up. For example, rms.companyabc.com can be set up for
clients to be able to connect to the AD RMS server to validate their RMS rights.
. A server running SQL Server must be available to store the AD RMS databases. It is
highly recommended to use an alternate server than the one where AD RMS is
installed.
Installing AD RMS
Installation of AD RMS can be performed using the Server Manager utility, by adding the
AD RMS role to the server. The process of adding the AD RMS role is as follows:
1. Open Server Manager (Start, All Programs, Administrative Tools, Server Manager).
2. In the Nodes pane, select Roles, and then click the Add Roles link in the tasks pane.
3. Click Next at the welcome page.
ptg
4. On the Select Server Roles page, check the box for Active Directory Rights
Management Services. If prompted to add additional services and features such as IIS
or the Message Queuing Service, choose to add the Required Role Services, and then
click Next to continue.
5. Review the Introduction page, and click Next to continue.
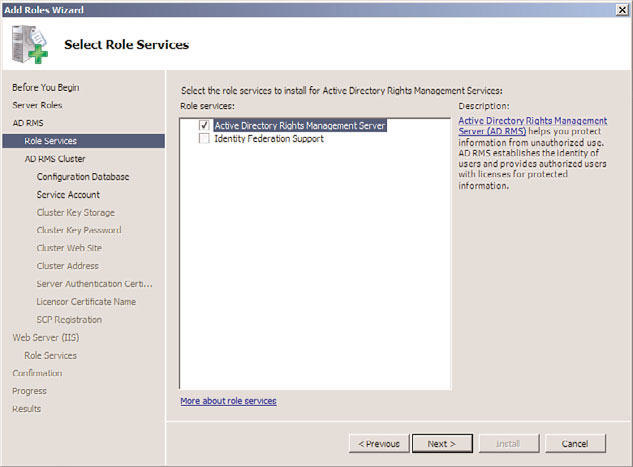
6. On the Select Role Services page, shown in Figure 14.5, select which components to
install. In this case, only the core AD RMS role service is installed. Click Next to
continue.
7. On the AD RMS Cluster page, choose to Create a New AD RMS Cluster, and click
Next to continue.
8. On the Select Configuration Database page, choose whether to install the limited
Windows Internal Database service (not recommended) or to create an RMS database
on a separate server running SQL Server 200x.
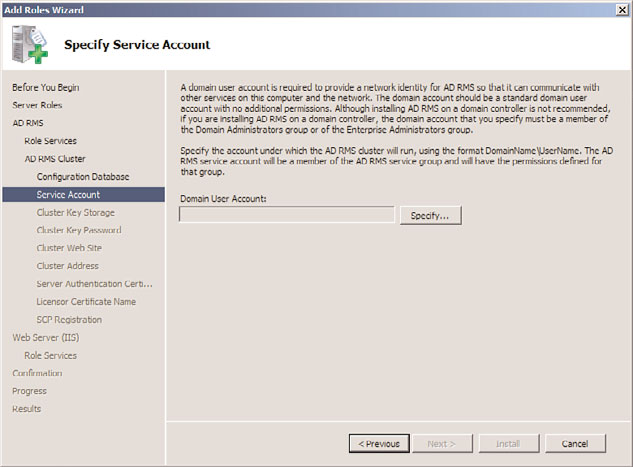
9. On the Specify Service Account page, shown in Figure 14.6, choose which service
account will be used for RMS by using the Specify button. It cannot be the same
account that is used to install AD RMS.
10. On the subsequent page, select Use AD RMS Centrally Managed Key Storage, and
click Next.
11. Enter a strong password when prompted, and click Next to continue.
12. Confirm which IIS website (Default Web Site for a dedicated build) will hold the AD
RMS web services, and click Next to continue.
13. Type the FQDN that will be used for the AD RMS service. For this example, enter
rms.companyabc.com, and then click the Validate button. The FQDN must already be
set up to resolve to the IP address of the IIS website on the RMS server. Click Next
to continue.
Active Directory Rights Management Services
453
14
FIGURE 14.5
Installing AD RMS.
ptg
FIGURE 14.6
Specifying the RMS Service Account.
454
CHAPTER 14
Transport-Level Security
NOTE
Using an SSL certificate for an HTTPS connection to the RMS server is recommended,
and can be enabled from this wizard.
14. If using SSL to protect the IIS website, select the certificate.
15. Enter a descriptive name for the RMS cluster, and click Next to continue.
16. On the AD RMS Service Connection Point Registration page, click Next to register
the Service Connection Point (SCP) in AD DS.
17. If installing IIS at the same time, accept the defaults for setup by clicking Next, and
then clicking Next again.
18. Click Install to finalize the installation wizard. It might take a while for the installa-
tion to complete.
19. Click Finish when the wizard is complete. Restart the server and log back on to com-
plete the install.
Using IPSec Encryption with Windows Server 2008 R2
ptg
IP Security (IPSec), mentioned briefly in previous sections, is essentially a mechanism for
establishing end-to-end encryption of all data packets sent between computers. IPSec oper-
ates at Layer 3 of the OSI model and subsequently uses encrypted packets for all traffic
between members.
IPSec is often considered to be one of the best ways to secure the traffic generated in an
environment, and is useful for securing servers and workstations both in high-risk
Internet access scenarios and also in private network configurations for an enhanced layer
of security.
Understanding the IPSec Principle
The basic principle of IPSec is this: All traffic between clients—whether initiated by appli-
cations, the operating system, services, and so on—is entirely encrypted by IPSec, which
then puts its own header on each packet and sends the packets to the destination server to
be decrypted. Because every piece of data is encrypted, this prevents electronic eavesdrop-
ping, or listening in on a network in an attempt to gain unauthorized access to data.
Several functional IPSec deployments are available, and some of the more promising ones
are actually built in to the network interface cards (NICs) of each computer, performing
encryption and decryption without the operating system knowing what is going on. Aside
from these alternatives, Windows Server 2008 R2 includes a robust IPSec implementation
by default, which can be configured to use a PKI certificate network.
Using IPSec Encryption with Windows Server 2008 R2
455
Detailing Key IPSec Functionality
IPSec in Windows Server 2008 R2 provides for the following key functionality that, when
combined, provides for one of the most secure solutions available for client/server
encryption:
.
Data privacy—
All information sent from one IPSec machine to another is thor-
oughly encrypted by such algorithms as 3DES, which effectively prevents the unau-
thorized viewing of sensitive data.
.
Data integrity—
The integrity of IPSec packets is enforced through ESP headers,
which verify that the information contained within an IPSec packet has not been
tampered with.
.
Anti-replay capability—
IPSec prevents streams of captured packets from being re-
sent, known as a “replay” attack, blocking such methods of obtaining unauthorized
14
access to a system by mimicking a valid user’s response to server requests.
.
Per-packet authenticity—
IPSec utilizes certificates or Kerberos authentication to
ensure that the sender of an IPSec packet is actually an authorized user.
.
NAT Traversal—
Windows Server 2008 R2’s implementation of IPSec now allows for
IPSec to be routed through current Network Address Translation (NAT) implementa-
ptg
tions, a concept that will be defined more thoroughly in the following sections.
.
Diffie-Hellman 2048-bit key support—
Virtually unbreakable Diffie-Hellman
2048-bit key lengths are supported in Windows Server 2008 R2’s IPSec implementa-