101 Excel 2013 Tips, Tricks and Timesavers (11 page)
Read 101 Excel 2013 Tips, Tricks and Timesavers Online
Authors: John Walkenbach

Figure 21-1:
Copying cell formatting by using the Format Painter.
Format Painter variations
In Step 1 in the preceding section, if you select a
range
of cells, you can paint another range by clicking a single cell. The formatting is copied to a range that’s the same size as the original selection.
In Step 2, if you
double-click
the Format Painter button, Excel remains in Format Painter mode until you cancel it. This enables you to copy the format to multiple ranges of cells. To get out of Format Painter mode, press Esc or click the Format Painter button again.
You can also use the Format Painter to remove all formatting from a range and return the range to its pristine state. Start by selecting an unformatted cell. Then click the Format Painter button and drag it over the range.
The Format Painter also works with complete rows and columns. If you start by selecting one or more complete rows, the Format Painter also copies row height. The same thing occurs with column widths if you start by selecting one or more columns.
This feature even works with complete worksheets. For example, if you want to remove all formatting from a worksheet, select an unformatted cell, click the Format Painter button, and then click the “select all” button at the intersection of the row and column borders.
You can also use the Format Painter with shapes and other objects such as pictures. Just select the object, click the Format Painter button, and click another object. Figure 21-2 shows an example of copying shape formats using the Format Painter.
 Although the Format Painter is versatile, it doesn’t work with charts.
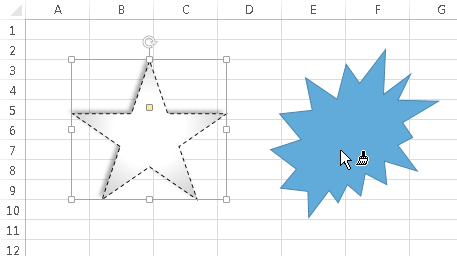
Figure 21-2:
Using the Format Painter to copy shape formatting.
Finally, the Format Painter is a handy tool, but it doesn’t perform any actions that can’t be done via other methods. For example, you can copy a range, select another range, and use the Home
➜
Clipboard⇒Paste⇒Formatting (R) command to paste the formatting only.
Tip 22: Inserting a Watermark
A
watermark
is an image (or text) that appears on a printed page. A watermark can be a faint company logo or a word, such as
DRAFT.
Excel doesn’t have an official command to print a watermark, but you can add a watermark by inserting a picture in the page header or footer. Here’s how to do it:
1.
Locate an image on your hard drive that you want to use for the watermark.
2.
Choose View⇒Workbook Views⇒Page Layout View to enter Page Layout view.
3.
Click the center section of the header.
4.
Choose Header & Footer Tools⇒Header & Footer Elements⇒Picture.
The Insert Picture dialog box appears.
5.
Click Browse and locate and select the image you picked in Step 1 (or locate a suitable image from other sources listed); then click Insert to insert the image.
6.
Click outside the header to see your image.
7.
To center the image vertically on the page, click the center section of the header and press Enter a few times before the &[Picture] code
.
You’ll need to experiment to determine the number of carriage returns required to push the image into the body of the document.
8.
If you need to adjust the image (for example, to make it lighter), click the center section of the header and then choose Header & Footer Tools⇒Header & Footer Elements⇒Format Picture; use the Image controls on the Picture tab of the Format Picture dialog box to adjust the image.
You may need to experiment with the settings to make sure that the worksheet text is legible.
Figure 22-1 shows an example of a header image (a copyright symbol) used as a watermark. You can create a similar effect with plain text in the header (for example, the word DRAFT).
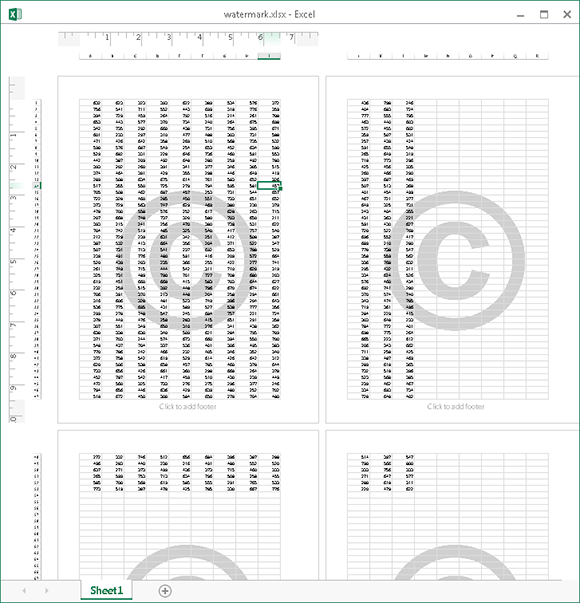
Figure 22-1:
Displaying a watermark on a page.
Tip 23: Showing Text and a Value in a Cell
If you need to display a number and text in a single cell, Excel gives you three options:
→ Concatenation
→ The TEXT function
→ A custom number format
Assume that cell A1 contains a value, and in a cell somewhere else in your worksheet, you want to display the text
Total:
along with that value. It looks something like this:
Total: 594.34
You could, of course, put the text
Total:
in the cell to the left. This section describes the three methods for accomplishing this task using a single cell.
Using concatenation
The following formula concatenates the text
Total:
with the value in cell A1:
=”Total: “&A1
This solution is the simplest, but it has a problem. The result of the formula is text, rather than a numeric value. Therefore, the cell cannot be used in a numeric formula. Also, the numeric portion will display with no formatting. For example, the formula might return
Total: 1594.34320933
Using the TEXT function
Another solution uses the TEXT function, which displays a value by using a specified number format:
=TEXT(A1,”””Total: “”$#,0.00”)
This formula returns something like this:
Total: $1,594.34
The second argument for the TEXT function is a number format string — the same type of string that you use when you create a custom number format. Because the number portion is formatted, this approach looks good. But besides being a bit unwieldy (because of the extra quotation marks), this formula suffers from the same problem mentioned in the previous section: The result is not numeric.
Using a custom number format
If you want to display text and a value — and still be able to use that value in a numeric formula — the solution is to use a custom number format.
To add text, just create the number format string as usual and put the text within quotation marks. For this example, the following custom number format does the job:
“Total: “$#,0.00
Even though the cell displays text, Excel still considers the cell contents to be a numeric value. Therefore, you can use this cell in other formulas that perform calculations.
Tip 24: Avoiding Font Substitution for Small Point Sizes
When you specify a font size smaller than eight points, you may notice that the numbers in a column no longer line up correctly. That’s because Excel uses a different (non-proportional) font for small text. Normally, each numeric character takes the same amount of horizontal space — that’s why numbers line up so nicely. But with a proportional font, numeric characters vary in width. The “1” character is more narrow than the “0” character, for example.
Figure 24-1 shows a worksheet with columns of numbers in varying font sizes. Notice that everything is fine until the point size is smaller than 8 points. In column E (7 points), the “1” character take up less space. In column F (6 points), the “5” and “7” characters also take up less space.
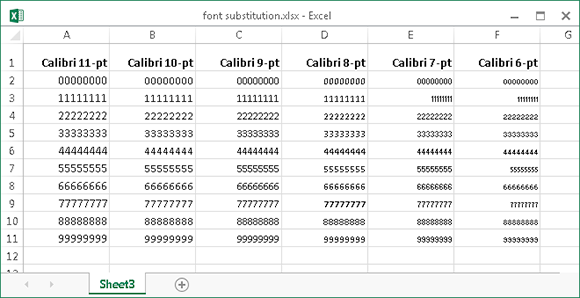
Figure 24-1:
Various font sizes, with font substitution enabled.
Font substitution also occurs when you zoom the worksheet, using the Zoom slider in the status bar. Sometimes zooming out causes values to appear as a series of hash marks (#####). The point at which the font is changed seems to vary, depending on the size of the original font. For the default 11-point font, zooming below 75% causes Excel to switch to a different font.
You can instruct Excel to stop this font substitution for small font sizes, but doing so requires editing the Windows registry.
Editing the registry can be dangerous if you don’t understand what you’re doing; always create a backup before you make any changes. If you’re not comfortable editing the registry, find someone who is — or just don’t implement this tip.
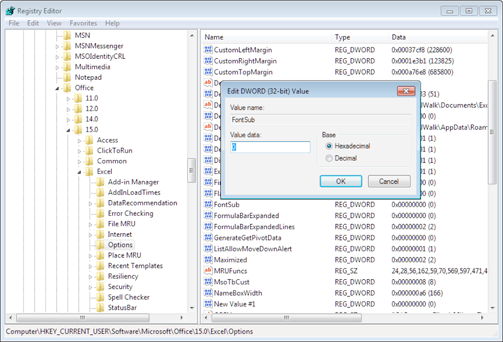
1.
Close Excel.
2.
Click the Windows Start button and run regedit.exe, the Registry Editor program.
3.
In the Registry Editor, navigate to this registry key:
HKEY_CURRENT_USER\Software\Microsoft\Office\15.0\Excel\Options
4.
With that registry key selected, choose Edit⇒New⇒DWORD.
The entry will be named New Value #1.
5.
Right-click the entry and choose Rename. Specify
FontSub
for the entry name.
6.
Double-click the FontSub entry.
The Edit DWORD dialog box appears.
7.
Specify 0 as the Value Data (the Base, Hexadecimal, or Decimal doesn’t matter), as shown in Figure 24-2.
8.
Click OK to close the Edit DWORD dialog box.
9.
Choose File⇒Exit to quit Registry Editor.