Bread Machines For Dummies (16 page)
Read Bread Machines For Dummies Online
Authors: Glenna Vance,Tom Lacalamita

Figure 8-4: |  |
During the first few minutes in the oven, the final expansion of the dough takes place. Because yeast grows quickly when exposed to heat and humidity (which is exactly what happens during the first few minutes in the oven) the volume of the dough increases at an accelerated speed. This is called the
oven spring.
At this time, the loaf will often burst â the network of bread fibers will tear and give a shredded crust on one side of the loaf.
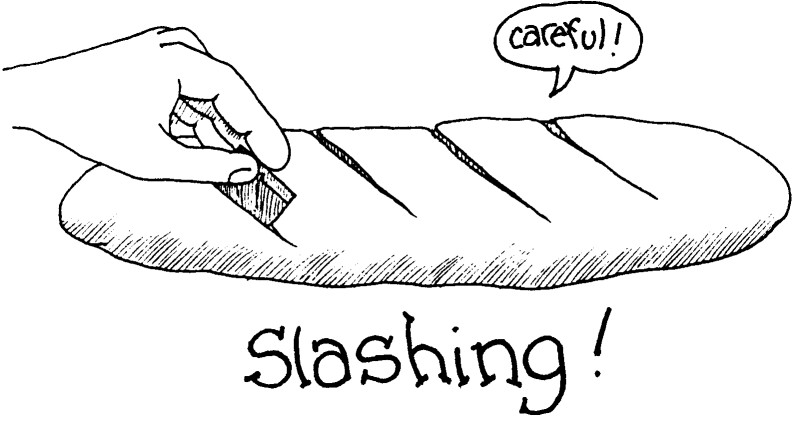
Slashing the top of the dough just before you place it in the oven will give an attractive appearance to the loaf and let you predict the spot where the loaf will expand. You can use this technique to create your own unique, visual style that you apply to all your breads. You could even use your initials, if you too. However, a little bit of know-how is needed.
 Use a very sharp knife or a razor blade.
 Cut at a very shallow angle so that you cut under the surface and not down into the loaf, as shown in Figure 8-5.
 For a long loaf, cut length-wise slashes.
 For a round loaf, cut cross-wise slashes.
Figure 8-5: |  |
What'll you have? Crispy, chewy crusts? Or soft and tender?
If it's soft and tender you like, use milk for the liquid in the recipe and brush the crusts with butter immediately after the bread is baked. (See Chapter 5 for more information on how liquids affect a bread.)
You want crispy and chewy? Here's the secret. Use water for the liquid in the bread dough. Then, after the dough has risen, and just before you're placing it in the hot oven, brush or spray the loaves with cold water. Let the bread bake a couple of minutes and take it out just long enough to brush it again with cold water. Repeat this two or three times during the first 10 minutes of baking.
How about a glossy look? Combine 1/4 cup water and 1/2 teaspoon cornstarch; bring to a boil and cool. Remove the loaves 5 minutes before the end of their baking-time and brush with the glaze you've created. Return the bread to the oven to finish baking.
For a shiny, golden crust, brush with an egg glaze before baking. To make the glaze, combine 1 slightly beaten egg with 1 tablespoon of milk or water.
Glazing a yeast bread adds a special touch. When you glaze, you can add flavor to compliment the flavor in the bread or color for eye appeal. Glazes are thin enough to drizzle over the tops of coffee cakes, rolls, or breads; frostings or icings are thicker, more creamy, and are spread on top of the baked product.
A basic glaze combines 1 cup of powdered sugar, 1 teaspoon of softened butter, and 1 to 2 tablespoons of hot water or milk. You can vary this recipe according to your taste and creativity by adding vanilla, almond extract, rum, brandy, maple flavoring, grated lemon or orange peel, or cocoa. You can also substitute the water or milk with fruit juice: lemon, orange, pineapple, or apple.
Egg glazes are great for making a shiny, golden crust. Combine 1 slightly beaten egg with 1 tablespoon of milk or water. See the sidebar “Making crust delicious and attractive” for other ways to change your crust.

Filling 1/2 of the eggshell with water is a quick way to measure the tablespoon of water needed for an egg glaze.

Doughs are brushed with an egg glaze after they've risen and when they're ready to pop in the oven. Brush with a soft pastry brush so as not to puncture the dough.

If you're making rolls, keep in mind that two ounces of dough makes a standard dinner roll. You should consider using a small kitchen scale as a practical method to divide the dough into equal size rolls. And when you break your dough into rolls, it's better to cut dough into pieces with a dough scraper or kitchen scissors than to tear off pieces. Keep these tips in mind:
 Three cups of flour makes approximately 12 dinner rolls.
 A soft dough produces the lightest, most tender rolls. When the dough is firm, it doesn't stretch as easily, so it will be a heavier dense roll.
 If you are having a problem working with the dough because it seems too sticky, use a little shortening or pan spray on your fingers to make the dough easy to shape.
 Prevent the dough from drying out while you're working with it by covering it with a piece of plastic. The plastic bags that you carry your groceries home in work wonderfully for covering dough. They keep the moisture in, and the dough doesn't stick to it.
Rolls come in all shapes and sizes. Here's how to form them:
 Round rolls and pan rolls:
Use an unfloured work surface. Cup your hand over the piece of dough and rotate in small circles, applying a little pressure with the motion, as shown in Figure 8-6. This is the most common method and forms beautiful, symmetrical balls of dough.
Some bakers like to roll the dough between their hand to form the ball while others use a pull and tuck method until the top of the ball is completely round and the bottom has the tucked dough.
 Cloverleaf rolls:
Divide each piece of dough into three equal parts and shape each into a round ball. Place the three balls in one muffin cup.
 Parker House rolls:
On a lightly floured surface, roll the dough out until it is 1/2-inch thick. Using a biscuit cutter, cut into circles. Brush with melted butter. Make an off-center crease in each circle, as shown in Figure 8-7. Fold the dough so that the top half overlaps slightly. Press edges together. Place 2 to 3 inches apart on greased cookie sheets.
 Crescent Rolls:
On a lightly floured surface, roll the dough into a 12-inch circle. Brush with butter. Cut into 12 wedges. Starting with the wide end of the wedge, roll dough toward the point, as shown in Figure 8-8. Place point down, 2 to 3 inches apart on greased cookie sheets; curve to form a crescent shape.
 Brioche:
After the dough has been divided into roll-size pieces, cut off 1/4 of the dough from each piece. Shape each large and small piece into balls. Place larger ball into a muffin pan cup or a small brioche mold. Make an indentation with your thumb in the top of the larger ball, wet the indentation with egg wash and place the smaller ball in the indentation.
 Knots:
After the dough has been divided into roll size pieces, on an unfloured surface, roll each piece into a 10-inch rope. Tie a loose knot in each rope of dough, stretching the rope gently, if needed.
 Swirls:
After the dough has been divided into roll size pieces, on an un-floured surface, roll each piece into a 10-inch rope. Loosely wrap each rope into a flat coil shape. Gently press the rope end into the side of the coil.
 Rosettes:
After the dough has been divided into roll size pieces, on an unfloured surface, roll each piece into a 12-inch rope. Tie a loose knot, stretching the rope gently, if needed, to leave two long ends. Tuck top end under roll. Bring bottom end up and tuck into center of roll.
