Bread Matters (7 page)
Authors: Andrew Whitley

One step at a time
Many people think that baking bread takes too long. It is true that to make a well-fermented loaf takes quite a while. But it doesn’t need to take much of
your
time – i.e. time that you may not have or feel you cannot spare. Breadmaking is a sequence of relatively short actions interspersed with periods of waiting. Here are the stages involved in making a simple loaf and the amount of time that each takes:
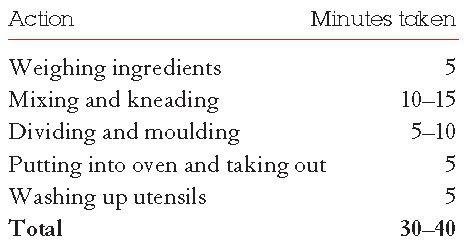
So all it takes is half an hour or so of your time. This can be spread over 4, 12 or 24 hours, depending on the method you use and the other demands on your time.
The important point is that a pressured lifestyle doesn’t have to entail rushed bread. Forget the claims of bread machines that promise a loaf in little more than an hour. If fermentation is involved, for reasons of nutrition and flavour that only the slow baker can appreciate, the longer the better.
The simple life
There is only a handful of basic breadmaking methods. Don’t be misled by books that boast prodigious numbers of recipes; many will be no more than small variations on a theme. Be inspired by new ideas by all means, but do not be intimidated by the apparent size of the task ahead. Baking is easy once you understand what is happening at the heart of it.
‘When there is a conscious sensuous pleasure in the work itself, it is done by artists,’ wrote William Morris
1
. ‘Artisans’ do not reject the appropriate use of machines but they decline to be dominated by them. They gain satisfaction from intimate contact with the materials of their trade and from direct involvement in the whole process from flour to baked loaf. The feel of soft, warm dough under the hands, the sight of an oven well set with loaves, the beguiling smell of baking bread, the satisfying sound of crackling crusts – all these can be yours when you make your own bread.
One of the reasons breadmaking is so satisfying is that it provides a balance between variation and repetition. The human body seems to need both the stimulation of different tasks and the mental relaxation produced by rhythmic repetition. Hand breadmaking has it all.
Breadmaking machines
I am often asked (in a ‘lighting the blue touch paper’ sort of spirit) what I think of domestic bread machines. There are certainly a lot of them in circulation – or gathering dust, perhaps. An insurance firm that commissions an annual survey of the least-used household gadgets reported in 2004 that 7.4 million people in the UK own a bread machine but never use it
2
. What a shame. They could make serious inroads into the eight million large loaves sold each day. And, believe it or not, apart from producing delicious bread with no additives, this might be better for the environment. A well-known miller has calculated that, taking into account the whole process from bakery to shop to consumer, factory bread uses more energy than bread made in a domestic machine. If this is so, it throws interesting light on the whole notion of industrial ‘efficiency’.
After some initial scepticism, I have realised that automatic breadmakers have introduced millions of people to the pleasure of home-made bread. And if at first all the control seems to be in the hands of the machine, users soon discover how to adjust the settings to achieve the results they want. I know one pillar of the wholefood establishment (he also owns a small bakery) who produces wonderful sourdough bread in his domestic breadmaker.
Many a bread journey has begun with one of these machines, a journey to discover how fermentation works and how time, taste and texture are connected. It is often a journey of liberation: as you understand more about the ingredients, you leave behind the programmed settings and risk the ‘sensuous pleasure’ of the process. In my experience, it is a journey that never really ends.
So let’s begin. You don’t need to acquire an expensive array of equipment before you start. But there are some essential tools – both mental and physical – that will be needed along the way. First and foremost, it helps to approach the task in the right frame of mind:
- Be patient
If nothing seems to be happening to your dough, it doesn’t mean that something won’t eventually happen. - Watch and learn
Notice what happens and when; don’t change more than one variable at a time. - Empathise
You are working with living organisms (yeasts and bacteria); do as you would be done by – keep them warm and nourished. - Take it easy
You are making bread to eat, not taking part in a competition, so don’t judge or be judged solely on appearances.
Tools and equipment
Bowls
I prefer stainless-steel or polypropylene bowls because they are lighter and won’t break. However, earthenware and glass are better insulators. Wood, too, keeps dough warm and is making a comeback as a food contact material after it was found to harbour fewer microbes than some of the synthetic alternatives.
Polythene bags
These have many uses, e.g. covering bowls of dough and rising loaves, because they retain moisture and prevent a skin forming on the surface of the dough. They can be washed and re-used, unlike the ghastly ‘oiled cling film’.
Scales
The best kind to get are electronic ones with a ‘tare’ facility (which resets the display to zero) and ideally with 1 gram or 2 gram steps. Otherwise, balance scales are fine, but you will have to rely on teaspoons and fractions thereof for small quantities of spice, dried yeast or salt, which is bound to be a bit risky until you are confident enough to judge these things by eye.
Measuring jugs
I use jugs (either glass or polypropylene) more for pouring than for measuring because they are never very accurate. Since one millilitre of water conveniently weighs one gram, it is easier to weigh liquids than to measure them, particularly for small amounts. This is where the electronic scales come into their own. Just zero the display and weigh your liquid on top of the other ingredients.
Thermometer
A thermometer is useful for checking liquid and dough temperatures until you can judge them by hand. The best is a digital probe – a stainless-steel rod that you can poke into dough or dip into liquids. It should have a read-out with a temperature range of -20°C to +150°C or thereabouts.
Worktop
Wood is the warmest surface and therefore kindest to typical bread doughs, but it can take more effort to clean if the dough gets into the grain. Laminated worktops are fine, though possibly less able to resist scratching from scrapers. Marble and stone, being naturally cold, are best for pastry and croissants.
Scraper
A plastic scraper is one of the most useful tools to have around. It can be used for dividing dough, folding and stretching wet Italian doughs, getting dough off your hands, cleaning the worktop and so on. Bakers also use the ‘Scotch’ scraper, which is a stainless-steel rectangle with a wooden or plastic handle. If you use only one, get a flexible plastic scraper with two slightly rounded corners, which make cleaning bowls out much easier.
Knife
A sharp knife or razor blade is useful for marking or ‘slashing’ dough before baking. The blade needs to be very sharp and not serrated, otherwise it will drag on the dough and make an unsightly cut. A 10cm scalloped blade is best.
Baking tins
A good baking tin is a lasting friend. They come in various shapes, sizes and finishes. Although ‘small’
tins are supposed to hold llb (454g) of dough and ‘large’ tins 21b (900g), they vary in size considerably - and in any case, not all types of dough expand to the same extent. I find many domestic tins rather shallow and wide and the resulting loaves can be unflattering to look at. Unless you have particular requirements such as a desired size of slice, try to find tins that are tall, narrow and deep.
I would avoid older-type non-stick finishes because they eventually break up and can leave pieces embedded in the loaf crust. There are some new non-stick finishes based on silicone rubber that are effective. Best of all is a glass-like finish, which is baked on to the tin like stove enamel. This is very durable so long as you do not dig loaves out of the tin with a knife – but you shouldn’t need to because this finish is reliably non-stick. In general, the heavier the metal, the more evenly the heat will be conducted to the loaf inside and the less chance of the tin distorting in the heat of the oven.
Try to avoid washing baking tins, especially plain metal ones, because repeated greasing and baking can build up a natural sheen, which makes it less likely that dough will stick. If you do need to clean tins, wipe them with a soft, wet cloth and no detergent.
Baking trays
Try to get trays that exactly fit (either alone or two side by side) your oven shelf dimensions. Go for the thickest-gauge metal available. Thin steel or aluminium trays may be cheap but they have an annoying habit of buckling as they heat up, and the sudden movement can cause the collapse of rolls or loaves whose structure has not yet ‘set’.
Proving baskets and cloths
Proving dough in a basket or cloth is the traditional Continental way of handling dough destined to be baked on the sole (or bottom) of a brick oven, or that is too sloppy to prove as a freestanding loaf without flowing into a puddle. It is an example of adaptation to the quality of the gluten in local wheats, which tended to be soft and extensible rather than strong and elastic. Great lightness and a very open structure are possible with such dough, but only if it can be held in a reasonably coherent shape before being fixed by the heat of baking.
Proving baskets
Known as
pannetons
in French and
Brotformen
in German, these are commercially available but rather expensive. The French type consists of a wicker basket with a linen liner stitched inside. The German ones, most often associated with rye bread, are round or oblong and made from bent willow cane or wood pulp; they are not lined with fabric, so the dough takes on the ribbed profile of the basket. Both types of basket must be dusted with flour to prevent the dough sticking. They are not generally washed between uses and gradually acquire more of a non-stick character.
You can make your own proving basket using a piece of linen or thick, unbleached calico and a cheap wicker basket. Do not be tempted to use a tea towel unless it is made of fairly thick linen. It is important that the fabric has an open weave, so that air can penetrate to conduct moisture from the surface of the dough. For this reason, light cotton and muslin are not suitable. Nor is a plastic or steel bowl, because moisture from the warm dough will condense on the surface and make the dough stick to the fabric. In an attempt to save money, I once bought a load of plastic basins to make my own proving baskets when demand for the bakery’s French Country Bread began to rocket. I drilled dozens of holes in the basins to create an air flow to the dough, but it still tended to stick to the liner fabric. You may notice the same effect if you try to make a proving basket out of a plastic colander and a tea towel.
Cloths
Known as
couches
in French, linen cloths, well rubbed with flour, can be rucked up into channels to allow long loaves such as baguettes to prove. The channels are pushed fairly close to each other so that the dough pieces can only expand vertically. When ready, they are gently rolled on to a peel (see below), from which they are slid on to the oven sole. If using cloths, take care to make the channels tall enough to contain the dough: it can be frustrating if a piece of dough rises over the top of the channel and sticks to its neighbour.
Peels
A peel is a flat, shovel-like tool, usually on the end of a long shaft, used by bakers to slide risen dough pieces into the oven to bake directly on the bricks or tiles that form the ‘sole’, or bottom, of the baking chamber. A ‘slip’ is a long, narrow peel from which several small rolls or a baguette can be slid sideways on to the oven bottom. If you have some sort of ceramic baking surface in your oven (see below), you will need to improvise a peel, preferably with enough of a handle to ensure you do not burn your hands on the oven as you slide the bread in. A piece of stiff cardboard will do, though there is always a risk of it bending under the weight of a large, moist piece of dough. Some people use the removable flat metal base from a cake tin. Hardboard or plywood can be cut by anyone with basic skills into the characteristic spade-like shape. Quite a few companies now sell ‘pizza peels’, which work equally well for bread. Whatever you use, dust your peel with rice flour, maize (corn) meal or semolina to stop the dough sticking to it. These flours provide more ‘non-stick’ effect than ordinary wheat flour but if you don’t have any of them to hand use wholemeal wheat flour rather than white: the branny bits give a reasonably slippery surface.