Build Your Own ASP.NET 3.5 Website Using C# & VB (110 page)
Read Build Your Own ASP.NET 3.5 Website Using C# & VB Online
Authors: Cristian Darie,Zak Ruvalcaba,Wyatt Barnett
Tags: #C♯ (Computer program language), #Active server pages, #Programming Languages, #C#, #Web Page Design, #Computers, #Web site development, #internet programming, #General, #C? (Computer program language), #Internet, #Visual BASIC, #Microsoft Visual BASIC, #Application Development, #Microsoft .NET Framework

Conditional, which tells the panel to refresh only when it’s triggered.
Execute the page in your browser to check out the results. The new page shouldn’t
look appreciably different than the previous version, but it should display a few
new lines of text to indicate the rendering times of different parts of the page. If you
click on the page numbers or sorting controls in the GridView, you’ll notice that
Licensed to [email protected]

ASP.NET AJAX
645
the refresh lacks any of the flashing associated with a complete page refresh, and
it’s only the rendering time display for the GridView that changes.
Next, try to click on the
Select
LinkButton for one of the employees. Shockingly,
nothing happens! Remember that the
Select
button opens the employeeDetails
DetailsView control that’s now invisible. Now that each control is in a distinct
UpdatePanel, and the UpdatePanel controls have their respective UpdateMode set
to Conditional, a postback in one control—clicking
Select
, in this case—doesn’t let
ASP.NET AJAX know enough to refresh the other UpdatePanel control. We need
to use another element to make this happen: a trigger.
ASP.NET AJAX triggers come in two fashions: AsyncPostBackTriggers and
PostBackTriggers. The former trigger performs an asynchronous Ajax postback,
while the latter triggers a normal, full-page postback operation. In most cases you’d
want to use AsyncPostBackTriggers—after all, we
are
making Ajax applications!
Yet there are some cases in which you’ll need to use an explicit PostBackTrigger.
A common scenario is the uploading of files. For security reasons, ASP.NET AJAX
doesn’t handle file uploads—any posted file is ignored. But if you use a
PostBackTrigger on a control that triggers a file upload, the upload can be made
to work.
In order to make the page that contains multiple UpdatePanels work properly, we’re
going to have to add a few AsyncPostBackTrigger controls to our UpdatePanels.
Switch
AddressBook.aspx
to
Design
mode and select the AddressGridUpdatePanel
first. Spotting an UpdatePanel can be tricky at first—they’re invisible controls that
are difficult to see on the design canvas. The easiest way to find them is to select a
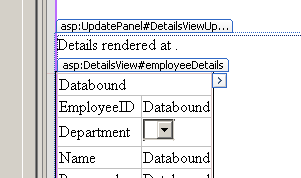
child control, so click on the employeeDetails DetailsView. From there, the label
for the containing UpdatePanel should appear as it does in
Figure 15.3.
Figure 15.3. Finding the UpdatePanel in
Design
view
Licensed to [email protected]
646
Build Your Own ASP.NET 3.5 Web Site Using C# & VB
Click on the label to select the UpdatePanel, then and look at the
Properties
window.
Edit the
Triggers
collection by selecting its entry in the
Properties
window and clicking on the
…
button that appears next to it. Add a new AsyncPostBackTrigger
by clicking on the
Add
button. Select
grid
for the
ControlID
field and select
SelectedIn-
dexChanged
for the
EventName
field. Click
OK
to add the trigger to your page, then save it and view it in your browser.
Once the page renders, try clicking the
Select
button on any row. Hey presto—the
DetailsView appears as it should! Look at the timestamps and you’ll see that both
the UpdatePanel controls now update, but the page itself isn’t being reloaded.
Not all of our problems are solved, though; in fact, we’ve created a new issue. Click
Edit
on an employee’s record, change the
City
field to
Beijing
, then click
Save
. The DetailsView updates correctly, but the GridView doesn’t register the update. If you
look at the timestamp, you’ll see that the GridView wasn’t refreshed when you
clicked
Save
. If you think we need another trigger, you’re quite correct. In fact, we’re going to need a few triggers to make this happen.
Switch back to Visual Web Developer and let’s add four AsyncPostBack triggers to
the AddressViewGridView using the
Properties
dialog as we did before. We’ll need
one trigger for each of the following events: ItemCreated, ItemDeleted, ItemInserted, and ItemUpdated. For each, choose
employeeDetails
for the
ControlID
. Next, select the employeeDetails GridView. Add one more trigger for the Click
event and choose
addEmployeeButton
for the
ControlID
.
If you switch to
Source
view, you’ll see the source code of your new triggers, which
looks like this:
Dorknozzle\VB\06_AddressBook.aspx
(excerpt)
UpdateMode="Conditional">
⋮
EventName="ItemCreated" />
EventName="ItemDeleted" />
Licensed to [email protected]
ASP.NET AJAX
647
EventName="ItemInserted" />
EventName="ItemUpdated" />
UpdateMode="Conditional">
⋮
EventName="SelectedIndexChanged" />
EventName="Click" />
Now, execute the page and edit an employee’s
City
field again. You’ll see the change
reflected in the GridView. Click the
Add Employee
LinkButton to create a new employee, and the new item will appear in the GridView. If you want to live dangerously, delete the new employee and note how the item disappears from the GridView. Finally, note that even with all these changes, the page itself has never been wholly
reloaded—that page’s timestamp should remain the same.
Now, you might ask “Why bother setting up all these triggers? If we just leave the
UpdateMode property of all the UpdatePanel controls set to the default value of Always, we’ll never have to deal with this.” Technically, that’s correct, but that idea’s not without its drawbacks. UpdatePanels can be quite expensive in terms of server
capacity. In order to properly maintain state, the controls must submit the entire
view state back to the server. The server must then process this mass of data and
push the content of all the UpdatePanel controls back to the browser. By only triggering the updates on the panels we wished to change in this example, we saved significant amounts of bandwidth per request.
Licensed to [email protected]
648
Build Your Own ASP.NET 3.5 Web Site Using C# & VB
The ASP.NET AJAX Control Toolkit
So far, we’ve explored the basic ASP.NET AJAX Server Controls—the ScriptManager,
the UpdatePanel, and the UpdateProgress controls. They’re very handy, but they
have no flair, and today’s users expect a little glitz in their web applications. With
the ASP.NET AJAX Control Toolkit, adding a touch of glamour to your ASP.NET
AJAX application becomes a simple matter of applying a few control extenders to
your page.
The ASP.NET AJAX Control Toolkit is a Microsoft-supported open source project.
It’s a good example of a very well-designed, well-tested control library that you can
include in any of your projects. Unlike many of the libraries you might wish to use
in the future, this one is totally free of charge. Check out the sample project at
http://www.asp.net/ajax/ajaxcontroltoolkit/samples/, play around with some of the
controls, and think about how we can spice up Dorknozzle a little. Pay special attention to the Animation and the ValidatorCallout—we’ll see these controls in action shortly.
In order to best use the Toolkit, we need to integrate it into Visual Web Developer
Express. The first step is to acquire the Toolkit itself. Visit the project’s home page
at http://www.codeplex.com/AjaxControlToolkit and click on the
Releases
tab. Select
the
AjaxControlToolkit-Framework3.5-NoSource.zip
file, download it, and extract it to
a temporary folder on your hard drive. In the extracted folders, open the
SampleWebSite\Bin
folder. You should see a number of localized language folders
and also a key file:
AjaxControlToolkit.dll
.
Grab the
AjaxControlToolkit.dll
file and stash it somewhere permanent so we can
reference it from Visual Web Developer to integrate it into the designer. I recommend
that you create a folder within your
My Documents
folder to handle this:
1. Click on
Start
, and then
Run
.
2. Type in
My Documents
.
3. Double-click on the
Visual Studio 2008
folder.
4. Create a new folder called
Add-Ins
.
5. In this new folder, create a folder called
Ajax Control Toolkit
.
Licensed to [email protected]
ASP.NET AJAX
649
6. Get the
AjaxControlToolkit.dll
from the location we established above, and copy it
to the
Ajax Control Toolkit
folder we just created.
7. In Visual Web Developer, expand the
Toolbox
, right-click on an empty area, and
choose
Add Tab
. Call the new tab
AJAX Control Toolkit
.
8. Right-click on the text in the empty tab and select
Choose Items…
.
9. Click
Browse
to add a new file, and then head to the location where you saved
the
AjaxControlToolkit.dll
file. Double-click on the file to select it.
10. You should see a few new, highlighted lines in the
Choose Toolbox Items
dialog
with the namespace value of AjaxControlToolkit. Click
OK
to continue.
11. Two dozen or so new items should load into your new toolbar tab, ranging from
Accordian all the way to ValidatorCalloutExtender.
The ValidatorCalloutExtender Control Extender
ASP.NET’s built-in validation controls are very effective, but they’re visually boring—especially when they’re compared to many modern web applications. The ASP.NET AJAX Control Toolkit has a solution: the ValidatorCalloutExtender.
This control extender takes the plain old ASP.NET validator controls we learned
about in
Chapter 6
and extends them. It adapts their rendering to take advantage of the tools ASP.NET AJAX provides to make them more user friendly and visually
appealing.
Once you have the toolkit set up, open
HelpDesk.aspx
, go into
Design
mode, and click on the red text message that reads,
You must enter station number
. This will select
the simple RequiredFieldValidator control and show a smart tag indicating that
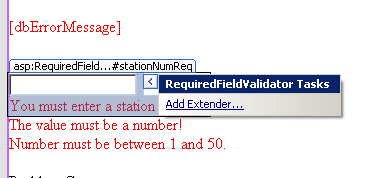
we can add something to it. Click on the smart tag and choose
Add Extender…
, as
shown in Figure 15.4
, to start the
Extender Wizard
. Select the ValidatorCallout and click
OK
. Repeat this process with three remaining validation controls on this page.
Licensed to [email protected]

