Building Web Sites All-in-One For Dummies® (36 page)
Read Building Web Sites All-in-One For Dummies® Online
Authors: Claudia Snell

In the case of HTML, Dreamweaver creates a document with an HTML file extension and that includes the document type, HTML tags, head tags, and body tags. It's all ready for you to begin creating your page.
Other options for the Blank Page files start off with just a comment at the top to identify what sort of page it is as well as the correct file extension to get you started. Although these files don't have any code in them, they do help you remember to save the file with the right extension. It's easy to make a mistake with all those files flying around. Whether to use them is really your preference. As a quick way to get going, you can use a Blank Template, a Page from Sample, or a Page from Template. The Page from Template option refers to templates you build yourself.
Page from Sample starter files
There are several types of starter files. Each type will give you some help getting started. Some offer just a little help, others are fully developed. Spend some time looking at the Sample Files. Open them and learn from them or use them in your own project. They can be a very useful tool.
CSS Style Sheet starter files
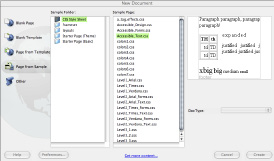
The CSS Style Sheet starter files, found in the Page from Sample area (see Figure 5-3), aren't complete CSS files, but they do include font treatments and basic color schemes to get your design started. Use these files to set the foundation styles, and then you can add your own custom styles to build your design.
Figure 5-3:
Choose the Basic: Arial option and Dream-weaver formats text on the page as Arial. So easy!

Frameset starter files
When you select the Frameset category, Dreamweaver sets up the initial files you need to create a frame-based Web site. (See Figure 5-4, under the Page from Sample section of the New Document dialog box.) Framesets are a little different from regular Web pages, and here's how. A regular HTML page has one Web page document. A
frameset
is one file that actually uses multiple HTML documents to create the whole page. The benefit of building a site this way is that you can have parts of your page stay the same while other pieces of the page change. For instance, you can put your navigation in the HTML document that loads into the left frame but launch different HTML documents in the right frame.
Figure 5-4:
Frameset layout choices.

_fmt.jpeg) Using frames has a downside, though. Search engines sometimes find only part of the page and launch it without the rest of the page, so visitors can get the main content frame but no navigation or banner area. Another problem with using frames is that they can reduce usability for some users because screen readers (an adaptive device or software that visually impaired visitors use to interact with computers) sometimes have trouble navigating frames. Framed layouts can also be a little more difficult to manage than straight HTML. For instance, linking to information within your site can present problems unless you take special care to direct the browser to load the new page into the right frames. Weigh the pros and cons before deciding to use frames in your design. Many designers don't use frames in their designs because of the associated cons.
Using frames has a downside, though. Search engines sometimes find only part of the page and launch it without the rest of the page, so visitors can get the main content frame but no navigation or banner area. Another problem with using frames is that they can reduce usability for some users because screen readers (an adaptive device or software that visually impaired visitors use to interact with computers) sometimes have trouble navigating frames. Framed layouts can also be a little more difficult to manage than straight HTML. For instance, linking to information within your site can present problems unless you take special care to direct the browser to load the new page into the right frames. Weigh the pros and cons before deciding to use frames in your design. Many designers don't use frames in their designs because of the associated cons.
Starter Page (Theme)
The Starter Page (Themes) category includes sets of files that work together. HTML and CSS are created when you use these options. With starter pages, you actually get an HTML file and a CSS file already set up to work together, with layouts already started. Some are fairly complete, but others are pretty simple (found under Starter Page [Basic]). The other starter files (discussed in the preceding sections) don't include the layouts. Find out how to build pages and sites with these prebuilt page designs in Book III, Chapter 6.
The Files panel
After you make your selections in the New Document dialog box and click the Create button, the dialog box closes and you see the following:
â¢
The Document window:
This is the work area where you design and code Web pages.
â¢
The panels on the right:
Choose from different workspace layouts, which you access by choosing WindowâWorkspace Layout. The panels to the right vary, as does the location of the panels, based on what Workspace Layout you choose. You can also customize and save your own Workspace Layout by simply positioning objects where you want them by choosing WindowâWorkspace LayoutâNew Layout and giving it a name.
For the examples in this book, we use the Designer Workspace Layout. By default, this workspace includes the Insert, CSS Styles, AP Elements, Files, and Assets panels to the right of the Document window. This workspace can also include other panels that you choose to open. Look under the Window menu for more panels and tools.
â¢
The Property inspector (at the bottom of the page):
This context-sensitive menu panel helps you work with images, text, and other parts of your page or code.
You use the Files panel for site management and organization. The Files panel is the list of all the files in your Dreamweaver site. We specify a
Dreamweaver
site because files will only show up in this window if you have set it up as described earlier in this chapter. You can open site files from the Files panel. You can work with the Files panel in either the Expanded view for site management or file uploading or in the Collapsed view while you work on individual pages. Upcoming Figure 5-6 shows the Collapsed view of the Files panel. Note how the site structure is also displayed.
Expanded view
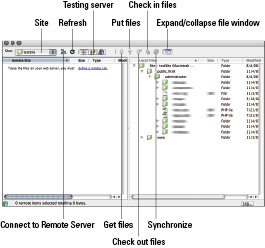
The Expanded view of the Files panel (shown in Figure 5-5) is divided into two main sections. On the left, you see (initially) an empty window. This will be populated with the list of files on your remote or testing server after you connect (more on that later). On the right is the list of your
local files
(the Web site files saved on your computer but not necessarily published to the Web).
Across the top of the Files panel (Expanded view), you see a menu and a series of buttons. From left to right, they are
Figure 5-5:
The Expanded view of the Files panel, showing remote and local files.

â¢
Site:
This drop-down menu is a list of the different sites you have set up. And, yes, you can set up multiple Web sites in Dreamweaver. Dreamweaver keeps track of each one separately. If you want to work on a different site, use the Site menu to select the site you want to work on. The files for that site will replace the current listing.
â¢
Connect to Remote Server/Disconnect from Remote Server:
Click this button to make a connection with your remote Web server. You have to do this before you can see a list of the files on that server and before you upload (or download) anything to it (or from it).
â¢
Refresh:
Clicking this button refreshes the file lists, both remote and local. This can take a few minutes if you have a very large site. Sometimes, you'll have better luck right-clicking just one folder within a site and choosing Refresh from the menu that appears. This method can be much faster.
â¢
View Site FTP Log:
Clicking this button shows the details of your last FTP transaction with the server. FTP (File Transfer Protocol) refers to a set of rules (a protocol) by which computers and servers can communicate, as long as the server is set up to accept FTP and the person trying to send things to the server via FTP has a valid FTP address, user name, and password (all provided to you by your host when you sign up for services). FTP transaction simply refers to sending or getting information via FTP.
Note:
HTTP (HyperText Transfer Protocol) is how servers and browsers communicate.
â¢
Remote Files, Testing Files, and Repository Files:
Use these three buttons to switch among the remote server, the testing server (if you're using one), and the file repository (used with Contribute/Version Control features).
⢠The
remote files
are those that are on your live Web server. These are the files that people see when they visit your site.
⢠The
testing server
is an optional secondary server location where you can test new functionality before incorporating it into your live site. Using a testing environment is strongly recommended to avoid having to publish unfinished work to a live site, risking that your visitors will see it.
⢠The
file repository
is another optional feature. It stores multiple versions of your Web documents. This enables you to roll back to a previous version if necessary. This can come in handy if you've inadvertently broken a page while editing. Simply roll back to a version that was not broken and retry your edits.
â¢
Get and Put:
These two buttons get (down arrow) files from the remote server or put (up arrow) files to the remote server (or testing/repository if you have those selected instead of the remote server). To
get
a file is to use FTP to retrieve a copy of a file from your Web server. To
put
a file is to publish (upload) it to the Web.
_fmt.jpeg) Put and Get overwrite existing files on the destination computer, so if you get the home page from the remote (or testing) server, you overwrite the copy on your local machine. When you put (publish) a page from your local machine to the remote (or testing) server, you overwrite the copy that is there. If you're trying to overwrite a newer copy with an older copy, Dreamweaver warns you that you're about to do that and gives you the option to cancel. This is one of the benefits of allowing Dreamweaver to manage your site because it keeps track of and compares the dates and times on your files.
Put and Get overwrite existing files on the destination computer, so if you get the home page from the remote (or testing) server, you overwrite the copy on your local machine. When you put (publish) a page from your local machine to the remote (or testing) server, you overwrite the copy that is there. If you're trying to overwrite a newer copy with an older copy, Dreamweaver warns you that you're about to do that and gives you the option to cancel. This is one of the benefits of allowing Dreamweaver to manage your site because it keeps track of and compares the dates and times on your files.
