Building Web Sites All-in-One For Dummies® (37 page)
Read Building Web Sites All-in-One For Dummies® Online
Authors: Claudia Snell

Both the Put and Get commands create the identical file structure, if it doesn't already exist. For instance, you add a new folder to your site on your local machine. When you publish the folder and new content, you don't need to create a place for it to go because Dreamweaver creates the new folder in exactly the right place on your remote server. The same thing goes when you download files from a site. The site structure is duplicated exactly. This ensures that your links work correctly and things are where you expect them to be. Pretty cool, huh?
â¢
Check Out and Check In:
Use these two buttons to manage workflow for a team. Members of the team
check out
files when they're going to work on them. That way, anyone else on the team who tries to open and work on the file at the same time is alerted that someone is already working on it. This prevents members of a team from overwriting each other's work. When done working on the file, the team member simply has to
check in
the file so that others can work on it.
 Using this built-in tool â or some other type of
source control
(also known as
version control
) â is very important so that multiple people simultaneously working on a site avoid overwriting each other's work.
â¢
Synchronize:
This function helps with site maintenance. Synchronize compares the files on your local machine with those on the remote server and lets you know which files are out of synch. You then have the option of putting (or getting) files to and from the server to synchronize your local and remote sites. This can be very helpful when you update several pages. Use Synchronize to find and upload the newly updated files. This ensures you won't accidentally forget a file when it's time to upload.
â¢
Expand/Collapse:
This button toggles between Expand the Panel and Collapse the Panel. It allows you to see both remote and local files when needed and then collapse the panel while you are working. This helps keep the on-screen clutter to a minimum.
Collapsed view
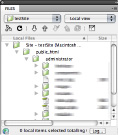
The same functionality that's available in Expanded view is also available in Collapsed view. (See Figure 5-6.) This view can be helpful if you just need to make a quick change to one file and upload it. The drop-down menu on the left is the Site Management menu; use it to select the site you want to work on. The menu on the right is the Site View menu; use it to choose the Local, Remote, Testing, or Site Map view. The same Connect/Disconnect, Refresh, Get, Put, Check Out, Check In, and Expand/Collapse buttons (explained in the preceding bulleted list) are available, too.
Figure 5-6:
The Collapsed view of the Files panel is handy for seeing and opening site files.

The buttons for Site Files, Testing Server, Site Map, and Synchronize are omitted from the Collapsed view to conserve space. These functions and several others are available via a drop-down menu in the upper-right corner of the panel or via the pop-up menu available through the button at the extreme upper-right corner of the panel. Look for an icon that looks like a tiny bulleted list. These show up in many panels, so be on the lookout.
Other options available through the Files panel include file and site management tools. In the far, upper-right corner is a button that looks like a tiny bulleted list. Click it, and a pop-up menu opens with options to work with files and folders in your site, group files for better organization, and change the view you're using in the Files panel. One of the most important options is the Site menu, which enables you to do the following:
â¢
Create or edit site settings.
Find out more about this in the “Creating a Web Site with Dreamweaver” section, later in this chapter.
â¢
Set up a site to work with Adobe Contribute.
Contribute
is content management/editing software. See Book VIII, Chapter 2 for information about using Contribute to maintain a Web site.
â¢
Turn on or off cloaking.
Cloaking
allows you to set some local files to not upload, which is a handy feature for working with files such as raw Flash files and Photoshop documents.
â¢
Run site reports.
Running reports enables you to check links and do other tests to make sure your site is working well.
â¢
Synchronize files.
You can ask Dreamweaver to compare the files on your local machine with those on the remote server (or the other way around) and give you a list of files that have been updated more recently. You can then choose to upload all files, or you can individually select files to be skipped and upload just the ones you'd like to publish. This is helpful when you make several edits to a site, and you want to make sure you publish all the new files to the server. It can be easy to forget which files you need to upload; Dreamweaver can help you with that.
The Document window
The Document window is where the file you're working on is displayed. There are different ways you can work with this window. The “best” way depends on what you're doing and what you're most comfortable with. In this section, we show you the three views you can choose (Code, Design, or Split) and describe some of the Document window's features.
Code view
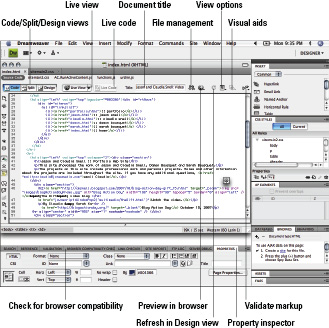
Code view (shown in Figure 5-7) is just a window with the HTML in it. No graphics or colors are displayed: just the underlying code of your page. This view is good if you're comfortable with hand-coding your pages or if you need to use as much space on your screen as possible to look at a larger block of code. The downside is that you can't see the end results of what you're coding without previewing in a browser or switching to a view that includes Design view.
Figure 5-7:
Code view in Dream-weaver shows you just the code.

Design view
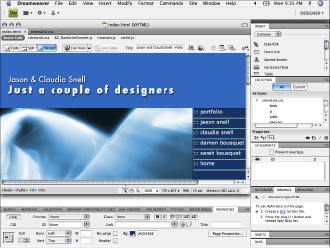
Design view is the opposite of the Code view. In Design view, you see only the visual aspects of your page (as shown in Figure 5-8). This can be helpful if you're not as comfortable with code or if you need to see more of your design for a moment. The downside to this mode is that you can't see what's happening with your code. Dreamweaver is a great tool but is no substitute for a person. Sometimes, edits that you make in the Design view can produce issues in the code, such as
empty tags
(tags that are left behind after the content in them has been removed). Check over your code with a validator (covered later in this chapter) before you go live with the page. A
code validator
is a test that you can run on a page's code to make sure it's written properly. The test results alert you to any issues so that you can fix them.
Figure 5-8:
Design view shows the visual appearance of the page.

Split view
Split view mode is really the best of both worlds. You get Code view at the top of the screen and Design view at the bottom. In Split view, you can hand-code
or
make edits in the design window. It allows you to see the effects of your edits right away, whether you make them in the Code portion of the view or in the Design portion of the view. When it's necessary to update the Design portion of the view, a Refresh button appears in the Property inspector. (We cover the Property inspector later in this chapter.)
Additional code-viewing helpers
At the top of the Document window, near the Code View, Split View, and Design View buttons, are some additional buttons: Live View and Live Code. You'll also find Source Code and the names of all the linked script and CSS files that you used in the document.
Live View gives you a preview of what your page will look like in a browser, directly in Dreamweaver. You can use this quick and handy tool when you'd rather just get a look at the page without using the Browser Preview button. Live View also lets you turn off JavaScript or plug-ins to see what your page looks like when visitors without those functions load your page.
Live Code highlights all the Live View source code. The highlighting is visible in Split and Code view modes.
Source Code shows a list of the linked CSS and script files. If you'd like to review the code in any of those files, click the name of the file in that list. It will be displayed in your workspace. This saves you from needing to have several files open while working. To return to the Web page code, click Source Code.
Document title
At the top of the Document window is the Title field. It's important to give each document a proper title. Remember that the page title shows in browsers and in search engines, so make sure you give your page a title that makes sense. You can add a title by typing
in the head of the document. See Book III, Chapter 2 for more information about HTML. Dreamweaver automatically adds the title tags in the correct place if you create your HTML documents via the New Document dialog box. Simply replace the default
Untitled Document
with the title of your choice. (And now, you know why so many pages seem to be titled
Untitled Document
out there.)
Check and validate code
The Document window toolbar offers code-validating and -checking functionalities. Code
validators
and
checkers
are quick tests that you can run to make sure your page is going to work well for your visitors. Clicking the Check Page button enables you to deal with checking for browser errors and support; clicking the Validate Markup button allows you to check the code for errors and see where the errors are.
 Using checkers and validators is a good habit to develop. You can set up these tests to look for different things, such as problems with different types of browsers or different versions of HTML and CSS. Decide what versions of browsers or code you will support, based on your site's purpose and the target audience. Try to find out as much as possible about the types of technologies that work best for your audience, and then develop your site to work with those technologies.
