Daily Life in Elizabethan England (29 page)
Read Daily Life in Elizabethan England Online
Authors: Jeffrey L. Forgeng

ers made in the latter part of Elizabeth’s reign often had elaborately swept hilts to protect to the hand. The rapier was an Italian innovation; it contrasted with the more traditional English sword in that it was longer and thinner (although not much lighter), being designed for thrusting with the point whereas the sword relied more on blows with the edge. The rapier often came with a matching dagger, easily distinguishable from a civilian knife by its larger size and its crossguard. A dagger might also be worn by itself. Such weapons could be of actual use in a society where street fights and brawls were known to break out in broad daylight, but for gentlemen they served primarily as an expression of social status and were likely to be highly ornate.
Miscellaneous Accessories
Hand wear ranged from functional, heavy work gloves or mittens used by laborers to the heavily embroidered and perfumed gloves with tassels and gold beads worn by noble ladies. Gloves were particularly fashionable among the aristocracy, who were rarely without them. Both gloves and mittens tended to have long flaring cuffs.
Working women commonly wore long aprons made of linen, and fashionable women had aprons made of rich fabrics. Tradesmen also wore short aprons, and blacksmiths had leather ones. Handkerchiefs were used in this period; among the wealthy, they might be richly adorned. Travelers often wore canvas or leather satchels, and perhaps a small wooden cask or leather bottle for drink slung over the shoulder. Fashionable ladies owned fans, which had long, straight handles, and were often made of ostrich feathers. In 1590 folding fans were introduced as the latest fashion acces-sory from France. Mirrors were sometimes suspended from the belt, even by women of fairly ordinary station.
Spectacles of the pince-nez type were used in Elizabeth’s day, although they were only for close-up activities like reading—they were fitted with magnifying lenses like modern reading glasses. Sometimes they were made more secure by strings that passed around each ear.
Men and women alike wore jewelry, including rings, earrings, bracelets, necklaces, and pendants. Miniatures (small portraits set in a frame) were fashionable, as were watches, usually suspended on a chain around the neck or incorporated into other pieces of jewelry.
Cosmetics were widely used among fashionable women, and sometimes
even by men. The favored look for women called for a very pale face, often with a touch of red in the cheeks and perhaps a tinting of the eyelids. The makeup used to achieve the fashionable whiteness was rather toxic, being based on lead oxide. Fashionable men and women also used perfumes.
Bathing may have been rare, but grooming was frequent, at least among those who aspired to social respectability. Children were taught to clean their nails and comb their hair every morning. Combs were made of ivory,
142
Daily Life in Elizabethan England
horn, or wood and had two sides: one broad-toothed for preliminary combing of tangled hair, the other fine-toothed for combing out smaller knots once the larger tangles were removed. Brushes were usually reserved for cleaning clothes. The very fastidious even owned
ear-spoons,
small ivory tools for getting rid of earwax. People of high social standing often carried small grooming kits in
comb cases.
Mirrors, or
looking glasses,
were used in wealthy households, but were still a relative luxury; they could be made of glass with a metallic backing, or of polished steel. Most people rarely saw their own faces.
CLOTHING PATTERNS
The instructions on the following pages will enable you to create a complete Elizabethan outfit, male or female, in a style appropriate to the latter part of Elizabeth’s reign. All the patterns are based as far as possible on surviving originals. Of course, this approach has some disadvantages. The survival of original pieces has been haphazard, and surviving pieces are not always well documented in published sources. To make things even harder, it is generally the unusual examples that have survived. Nonetheless, the patterns here will allow you to make an ordinary Elizabethan outfit with a degree of historical accuracy that is very rare in practical costuming books.
The instructions here presuppose a basic knowledge of sewing. You may want to consult an experienced seamster for additional help. Another useful source is
Singer Sewing Step-by-Step
(Minnetonka, MN: Cy de Cosse, 1990), which has brilliant instructions and illustrations to assist the home sewer.
The first step in successful costuming is making the right choice of fabrics. The instructions here suggest the fabrics from which the garments were most likely to be made. Even if you do not choose to use linen or wool, you can still use them as a guide in choosing an alternative fabric.
You might also wish to line and/or interline overgarments. Lining would normally be of linen, interlining of heavy linen, canvas, or buckram, depending on the desired stiffness. Most garments made of wool could also have been made of linen or canvas.
Unless specified otherwise, the patterns do not include a seam allowance: remember to add an extra ½” around the edges. Be sure to press seams as you sew them.
With any of the more complex patterns, it can be helpful to make a mock-up, or fitting, of cheap material first—muslin is ideal for this purpose. You can make the necessary adjustments to this fitting, and proceed to the real fabric when you are satisfied with the fit.
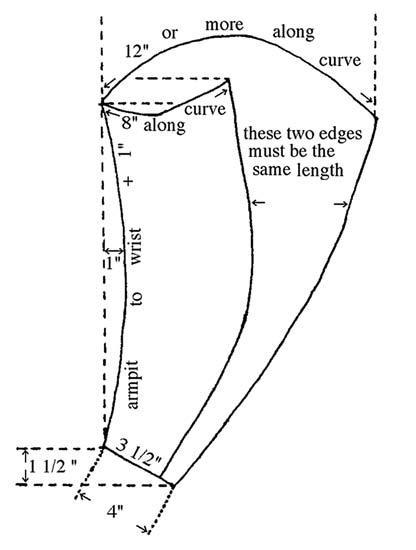
Smock
This pattern is based on a Swedish man’s shirt of the late 1560s, but it is intended here as one of the easiest styles of women’s shirts to reproduce.1
Clothing and Accoutrements
143
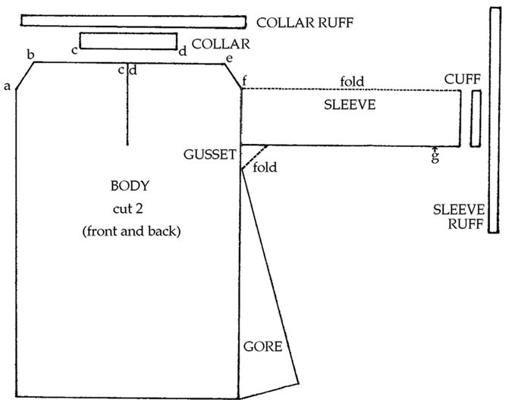
Pattern for a smock. The right side is as the left. [Hadfield/Forgeng]
The pattern has been altered by the addition of side-gores. This smock should require 3½ yds. of white linen; the ruffs might be of finer linen.
The exact measurements will depend on the wearer. The collar (
c-d
) should be about 2” longer than your neck size (including seam allowance).
The distance from the ends of the neck to the edge of the fabric (
a-b
and
e-f
) should be a bit longer than your shoulders. The length of the sleeve should equal the distance from your shoulder to your first knuckles, measured around your bent elbow. Adjust the overall length if desired—the smock should be fairly long, between knee-length and ankle-length. The neckline slash on the body is cut only on the front piece. Cut one each of the collar and collar ruff; two each of the body, gusset, sleeve, cuff, and sleeve ruff; and four of the gore.
Hem back the top and sides of the collar ruff. Hem back the side edges of the collar. Gather the collar ruff to the top of the collar (right sides together) and stitch in place. Press the seam allowances toward the collar so that the ruff stands up.
Hem back the front slit on the body front, and take in a small dart at the base of the slit. Sew the side gores to the body. Sew the body front to the body back at
a-b
and
e-f
(right sides together). Gather the top opening
144
Daily Life in Elizabethan England
of the body (
c-b-e-d
) into the bottom of the collar (right sides together), matching
c
and
d
on the body to
c
and
d
on the collar. Stitch.
Treat the sleeve ruffs and cuffs as with the collar ruff and collar. Hem back the sleeve from
g
to the cuff edge. Gather the sleeve into the sleeve cuff (right sides together) and stitch. Stitch up the bottom edge of the sleeve from
g
to the beginning of the gusset, and stitch the gusset to the sleeve. Stitch the sleeve/gusset piece to the body. (For a more complete description of the gusset, see the pattern for the man’s shirt below.) Sew the outside edge of the side gores on each side together. Hem the bottom edge and add ties at the base of the cuff and collar.
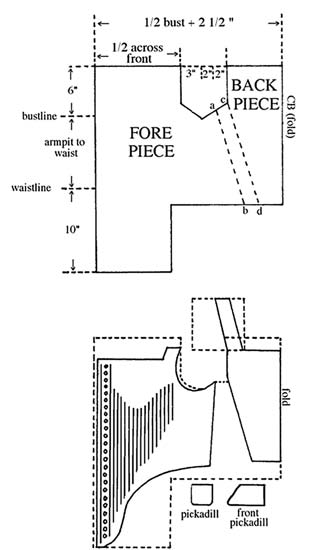
Bodice
This design is based on a late-16th-century noblewoman’s bodice.2 A sleeveless bodice should require about 1 yd. of wool for the outer shell, 1
yd. of linen for a lining, and 1 yd. of canvas or buckram for an interlining.
Add another 1 yd. of wool if you want sleeves (plus as much again for lining, if you want it).
The first step is to generate a pattern. Take a piece of denim-weight cloth and wrap your torso from armpit to hips, lifting your bust (it may help to wear a bra while doing this). Pin yourself in snugly, especially at bust and waist. Take the following measurements: —Bust
—Waist
—Armpit to Waist
—Across Front (armpit to armpit)
Fold your fabric as shown and pin it in place. Rough-cut your pieces as shown—remember to allow ½” seam allowance. Note that the total measurement of the bottom of the back piece at the waistline (from point
d
to point
d
on the other side) is ⅕ of your waist measurement.
Cut the fore pieces from the back piece along a line midway between lines
a-b
and
c-d
. You will now have two fore pieces and one folded back piece. Pin line
a-b
to line
c-d
, and do the same with the other fore piece and the other side of the back piece. Remove all other pins, wrap the bodice around your torso, and pin the fore pieces together along CF line. Make sure each time you don the garment that you line up the waistline to your own waist.
Insert a new pin at CF waist to make the waist fit tightly. Measure the distance from the original CF waist pin to the new one, then remove this pin. Remove the bodice, and shift point
b
on each fore piece forward by this distance, so as to take in this amount at the side opening. On both sides, redraw the new line
a-b
and pin the new
a-b
to
c-d
.
Clothing and Accoutrements
145
Pattern for a bodice. [Hadfield/Forgeng]
Put the bodice on again. Redraw the armholes to fit your arms—they angle slightly from bottom front to upper back. Draw your neckline in front and back, and the bottom edge of your bodice as shown. Unpin CF
and remove. Adjust your armholes, neckline, and bottom edge as needed to make them symmetrical. (The shaded area indicates the location of boning on the original—you can make this garment with boning if you choose.) To design the shoulder straps, cut an 11x11” piece and pin it to the back piece as shown. Put the bodice on, then pin the shoulder piece to the front.
Mark the desired shape for this strap—the outside edge should run along the edge of your shoulder.
At this point you have your patterns—you may want to make a paper
copy in case you make another bodice in the future.
You can now cut your fabric. For the bodice, you will want a total of two fore pieces and one back piece cut of wool for the outer layer, two fore pieces and one back piece of linen for the lining, and two fore pieces and one back piece of canvas or buckram for the interlining (if you use boning, it will go between the lining and interlining). For the shoulder straps, you will want two straps of the wool, two of the lining, and two of the interlining. Remember to allow ½” for seams all around.