Everyday Play (7 page)
Authors: Christy Isbell

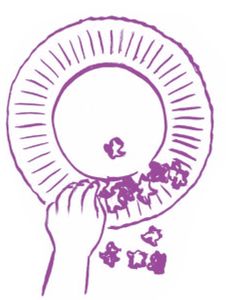
Making a Wreath
 More Fun!
Paper Chains
More Fun!
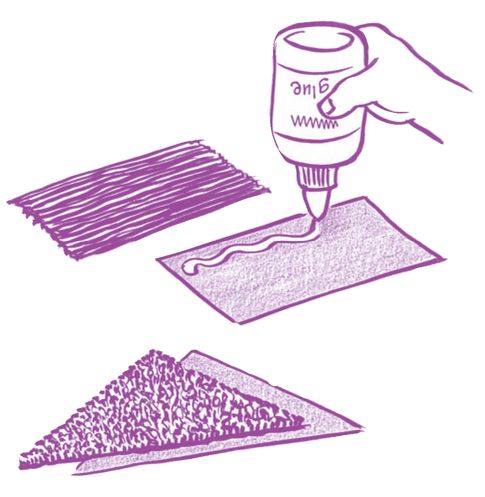
Place Mats
More Fun!
Feely Shapes
 Glue Shapes and Letters
More Fun!
Incline Writing Boards
Journal Drawing
Mirror, Mirror, on the Wall
More Fun!
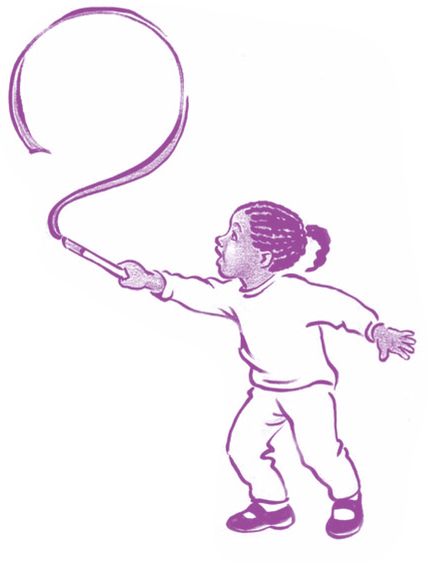
Ribbon Drawing
 Shape Person
More Fun!
Sidewalk Shadows
Develops your child’s scissor skills and bilateral hand skills
What You Needpaper plates | glue sticks or small container of glue for dipping | tissue paper | child-safe scissors
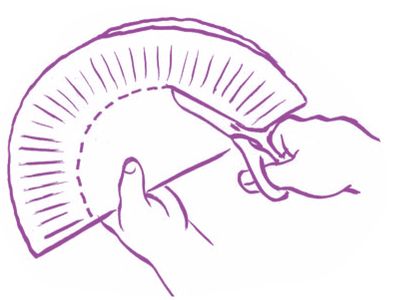
What to Do• Show your child how to fold a paper plate in half.
• Encourage her to cut a semi-circle around the inside of the paper plate.
• Unfold the plate to reveal a “wreath.”
• Help your child decorate the wreath by tearing small pieces of tissue paper and squeezing the paper into balls.
• Give her a glue stick to use to cover the “wreath” in glue, or dip each tissue paper ball into glue.
• Glue the tissue balls onto the wreath. When the glue dries, display the wreath prominently.
• Help your child punch two holes at the top of the wreath and lace yarn or ribbon through the holes so that she can hang the wreath.
• Use the wreath as a frame for a picture—either something your child has created or for a photo. Give it as a gift!
Gives your child experience using scissors
What You Needconstruction paper | child-safe scissors | glue sticks
What to Do• Show your child how to cut strips of paper. Draw lines on the paper for your child to follow, if needed.
• Ask him to cut strips of construction paper.
• Show him how to glue the ends of the paper to form circles, and then how to link the circles together to make paper chains.
• Use the paper chains as decorations during holidays, for special occasions, or as measuring tools. For instance, he can measure his height with the chains.
• Cut different lengths of paper so the circles are different sizes.
• Use other kinds of paper, such as magazine pages, wrapping paper, and so on.
Helps your child become more adept at using scissors
What You Needconstruction paper or large, plain paper bags cut into rectangles | variety of writing utensils, such as crayons, markers, paint, and glitter glue | laminating materials or clear contact paper | child-safe scissors
What to Do• Encourage your child to decorate her construction paper or cardboard place mat in whatever way she wishes.
• Laminate it (adult-only step).
• Demonstrate how to snip the edges of the paper to make a fringe.
• Encourage your child to use child-safe scissors to create a fringe around the outside edge of the paper.
• Invite your child to trace around a fork, spoon, and knife in their appropriate positions on the place mat. Then she can use the place mat to help her remember how to set her place at the table.
• Laminated place mats make great gifts.
Helps your child learn to draw shapes and use his hands to manipulate small objects
What You Needvariety of fabric, such as velvet, faux fur, corduroy, denim, silk, and lace | adult scissors | cardboard, paper, and glue | writing and drawing tools
What to Do• Cut pieces of cardboard into different shapes of various sizes from 2” across and larger. Cut matching shapes out of fabric of different textures (adult-only step). Glue the fabric to each shape and let the shapes dry.
• Encourage your child to explore the different textures of the shapes.
• Talk about the shapes and show him how to trace around them.
• Place the “Feely Shapes” inside a bag or box. Ask your child to reach into the back and identify each shape by the way it feels. Ask questions to guide him, such as, “Does it have sides? Is it round?”
Gives your child practice in tracing shapes or letters
and develops hand strength
What You Needand develops hand strength
color glue and/or glitter glue | paper
What to Do• Draw shapes or write your child’s name on paper.
• Demonstrate how to squeeze bottles to trace the shapes or letters with glue, leaving a raised line on the paper.
• Help your child with tracing, as needed.
• Allow time to let the glue dry thoroughly.
• Encourage her to use her index finger to trace the shapes or letters of her name.
• Use glue shapes or letters for crayon rubbings. Place white paper on top of the glue shapes and invite your child to color over them with a crayon.
Develops your child’s effective grasp of a writing utensil
What You Needthree-ring binder (3” size) | non-skid plastic drawer liner | large paper clips | variety of writing utensils, such as large washable markers | plain paper
What to Do• Cut a piece of non-skid drawer liner to the size of the three-ring binder (adult-only step).
• Place the three-ring binder on top of the drawer liner, with the wide side of the binder facing away from your child. Tilt the binder slightly to the left if your child is right-handed or slightly to the right if he is left-handed.
• Help him clip paper to the incline board using a large paper clip or clothespin on the side.
• He can enjoy drawing or writing on this inclined surface.
Helps your child gain control of a writing tool and
expands her pre-writing skills
What You Needexpands her pre-writing skills
unlined paper (Young children should not write on lined paper until they are developmentally ready. See page 123) | variety of drawing tools, such as adult-size pencils, washable markers, or crayons
What to Do• Explain to your child that journaling is a way to tell a story.
• Encourage your child to participate in “journal drawing” by asking her to draw about a particular subject or theme. For example, if you are talking about places where people live, ask her to draw a picture of the place (or places) where she lives.
• Ask her to describe her “journal drawing” to you. Transcribe her words onto the paper and read the dictation back to her. Journals can be wonderful keepsakes from your child’s early years.
Develops you child’s ability to draw or write on a vertical surface
What You Needwall mirror or large, stable mirror | dry-erase markers | eraser or dry cloth
What to Do• Have you child stand facing the mirror.
• Encourage him to use dry-erase markers to decorate himself on the mirror.
• Ideas: add hair, a mustache, a beard, a hair bow, earring, clothes, glasses, a hat, and so an.
• When you child finishes his drawing, show him how to use the eraser to clean off the mirror.
• If you have a full-length mirror, help you child trace around his entire body using a dry-erase marker.
Develops your child’s shoulder strength and gives her practice in forming shapes
What You Needribbon 1”-2” wide | small wooden dowel rods ½”-1” in diameter and 8” -12” long | staple gun or duct tape
What to Do• Cut the ribbon into 4’ to 5’ pieces. Staple or securely tape one end of the ribbon to the end of the dowel rod (adult-only step).
• Show your child how to hold the dowel and make the ribbon move through the air.
• Ask, “Can you draw a circle?” “A square?”
• Make a shape or a letter in the air using your ribbon, and see if she can guess what shape or letter it is. Then, ask her to copy you using her own ribbon.
• Or, sing the following song to the tune of “Put Your Finger on Your Nose”:
Make a circle in the air, In the air.
Make a circle in the air, In the air.
Make a circle in the air And shake it if you dare. Make a circle in the air, In the air.
Gives your child practice in tracing shapes and participating in a prewriting activity
What You Needvariety of shape stencils | washable markers | paper
What to Do• Demonstrate one way to use shape stencils to draw a person. For example, show your child how to use a square for the head, a circle for the tummy, and triangles for legs and arms.
• Encourage your child to explore different ways to make a “shape person.” He may trace the stencil or color inside the stencil.
• Ask him to tell you about his person. Transcribe his description of his person onto the paper. Ask him questions about his shape person, such as “What shapes did you use?”
• Give your child glitter glue, jewels, and scrap pieces of material for him to decorate his “shape person.”
• Make more than one and create a story about them.
• Make them into puppets by cutting them out and attaching them to craft sticks. Have a puppet show.
Develops drawing and tracing skills
What You Needsidewalk chalk
What to DoNote:
This activity requires you and your child to work together.
This activity requires you and your child to work together.
• Find a safe sidewalk or paved area.
• Lie down on the sidewalk and tell your child to use sidewalk chalk to trace your body, making a “sidewalk shadow.”
• Change places and trace your child’s outline on the ground.
• Encourage her to add details to the “sidewalk shadows.”
Other books
(2008) Down Where My Love Lives by Charles Martin
Ink and Ashes by Valynne E. Maetani
Little Red by Carl East
Ditto Ditto by R.J. Ross
Twisted Mind (Chequered Flag #2) by Mia Hoddell
The Assassin's Case by Craig Alexander
Mystic by Jason Denzel
Anya the Cuddly Creatures Fairy by Daisy Meadows
The Missing Italian Girl by Barbara Pope
Hero by Joel Rosenberg