Foundation Game Design with ActionScript 3.0, Second Edition (80 page)
Read Foundation Game Design with ActionScript 3.0, Second Edition Online
Authors: Rex van der Spuy

In the previous chapter you saw how each object in the game was its own separate class. Those game object class were very simple. All they did was load and display the PNG file. In Monster Mayhem, the game object classes are more complex. Not only do they display the object's image, but they also perform these two additional functions.
- They store data about the objects in variables, known as
properties
. - They let the objects perform actions using methods. These actions change the way the object appears.
Let's find out a little more about class properties and methods, and then see how they're used in the game
A class is essentially a description of an object. A class describes an object in these two ways:
- Properties
: The things that it is. - Methods
: The things that it does.
To get an idea of what properties and methods are, let's take a look at an imaginary class called Giraffe:
package
{
  import flash.display.Sprite;
  public class Giraffe extends Sprite
  {
    //Properties
    private var _isHungry:Boolean;
    private var _favoriteActivity:String;
    public function Giraffe()
    {
      _isHungry = true;
      _favoriteActivity =  "eating";
    }
    //Methods
    private function eatLeaves():void
    {
      //...  directives
    }
    private function wanderAimlessly():void
    {
      //...  directives
    }
  }
}
I'm sure you can get a pretty good idea of what the life of the poor giraffe is like by looking at the preceding class!
Properties
is just another name for
variables
such as these:
_hungry
_favoriteActivity
Yes, they're just plain old variables—as simple as that! Variables that describe features of an object, like they do in this giraffe, are called properties. That's just a bit of terminology you'll have to learn. Properties also refer to all the built-in Sprite properties (such as x, y, rotation, and visible) that you've been using all along.
Methods? Of course you know what methods are by now! Here are the giraffe's methods:
eatLeaves
wanderAimlessly
By using properties and methods together, you can create a
model
of an object. All game object classes in your game are really just models that are described by their properties and methods.
TheCharacter.asclass is one of the simplest in the game. It doesn't have any methods, just properties. Here's the entire class:
package
{
  import flash.display.DisplayObject;
  import flash.display.Sprite;
  public class Character extends Sprite
  {
    //Embed the image
    [Embed(source="../images/character.png")]
    private var CharacterImage:Class;
    //Private properties
    private var _character:DisplayObject = new CharacterImage();
    //Public properties
    public var vx:int = 0;
    public var vy:int = 0;
    public var timesHit:int = 0;
    public function Character()
    {
      //Display the image in this class
      this.addChild(_character);
    }
  }
}
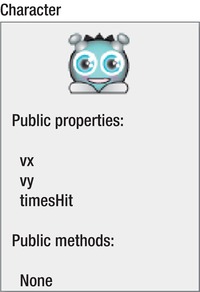
TheCharacterclass has three public properties.
- vx: The character's horizontal velocity.
- vy: The character's vertical velocity.
- timesHit: The number of times the character has been hit by the monsters.
These are all the important bits of information the game needs about the character.
Figure 8-6
illustrates this.

Figure 8-6.
The Character class's public properties
Notice that all these properties are declared as public. That's because other classes must be able to access them. You'll see how next. The other private variable,_character, is also a property, but it's just used internally by the class itself to display the PNG image.
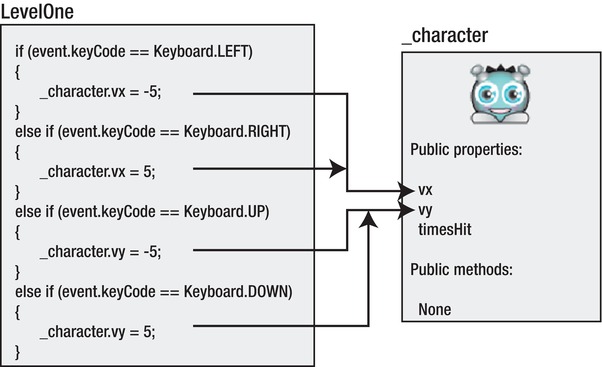
In previous examples, the application class contained vx and vy variables that you used to move the character around the stage. In this game those variables are actually part of the character class itself. You can access them inside the_characterobject from theLevelOneclass using dot notation, like this:
_character.vx
_character.vy
Because those properties have been declared as public, the application class can easily access and change them. When the player presses arrow keys on the keyboard, the code in thekeyDownHandlerdirectly changes the vx and vy properties inside the_characterobject. (The bold code below highlights this):
if (event.keyCode == Keyboard.LEFT)
{
  _character.vx = -5;
}
else if (event.keyCode == Keyboard.RIGHT)
{
  _character.vx = 5;
}
else if (event.keyCode == Keyboard.UP)
{
  _character.vy = -5;
}
else if (event.keyCode == Keyboard.DOWN)
{
  _character.vy = 5;
}
Figure 8-7 illustrates that this code is directly changing the vx and vy properties inside the_characterobject.

Figure 8-7.
The LevelOne class can directly change an object's public properties
The code in theenterFrameHandlercan then use the character's changed vx and vy properties to move it on the stage, like this:
_character.x += _character.vx;
_character.y += _character.vy;
After the character is moved, thecheckStageBoundariesmethod prevents it from moving outside the area of the stage.
checkStageBoundaries(_character);
Here's the method's function definition that does all the hard work:
private function checkStageBoundaries(gameObject:Sprite):void
{
  if (gameObject.x < 50)
  {
    gameObject.x = 50;
  }
  if (gameObject.y < 50)
  {
    gameObject.y = 50;
  }
  if (gameObject.x + gameObject.width >_stage.stageWidth- 50)
  {
    gameObject.x = _stage. stageWidth- gameObject.width - 50;
  }
  if (gameObject.y + gameObject.height >_stage.stageHeight - 50)
  {
    gameObject.y = _stage.stageHeight - gameObject.height - 50;
  }
}
This method is also used to check the stage boundaries of the_monster1and_monster2objects. Notice that it uses theLevelOneclass's private_stagevariable to find the height and width of the stage.
TheenterFrameHandleruses thecharacterVsMonsterCollisionmethod to check for collisions between the character and monsters. There are two monster collisions to check for, so the method is called twice'once for each monster.
characterVsMonsterCollision(_character, _monster1);
characterVsMonsterCollision(_character, _monster2);
Here's the method's function definition:
private function characterVsMonsterCollision
  (character:Character, monster:Monster):void
{
  if(monster.visible
  && character.hitTestObject(monster))
  {
    character.timesHit++;
    checkGameOver();
  }
}
Notice that the method only checks for a collision if the monster is visible.
if(
monster.visible
&&character.hitTestObject(monster))
{...
This is because when the star hits any of the monsters, their visible property is set to false. The code only needs to check for collisions between the character and monsters if the monster in question is actually visible and thus still in the game.
If there is a collision, the character's timesHit property is increased by one, and thecheckGameOvermethod is called.
character.timesHit++;
checkGameOver();
The character's timesHit property is initialized to 0 in theCharacterclass. It becomes 1 after the first collision. Unfortunately for the player, the character only needs to be hit once to lose the game. I'll explain how this happens in thecheckGameOvermethod in the pages ahead.
Take a look at the entireenterFrameHandlerin the completeLevelOnecode listing once again. Notice that thecharacterVsMonsterCollisionmethod is the very last bit of code it runs. That's because the game should only check for collisions
after
the game objects have been moved. The reason for this is to make sure that you're checking collisions and boundaries based on the objects' current new positions'and not the positions they had in the previous frame.
Here's the order in which you should run the code in theenterFrameHandler:
- First, move the game objects.
- After they've been moved, check stage boundaries and collisions with other objects.
- Make sure that you check for collisions between pairs of game objects after you've moved both of them. For example, first move the character, then move the monsters, and only after that check for collisions between them.
If you check for collisions and boundaries before you move the objects, the collisions won't be based on their current positions. They'll be based on the positions the objects had
in the previous frame
. All of your collisions will look slightly off.
You can test this yourself by running the character'scheckStageBoundariesmethod before changing its position on the stage, like this:
checkStageBoundaries(_character);
_character.x += _character.vx;
_character.y += _character.vy;
Recompile the code, and move the character to one of the stage boundaries. You'll see that the character will overlap with the boundaries by 5 pixels, as you can see in
Figure 8-8
. That's because the character hasn't yet been updated to its new, current position.

Figure 8-8.
If you don't move game objects before you check for collisions or boundaries, the collisions will be off by one frame.
This is a very common problem in game design but, as you can see, it's easy to fix. Remember this if you ever notice that collisions in your own games are slightly imprecise.
LevelOnecreates the monster objects using the sameMonsterclass, like this:
_monster1 = new
Monster
();
_monster2 = new
Monster
();
Both monsters behave in exactly the same way so they can both use exactly the same class. Two for the price of one! This is one great thing about using classes: you only need to write a class once. As long as it's general enough, you can reuse it over and over again for as many objects of the same type as you need.
