Foundation Game Design with ActionScript 3.0, Second Edition (38 page)
Read Foundation Game Design with ActionScript 3.0, Second Edition Online
Authors: Rex van der Spuy

Figure 3-48.
Center the image loader over the Sprite's 0,0 point to center its registration point.
If we can do this, the character will grow, shrink, and spin from its center. All this can be done with two simple lines of code. Let's see how.
- Find the section of code in the GameWorld.as file where you added the character to the stage. Carefully add the following new code in bold text below.
//Add the character to the stage
characterURL = new URLRequest();
characterLoader = new Loader();
character = new Sprite();
characterURL.url = "../images/character.png";
characterLoader.load(characterURL);
characterLoader.x = -50;
characterLoader.y = -50;
character.addChild(characterLoader);
stage.addChild(character);
character.x = 225;
character.y = 150; - Compile the program.
The first thing you'll notice is that the character is no longer centered on the stage. It has shifted 50 pixels up and to the left, as you can see in
Figure 3-49
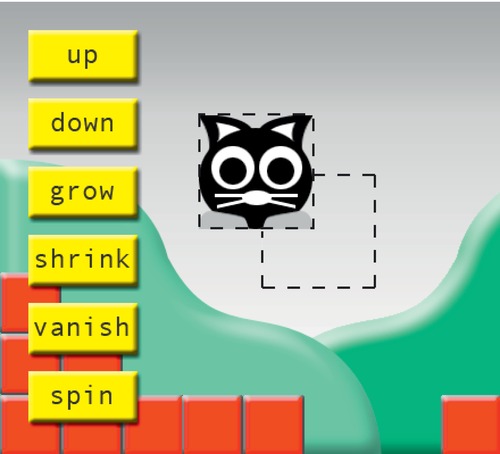
Figure 3-49.
The character is now offset by 50 pixels.
If you've paid attention during this chapter it should now be obvious why this is happening. The new code you just added shifted the image loader object 50 pixels to the left, and 50 pixels up.
characterLoader.x = -50;
characterLoader.y = -50;
You've positioned it
inside the Sprite
. Because the character is exactly 100 pixels square, the image loader is now centered directly over the Sprite's registration point.
This is great, but it also means that you'll need to compensate for this by adjusting all of the character'sxandyproperty values by 50 pixels. If you want to center the character on the stage, add 50 pixels to the previous values you used to center it, like this:
character.x = 275;
character.y = 200;
If you modify these properties and compile the program again, the very center of the character will now be at the very center of the stage.
Hey, now go ahead and try the grow, shrink and spin buttons! We now have exactly the effects we're looking for - they all happen from the center of the character, as you can see in
Figure 3-50
. We've successfully centered the image over the Sprite's registration point.
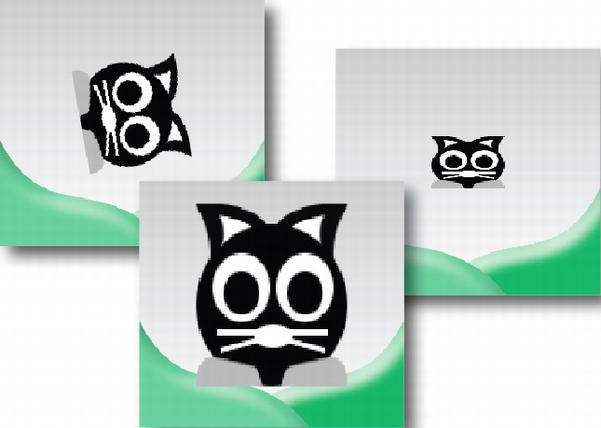
Figure 3-50.
Grow, shrink, and spin from the center.
To keep things simple, most of the code in this book keeps the registration point of Sprites at the top left corner. But as you can see, there are many occasions where centering the registration point is essential to achieve certain effects.
We've written a lot of AS3.0 code in this chapter! Just in case you have any doubts about what you've written, here's the complete, finished code for the GameWorld project. I've used bold highlighted comments to act as headings for major sections of code so that you can easily see how the sections are organized. You'll also find the working example of this project in the GameWorldFinished folder in the chapter's source files.
package
{
  import flash.display.Loader;
  import flash.display.Sprite;
  import flash.events.MouseEvent;
  import flash.net.URLRequest;
  [SWF(width="550", height="400",
    backgroundColor="#FFFFFF", frameRate="60")]
  public class GameWorld extends Sprite
  {
    //Declare the variables we need
    public var backgroundURL:URLRequest;
    public var backgroundLoader:Loader;
    public var background:Sprite;
    //Character
    public var characterURL:URLRequest;
    public var characterLoader:Loader;
    public var character:Sprite;
    //upButton
    public var upButtonURL:URLRequest;
    public var upButtonLoader:Loader;
    public var upButton:Sprite;
    //downButton
    public var downButtonURL:URLRequest;
    public var downButtonLoader:Loader;
    public var downButton:Sprite;
     //growButton
    public var growButtonURL:URLRequest;
    public var growButtonLoader:Loader;
    public var growButton:Sprite;
    //shrinkButton
    public var shrinkButtonURL:URLRequest;
    public var shrinkButtonLoader:Loader;
    public var shrinkButton:Sprite;
    //vanishButton
    public var vanishButtonURL:URLRequest;
    public var vanishButtonLoader:Loader;
    public var vanishButton:Sprite;
    //spinButton
    public var spinButtonURL:URLRequest;
    public var spinButtonLoader:Loader;
    public var spinButton:Sprite;
    public function GameWorld()
    {
      //Add the background to the stage
      backgroundURL = new URLRequest();
      backgroundLoader = new Loader();
      background = new Sprite();
      backgroundURL.url = "../images/background.png";
      backgroundLoader.load(backgroundURL);
      background.addChild(backgroundLoader);
      stage.addChild(background);

      //Add the character to the stage
      characterURL = new URLRequest();
      characterLoader = new Loader();
      character = new Sprite();
      characterURL.url = "../images/character.png";
      characterLoader.load(characterURL);
      character.addChild(characterLoader);
      stage.addChild(character);
      character.x = 225;
      character.y = 150;
      //Add the upButton
      upButtonURL = new URLRequest();
      upButtonLoader = new Loader();
      upButton = new Sprite();
      upButtonURL.url = "../images/up.png";
      upButtonLoader.load(upButtonURL);
      upButton.addChild(upButtonLoader);
      stage.addChild(upButton);
      upButton.x = 25;
      upButton.y = 25;
      //Add the downButton
      downButtonURL = new URLRequest();
      downButtonLoader = new Loader();
      downButton = new Sprite();
      downButtonURL.url = "../images/down.png";
      downButtonLoader.load(downButtonURL);
      downButton.addChild(downButtonLoader);
      stage.addChild(downButton);
      downButton.x = 25;
      downButton.y = 85;
      //Add the growButton
      growButtonURL = new URLRequest();
      growButtonLoader = new Loader();
      growButton = new Sprite();
      growButtonURL.url = "../images/grow.png";
      growButtonLoader.load(growButtonURL);
      growButton.addChild(growButtonLoader);
      stage.addChild(growButton);
      growButton.x = 25;
      growButton.y = 145;
      //Add the shrinkButton
      shrinkButtonURL = new URLRequest();
      shrinkButtonLoader = new Loader();
      shrinkButton = new Sprite();
      shrinkButtonURL.url = "../images/shrink.png";
      shrinkButtonLoader.load(shrinkButtonURL);
      shrinkButton.addChild(shrinkButtonLoader);
      stage.addChild(shrinkButton);
      shrinkButton.x = 25;
      shrinkButton.y = 205;
      //Add the vanishButton
      vanishButtonURL = new URLRequest();
      vanishButtonLoader = new Loader();
      vanishButton = new Sprite();
      vanishButtonURL.url = "../images/vanish.png";
      vanishButtonLoader.load(vanishButtonURL);
      vanishButton.addChild(vanishButtonLoader);
      stage.addChild(vanishButton);
      vanishButton.x = 25;
      vanishButton.y = 265;
      //Add the spinButton
      spinButtonURL = new URLRequest();
      spinButtonLoader = new Loader();
      spinButton = new Sprite();
      spinButtonURL.url = "../images/spin.png";
      spinButtonLoader.load(spinButtonURL);
      spinButton.addChild(spinButtonLoader);
      stage.addChild(spinButton);
      spinButton.x = 25;
      spinButton.y = 325;
      //Add the button listeners
      upButton.addEventListener
        (MouseEvent.CLICK, upButtonHandler);
      downButton.addEventListener
        (MouseEvent.CLICK, downButtonHandler);
      growButton.addEventListener
        (MouseEvent.CLICK, growButtonHandler);
      shrinkButton.addEventListener
        (MouseEvent.CLICK,shrinkButtonHandler);
      vanishButton.addEventListener
        (MouseEvent.CLICK, vanishButtonHandler);
      spinButton.addEventListener
        (MouseEvent.CLICK, spinButtonHandler);
    }
    //The event handlers
    public function upButtonHandler(event:MouseEvent):void
    {
      if(character.y> 0)
      {
        character.y -= 15;
        //Optional:
        //character.x += 10;
      }
    }
    public function downButtonHandler(event:MouseEvent):void
    {
      if(character.y< 300)
      {
        character.y += 15;
        //Optional:
        //character.x -= 10;
      }
    }
    public function growButtonHandler(event:MouseEvent):void
    {
      character.scaleX += 0.1;
      character.scaleY += 0.1;
      //Optional:
      //character.height += 25;
      //character.width += 15;
    }
    public function shrinkButtonHandler(event:MouseEvent):void
    {
      character.scaleX -= 0.1;
      character.scaleY -= 0.1;
      //Optional:
      //character.height -= 25;
      //character.width -= 15;
    }
    public function vanishButtonHandler(event:MouseEvent):void
    {
      character.visible = !character.visible;
    }
    public function spinButtonHandler(event:MouseEvent):void
    {
      character.rotation += 20;
    }
  }
}
Whether you know it yet or not, you now have a considerable arsenal of skills at your disposal to build very rich interactive game worlds. In this chapter we looked at the very basic techniques necessary to build these worlds—and you really don't need many more. If you understand how to make, display, and control Sprite objects and how to use event listeners to make actions happen in your game, you have the basics that will make up rest of the projects of this book.
In
Chapter 4
, we're going to build our first complete game. It's a number guessing game, which will expand your programming skills considerably. You'll learn how to analyze a player's input to create a basic artificial intelligence system, modularize your program using methods, add interactive text, and keep players guessing (literally!) using random numbers.

Decision Making
This chapter will be your first real look at designing a complete game. It's a short, simple game, but it contains all the basic structural elements of game design that you'll be returning to again and again. Input and output, decision making, keeping score, figuring out whether the player has won or lost, random numbers, and giving the player a chance to play again—it's all here. You'll also be taking a much closer look at variables and if statements. Furthermore, you'll learn how to modularize your program by breaking down long segments of code into bite-sized methods. By the end of the chapter, you'll have all the skills necessary to build complex logic games based on this simple model.
The game you'll build is a simple number guessing game. The game asks you to guess a number between 0 and 99. If you guess too high or too low, the game tells you this until you're able to figure out what the mystery number is by deduction.
Figure 4-1
shows what the game will look like when it's done.
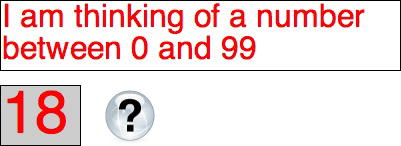
Figure 4-1.
The number guessing game
You'll actually build this game in a few phases. You'll start with the most basic version of the game and then gradually add more features such as limiting the number of guesses, giving the player more detailed information about the status of the game, randomizing the mystery number, and adding an option to play
the game again. You'll also learn how to make game buttons that change how they look depending on how you interact with them.
Sound like a lot? Each phase of the game is self-contained, so you can give yourself a bit of a break to absorb and experiment with the new techniques before moving on to the next phase. You'll be surprised at how easy and simple it is when you put all the pieces together.
In the previous chapter you learned how to load, display, and position images. In most games, however, you'll combine images with text. And the text will usually change depending on how the game changes. The first thing you're going to look at in this chapter is how to make and use interactive text usingTextFieldandTextFormatobjects.
I'm going to start you with a basic program that sets up two text fields on the stage and displays a trace message that says “Game started”. You won't understand much of this new code, but I'll explain all of it in the pages ahead. If you don't feel like typing all this out, you'll find this setup file in the chapter's source files in a project folder called NumberGuessingGameSetup.
- Create a new AS3.0 project and enter the following program into the editor window:
package
{
  import flash.net.URLRequest;
  import flash.display.Loader;
  import flash.display.Sprite;
  import flash.events.MouseEvent;
  import flash.events.KeyboardEvent;
  import flash.ui.Keyboard;
  import flash.text.*;
  [SWF(width="550", height="400",
  backgroundColor="#FFFFFF", frameRate="60")]
  public class NumberGuessingGame extends Sprite
  {
    //Create the text objects
    public var format:TextFormat = new TextFormat();
    public var output:TextField = new TextField();
    public var input:TextField = new TextField();
    public function NumberGuessingGame()
    {
      setupTextfields();
      startGame();
    }
    public function setupTextfields():void
{
//Set the text format object
format.font = "Helvetica";
format.size = 32;
format.color = 0xFF0000;
format.align = TextFormatAlign.LEFT;
//Configure the output text field
output.defaultTextFormat = format;
output.width = 400;
output.height = 70;
output.border = true;
output.wordWrap = true;
output.text = "This is the output text field";
//Display and position the output text field
stage.addChild(output);
output.x = 70;
output.y = 65;
//Configure the input text field
format.size = 60;
input.defaultTextFormat = format;
input.width = 80;
input.height = 60;
input.border = true;
input.type = "input";
input.maxChars = 2;
input.restrict = "0-9";
input.background = true;
input.backgroundColor = 0xCCCCCC;
input.text = "";
//Display and position the input text field
stage.addChild(input);
input.x = 70;
input.y = 150;
stage.focus = input;
}
public function startGame():void
{
trace("Game started")
}
}
} - Compile the program. You'll get a trace message saying “Game started”. The Flash Player window will open, showing you two text fields. The larger one will display the words “This is the output text field” in red text. The smaller one, with a gray background, will have a flashing cursor in it; this is where you can type your guess.
Figure 4-2
shows what you'll see.
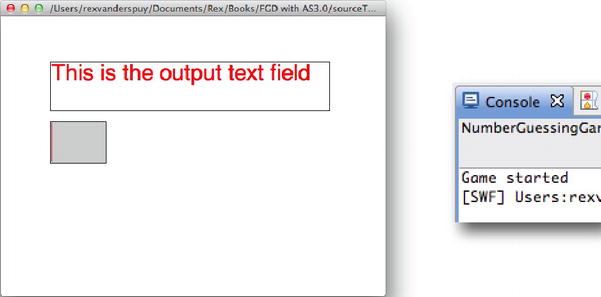
Figure 4-2.
What happens when you compile the setup program
Don't let the code intimidate you. It doesn't contain any concepts that you haven't covered in the previous chapter—it's just dressed up a little differently. Let's see how it works.
You'll notice that this program is importing all the same classes from the previous chapter, but with the addition of a few new ones. Here's the new import code:
import flash.events.KeyboardEvent;
import flash.ui.Keyboard;
import flash.text.*;
The first two new lines import theKeyboardEventandKeyboardclasses. These are two special classes that you need to use if you want make games where the player interacts with the keyboard. You'll be using keyboard interactivity in this project, and you'll see how these two classes are put to use as the program develops.
The third line is interesting, because there's no class specified, just an asterisk:
import flash.text.*;
The asterisk means “give me all the text classes you've got.” The AS3.0 library has a section calledflash.textthat contains all the classes that are used to display and manipulate text. There are many of them, and whenever you need display text in a game, you'll need most of them. Rather than going to all the trouble of importing each class individually, you can simply use an asterisk in place of a class name. The program will then load
all
the classes fromflash.text. If you were to import each class individually, you'd have to write four import statements that look like this:
import flash.text.TextFormat;
import flash.text.TextField;
import flash.text.TextFormatAlign;
import flash.text.TextFieldAutoSize;
There's no technical advantage to using an asterisk to import all these classes over importing them individually, as long as you know you're going to use all the classes in your program. If you definitely know you're not going to use a class, it's best to import the classes individually so that you can exclude the one you don't need. If you import a class you don't use, it will take longer for your code to compile because the AS3.0 compiler will still have to browse through the class you didn't use when it makes your SWF file. Importing unnecessary classes won't affect how your game runs, however.
You can use an asterisk to import all the classes from any of the AS3.0 code packages. For example, if you want to import all the classes from the display package, you could do it like this:
import flash.display.*;
You're going to use all these classes in this project.
You'll recall from
Chapter 3
that making an object, like a Sprite, is a two-step process.
First, you have to declare a variable to contain the Sprite object, like this:
public var gameCharacter:Sprite;
Next, you need to turn that variable into a Sprite object with thenewkeyword.
gameCharacter = new Sprite();
You wrote a lot of code like this in the previous chapter. But what you probably didn't know is that you can combine both lines of code into one, like this:
public var gameCharacter:Sprite = new Sprite();
This line of code declares the variable and creates the object in one step. The result is the same: you end up with a Sprite object, but you've saved yourself a line of code.
Sometimes you'll write a program where you won't know, when the program starts, exactly what kind of object a variable will contain. That's because in some complex programs the objects you want to create don't exist until the program starts running. In those cases, you'll need to declare the variable first and then create the object later in the program. You'll see examples of why this is important in the later chapters of this book.
However, you'll often know exactly what type of object to create when the program first initializes. In those cases, declare the variable and create the object in one step. That's what the first three new lines of code do in the class definition:
public class NumberGuessingGame extends Sprite
{
  public var format:TextFormat = new TextFormat();
  public var output:TextField = new TextField();
  public var input:TextField = new TextField();
They create one TextFormat object and two TextField objects.
The TextFormat object is calledformat. Its job is to determine how text should look on the stage: such as its font, color, size, and the text alignment.
The TextField objects care calledinputandoutput. These objects are the actual text you see on the stage. You saw them both on the stage when you compiled this program: theoutputfield is along the top and theinputfield is the small one with the gray background just below it.
Let's find out how these TextFormat and TextField properties work.
Look in thesetupTextfieldsfunction definition and you'll see these four lines of code:
format.font = "Helvetica";
format.size = 32;
format.color = 0xFF0000;
format.align = TextFormatAlign.LEFT;
This code is setting four properties of theformatobject. You'll recall from
Chapter 3
that all objects have properties that you can change to achieve different effects. You'll remember that Sprite objects have properties like x, y, visible, scaleX, and scaleY.
formatis a TextFormat object, and its properties determine what text looks like on the stage. Here are the four properties that it's setting:
- font
is the font that you want your text to display in. This example uses Helvetica. You can use the name of any font that's installed on your computer. Surround the exact name of the font with quotation marks.The font property works fine while you're testing your game, but if it plays on another computer that doesn't have exactly the same font installed as you've specified, the font obviously can't load. It will instead be replaced by another font that the Flash Player thinks might be close. If you want the fonts in your game to look exactly the same on all computers, no matter whether or not the font is installed, you have to use a technique called
font embedding
. Embedding fonts can sometimes produce quirky results, but you'll find out how to do this at the end of this chapter in the “A quick guide to embedding fonts” section. - color
is the hexadecimal code for the font. You can use any hex code you like; just precede it with0x. This example uses 0xFF0000, which is the hex code for red. - size
is the font size. - Align
is the alignment of the text: left, right, or centered. Here are the property values you can use if you want to change the alignment:- TextFormatAlign.LEFT
- TextFormatAlign.RIGHT
- TextFormatAlign.CENTER
- TextFormatAlign.LEFT
