Foundation Game Design with ActionScript 3.0, Second Edition (74 page)
Read Foundation Game Design with ActionScript 3.0, Second Edition Online
Authors: Rex van der Spuy

The 3D text was just as easy to make. I typed out the words “GAME OVER” with the Emulogic font. I gave the text a bright green fill and white outline color. I then applied an Extrude and Bevel effect from the Effects![]() 3D menu. Again, it was just a matter of fiddling with the effect parameters until the result seemed to look good. Lastly, I rotated the text slightly.
3D menu. Again, it was just a matter of fiddling with the effect parameters until the result seemed to look good. Lastly, I rotated the text slightly.
Figure 7-72
shows the end result. Another 30 seconds of work well spent!
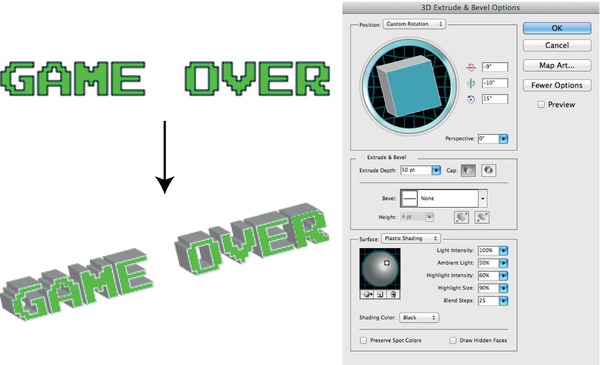
Figure 7-72
. Create 3D text with the Extrude and Bevel effect.
Figure 7-73
shows the final Game Over graphic. When this graphic is displayed in the game, the words “You Won!” or “You Lost!” will be displayed just below the “GAME OVER” text.
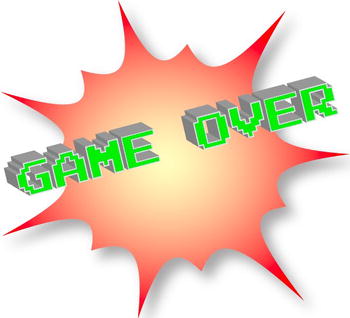
Figure 7-73
. The finished Game Over graphic
All the graphics are finished, so copy the PNG files into the game project's images folder. Now let's look at how to program the game.
You now know more than enough about Adobe Illustrator to start making sophisticated game graphics. However, you'll certainly want to learn more about Illustrator and the first place to look is Illustrator's own help menu. Select Help![]() Illustrator Help and the Adobe Help application will open with a chapter-by-chapter description of Illustrator's features and how to use them.
Illustrator Help and the Adobe Help application will open with a chapter-by-chapter description of Illustrator's features and how to use them.
Adobe also maintains an excellent tutorial site featuring many videos on how to use basic features and achieve special effects. You can find out more at Adobe's support web site atwww.adobe.com/support/illustrator/.
Time Bomb Panic combines all the programming techniques you've learned in the book so far. When you take a look at the code, you'll see that 90% of it is more or less identical to the code you were using in the previous chapters. That's good, because it shows that you can use all the code you've been learning in the context of a real game. There's not much new to learn.
What about the 10% that you haven't seen before? Here are the new things you'll learn:
- How to create and use a
Timerobject. Like random numbers, timers are essential to most types of video games. - How to create individual classes for all your game objects.
- How to use a custom method to simplify and reduce repetitive code.
You'll go on a tour of all these new features as well as the specific way in which the game handles a few techniques you've looked at before, such as:
- Collision detection between the boxes and bombs.
- Stage boundaries.
- Checking for the end of the game.
- Displaying the Game Over image.
By the time you're done, you should have all the confidence you need to make a game of similar complexity.
Before you look at the code of the main application class, you must overcome a big problem: there are many objects in this game. If you don't find a way to manage them before you start programming the game, you drown in hundreds of lines of repetitive code.
How many objects are there? You've created five game graphics, so you've got at least five. But many of those images, like the boxes and bombs, are used multiple times in the game. Take a good look at
Figure 7-74
.
Knowing what you now about game programming, how many objects do you think you'll have to deal with?
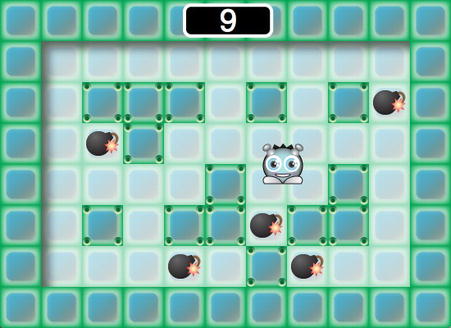
Figure 7-74
. How do you make code manageable if you have a game with lots of objects?
You've got 14 boxes, five bombs, one character, one background, one visible text field, and the Game Over graphic that appears at the end of the game. This Game Over graphic also contains another text field. That's a total of 24 objects. At most, the example programs in previous chapters have had five.
Why is this a problem? Think about how much code you have to write to create and add just one object to a game. First, you have to embed the image, create the DisplayObject container, and create the containing Sprite, like this:
[Embed(source="../images/character.png")]
public var CharacterImage:Class;
public var characterImage:DisplayObject = new CharacterImage();
public var character:Sprite = new Sprite();
Then you have to add the image to the Sprite, add the Sprite to the stage, and position it, like this:
character.addChild(characterImage);
stage.addChild(character);
character.x = 300;
character.y = 150;
That's eight lines of code—for just one object. With the 24 objects you have in this game you'd need to duplicate this same code 24 times. You'd end up with 192 lines of repetitive code just to add all the objects to the game.
It's just not manageable, so let's learn a better way. You're going to keep all of your objects inside their own individual classes and then use a custom method to add and position them on the stage.
I've talked a lot about classes already, but don't worry if you didn't understand too much about what I tried to explain. Unless you've got a real, living, breathing class in front of you, it can be a very abstract concept to understand. So let's look at some living, breathing classes!
You've seen many classes already in this book.
- AS3.0's built-in classes like
Sprite,TextField, andEventthat you import into your programs. - The application classes in which you wrote our main programs, like
PickingUpObjects,KeyboardControl, orNumberGuessingGame. I've been calling them “programs” up till now, but they are really “application classes.” - The
Collisionclass, a specialized class in
Chapter 6
that helped you create a collision boundary between game objects.
Fine, but what is a class exactly? In short, it's just a “thing” in your game. You can make a class for any object you want to use in your game. Those objects can be abstract bits of code, like theCollisionclass, or they can be the real game objects you see on the stage.
So if a “class” is just a “thing,” doesn't that mean you should be able to make a class for each of the things in your game? It absolutely does! To prove it, open the TimeBombPanic project folder and peer into the src folder. You'll see these files (also shown in
Figure 7-75
):
- TimeBombPanic.as
- Collision.as
- Character.as
- Box.as
- Bomb.as
- Background.as
- GameOver.as
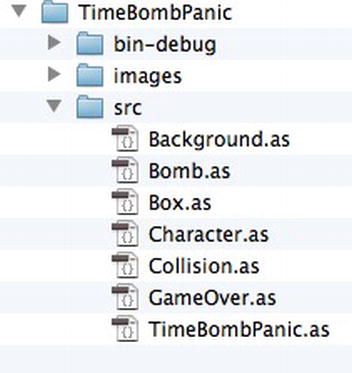
Figure 7-75
. The classes used in Time Bomb Panic. There's one for each game object.
You know now thatTimeBombPanic.asis the application class—the main program. And you know thatCollision.asis the specialized class you wrote in
Chapter 6
. But you can clearly see that there is now also a class for each and every one of the five game objects you drew with Illustrator in the first part of the chapter.
What do those classes do? It's very easy. All they do is load the embedded images into themselves. To prove this, have a look at theCharacterclass.
package
{
  import flash.display.DisplayObject;
  import flash.display.Sprite;
  public class Character extends Sprite
  {

//Embed the image
    [Embed(source="../images/character.png")]
    public var GameObjectImage:Class;
    public var gameObjectImage:DisplayObject
      = new GameObjectImage();
    public function Character()
    {
      this.addChild(gameObjectImage);
    }
  }
}
The job of theCharacterclass is just to display thecharacter.pngimage. That's all! And you've seen all this code before—it's six of those eight lines of rather tedious code you always use to embed and display an image.
Why is this useful? It means that because you've written this code in the class, you never have to write it out again, and you can reuse it in any other game you write. You'll see this at work soon.