Foundation Game Design with ActionScript 3.0, Second Edition (73 page)
Read Foundation Game Design with ActionScript 3.0, Second Edition Online
Authors: Rex van der Spuy

The character is almost finished!
Figure 7-67
shows what it now looks like.

Figure 7-67
. The almost-finished game character
You could leave your character like this and it would be just fine for your game. But let's take it one small step further.
The finishing touch is to give the character some rosy cheeks.
- Add two circles below the character's eyes. Fill them with a transparent-to-light-pink radial gradient. The effect is subtle, but adds a little something to the depth and liveliness of the character. You're aiming for a final image that looks like
Figure 7-68
.
Figure 7-68
. Add some rosy cheeks. - Finally, save your work and create the character.png file.
The next step is to design the background game screen.
Rather than take you on a step-by-step tour on how to make the game background, I'll explain how it was made. There are no new techniques here, and your Illustrator skills should now be good enough that you will easily be able to create something similar.
I first created a 550 by 400 pixel document. To make my job easier, I made Illustrator's grid visible and set the grid cell size to 50 by 50 pixels. None of the objects in the game are larger than 50 pixels square, so it makes sense to use that as a base size for planning the layout of the game playing field.
To set the grid size, select Edit![]() Preferences
Preferences![]() Guides and Grid (Windows) or Illustrator
Guides and Grid (Windows) or Illustrator![]() Preferences
Preferences![]() Guides and Grid (OSX). Set the Gridline every: option to 50px.
Guides and Grid (OSX). Set the Gridline every: option to 50px.
With the grid cell size defined, you can make it visible by selecting View![]() Show Grid. Then select the View
Show Grid. Then select the View![]() Snap to Grid option so that objects will neatly align themselves to the grid squares.
Snap to Grid option so that objects will neatly align themselves to the grid squares.
With that done, I made a copy of my box graphic. I removed the corner rivets, and made a copy of it into each grid square. I then grouped all the squares and set their opacity to 40% in the Transparency panel.
Figure 7-69
shows what this looks like.
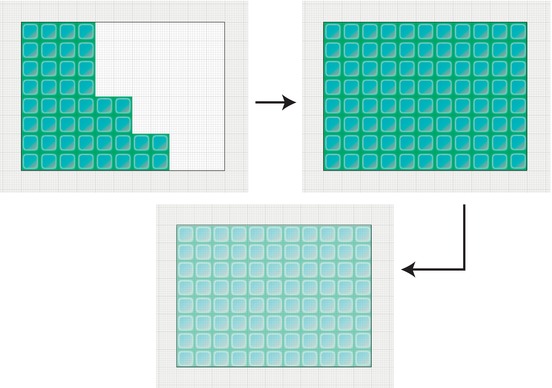
Figure 7-69.
The process of creating the game background
To make the border, I first created a new layer. I made copies of the box graphic around the perimeter. I grouped them together and added a drop shadow effect to make it look as though the border is floating slightly above the main playing field. I then drew a black rounded rectangle with a white stroke color on the top border. This is where the game's timer will be displayed. You can see the end result in
Figure 7-70
.
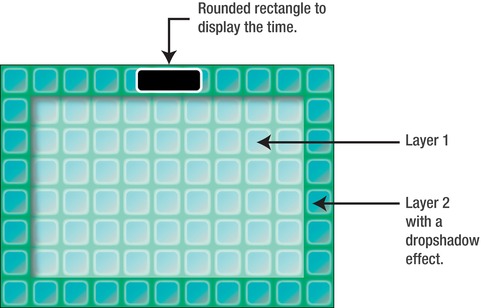
Figure 7-70
. The finished background graphic
The Game Over graphic was just as easy to make.
To make the explosion for the Game Over graphic, I started with a simple star shape and filled it with a red-to-yellow radial gradient. I then added a Fisheye Warp effect from the Effects menu, just to puff it out a bit. I then added a Pucker and Bloat effect from the Effects menu. A simple drop shadow finished it off, and you can see the final effect in
Figure 7-71
. It took less than 30 seconds to make.
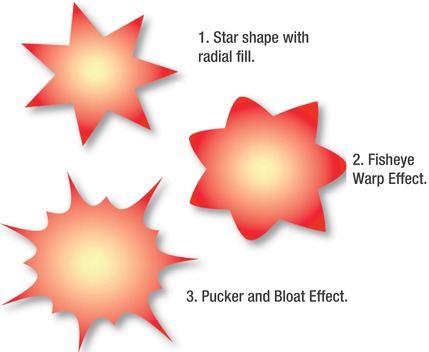
Figure 7-71
. Effects applied to the star shape to create a cartoon explosion.
It was really just a matter of playing around with the parameters in those effect menus until I liked the result I saw on the artboard