Grow a Sustainable Diet: Planning and Growing to Feed Ourselves and the Earth (4 page)
Read Grow a Sustainable Diet: Planning and Growing to Feed Ourselves and the Earth Online
Authors: Cindy Conner
Tags: #Gardening, #Organic, #Techniques, #Technology & Engineering, #Agriculture, #Sustainable Agriculture

Right now you might think it’s a good idea to grow
all
your food, and maybe you can do that. However, once you really get started you might realize that it would be better to grow some of it and support local growers for the rest. Deciding how to use the resources at your disposal efficiently is a big step. I’ll give you some examples of how to use a limited growing area to your best advantage. Growing your own food is time-consuming and dirty work. You have to be ready to make a commitment to a place (your garden) and to learning new skills. I can only teach gardening in the context of the “whole system.” Besides the ecosystem of what’s going on in the soil and plants, it also means what is going on in your kitchen and lifestyle. If your time is filled with activities
now, something will need to change to make time for gardening on a larger scale, because it is not only the gardening, but the eating that will be evolving. Cooking from the garden is different from cooking frozen or canned food from the store. Using food fresh from the garden is even an adjustment for chefs who have only ever used produce trucked in from a distance. Some people like to jump into the deep end, so to speak, and let new projects overwhelm them. Remember, however, to think of the significant others who will be on this journey with you, although not so involved. Take time to think through the changes you are making. Gradually, some things that used to seem important are not so much on your mind anymore, as your new lifestyle begins to develop.
With all that in mind, let’s get started.

M
APS HELP YOU KNOW
where you are going and a map of your garden is no exception. As you are designing your map, use all space wisely. Sustainable diets strive to leave a small footprint. To assess what you have, measure the space you have to work with, draw it out on paper, and divide the garden area into beds. I like 4′ wide garden beds, but some people with a shorter reach prefer 3′ wide beds. The wider the bed, the more efficiently the space is used, up to a point. You will not be efficient if you are not comfortable working in a bed that is too wide.
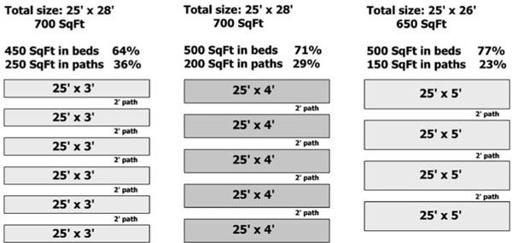
Having wider beds gives you more growing area in proportion to your space. As you can see in
Figure 2.1
, in the same footprint of 700 ft
2
, you would have 7 percent more growing space with 4′ wide beds, rather than 3′ wide beds. Within that same footprint, you could gain another 25 ft
2
by making the paths 1½′ wide, rather than 2′ wide.
Plan your paths. Wide paths are only needed if you are bringing in equipment or lots of people. The narrower your paths, the less you have to manage. I’ve found a good workable width is 18″, which allows room for a rolling stool. I have trouble moving around in anything less than that. Some paths can be wider, such as when dividing sections of the garden, but not all the paths need to be wide.

Figure 2.1. Bed Width Comparison
Have a plan for maintaining the paths from the beginning. In the narrow paths between my beds I plant Dutch white clover, or I mulch with leaves from the trees in our yard. The clover is a short-lived perennial. Occasionally it dies out and needs to be replanted. When it is growing vigorously it tends to creep into the sides of the beds. That’s when it is time to harvest it for mulch or for the compost pile. I cut it with a sickle to harvest, but only have to do that a couple times over the summer. The clover keeps the weeds out, gives me a nice green carpet to be working on, and provides plenty of habitat for beneficial insects. If, instead, I put down leaves in the fall to mulch the paths, they will gradually decompose and by the next year will have become compost to toss onto the beds.
Other alternatives for mulching paths are newspaper and cardboard, but that is material you have to bring in from elsewhere. You might already have a supply as part of your circle of living. As long as they don’t contain harmful chemicals to leach into your garden, these materials do a good job of keeping the weeds out of your paths. Pizza boxes are a good size to lay down in the path. Grass clippings thrown over cardboard or paper mulch make them look better, keep them from blowing away, and help them compost in place. Cardboard and newspaper are what I used before I decided to eliminate outside inputs in my paths. Recently I had an old cotton bedspread that, after forty years, had reached the end of its useful life in the house. I put that down in a path that I wouldn’t be digging up anytime soon and threw some leaves on top.

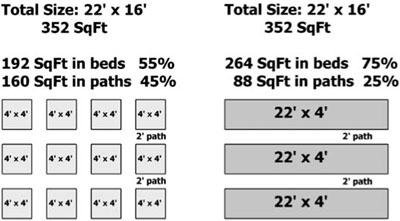
Figure 2.2. Connecting 4 × 4 Beds
If you happen to have a garden full of 4′ × 4′ beds, linking them together into longer beds could increase your production area by 20 percent, as shown in
Figure 2.2
. Besides increasing the production area, having fewer paths results in less path maintenance. Grass paths are a possibility for the wider paths, but not the narrow ones. Maneuvering a mower in tight spaces might result in damage to your plants. Grass paths require mowing and you need to be careful not to blow grass onto your beds. You don’t want to be washing grass off your harvested vegetables. Bagging the grass when you mow these paths gives you mulch or compost material.
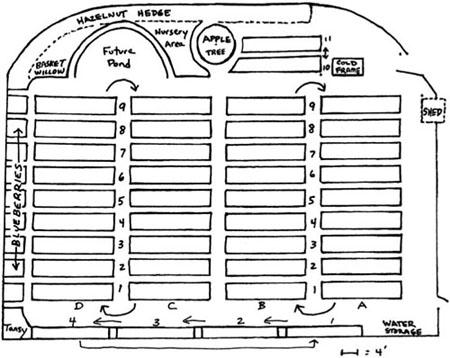
My large garden is divided into four sections of nine beds each, with 18″ paths between the beds. This is the garden you see in my DVD
Cover Crops and Compost Crops IN Your Garden
. There is nothing magical about having nine beds in a row that I know of. That’s just what fits into my available space and it works well for me. The sections are divided by 4′ wide grass paths that I mow with a push mower, bagging the grass. When I originally planned out that garden, I imagined I would just zip through there on the riding mower, which I did in the early years. That was before the garden fence went up. As the plantings got more intense there was no room for the riding mower, which was okay because I couldn’t bag the grass with that mower anyway. The wide paths, in addition to providing more work space and easy access between sections, are now part of my plan to supply mulch in the form of grass clippings to some of my beds.

Figure 2.3. Large Garden
Fall is the time at my place to redefine the bed edges, if necessary. As I harvest the last of the summer crops and plant the cover crops, I dig out the narrow paths if they’ve been mulched or if the white clover has died back, and toss that rich soil onto the beds. Doing this defines the path and enriches the bed. I either broadcast white clover again in the path or mulch with leaves. If you are starting a new garden, dig out the paths. That sod you remove will go to your new compost pile. Any extra soil you dig from the paths can go to build up your new beds. If it is clay that you are digging up, add it to the compost, rather than to
your bed. Clay holds a lot of nutrients that can become available in the composting process.
On your garden map identify each bed with a number or letter, or both. In my garden the four main sections are designated as A, B, C, and D, plus an additional section (E) of smaller beds for perennials. The nine beds in each section are identified as A1, A2, A3, etc. Farmers make similar maps, but instead of beds they have fields, with names to identify them.
If you anticipate predators you may want to plan for a fence. I’ll address fences in
Chapter 12
. My large garden has a good fence now, but it had none when I started out. Even without a fence, you can establish a border. A border defines your space and could be an area surrounding your garden, planted to annual or perennial plants that will enhance your ecosystem, attracting beneficial insects that keep the harmful ones in balance. More about that in
Chapter 6
. A border could be allowed to develop into more of a hedge, planted to one or more types of bushes or small trees. A hedge is something to keep in mind for the future as you plan your space. The height of a hedge needs to be considered so it doesn’t shade your vegetable beds. As you can see on the map (
Figure 2.3
), I have a hazelnut hedge planted on the north side of my garden.
I run my garden beds east to west. In my large garden, each bed is 4′ × 20′. In 1985 I began with 12 beds, each 5′ × 20′ and planted in pairs. Each pair of beds had a 2′ mulched path between the beds and was surrounded by a 4′ grass path. The idea, which I had read about in a magazine article, was to allow space for a garden cart along each bed for bringing in mulch. It seemed like a good idea at the time, but it didn’t take long for me to realize that I only needed 18″ between the beds and that if I wanted to bring leaves in for mulch, it could be easily managed from the short sides. I also discovered I’m more comfortable working in a 4′ wide bed than a 5′ one. I took out those wide grass paths, making room for more beds, and made the paths between the beds 18″. The new plan increased my growing area within the same space and decreased the area needed to be maintained as paths.
Wire grass, a type of Bermuda grass, is a problem in my area anywhere there is grass, and my garden is no exception. It shows up whether
we want it to or not, spreading by both rhizomes and stolons. Limiting the grass along the bed edges limits the threat of wire grass creeping in. Often, people want to surround their beds with wood boxes. That’s not something I recommend, unless you have a really good reason. Doing it because that’s how you think you start a garden is not a good reason. Doing it to exclude wire grass is an even worse reason. If you have wire grass, a box around your beds is not going to keep it out. In fact, it prolongs the problem because parts of the plant will sit right under the edge of the box to keep coming back. The same goes for other barriers you might spend time and money on. Having narrow, well maintained paths leaves no place for the wire grass to grow.
Don’t hesitate to make changes if you find things don’t work as well as you originally planned. A bed length of 20′ works well for me and fits my space nicely. When I was selling vegetables, I had an additional garden with beds 4′ × 75′. A market grower friend of mine had beds 4′ × 200′.
