In The Royal Manner (2 page)

You may also find it useful to invest in a breakfast service which contains larger cups, saucers and side plates for that special brunch or breakfast tray in bed.
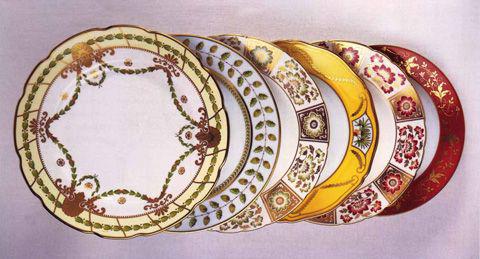
This selection of particularly decorative yet stylish plates gives a good example of the designs available. From left to right: limited edition, Asprey, London; Red Derby Panel by Royal Crown Derby, made exclusively for Asprey, London; hand-painted Limoges, Asprey, London; Green Derby Panel by Royal Crown Derby; Constance by Bernardaud: Eugenie by Thomas Goode.
GLASSWARE
We all have an assorted collection of glassware, most of which can be utilized for pre-dinner drinks or at the table. However, it is essential to have some uniformity at the place settings on your table. It has often been said that ‘size isn't important’ but in this instance it most definitely is. Traditionally, each drink should be served in a different style and different size of glass.
The essentials for a lunch or dinner party are a water glass and a wine glass (if you are serving red and white wine then you should have a different glass for each). Champagne should be served in a flute or champagne saucer or coupe. The flute is by far the most popular design because its shape helps maintain the champagne's sparkle.
I prefer clear crystal glassware with very little design as this looks more stylish. I would particularly choose glasses that are ‘tulip’ in shape, more bulbous at the bottom and slightly narrower at the top. Glasses should never be filled more than two thirds full. Red wine glasses are only filled one third full, to allow the aroma and flavour of the wine to develop. It is a personal preference whether red wine or water should be served in the largest glass.
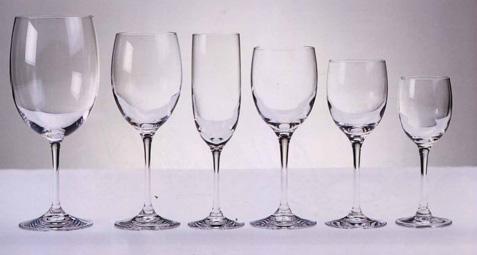
Water / red wine Water / red wine Red wine / water Champagne White wine Sherry Liqueur
HISTORY OF CHAMPAGNE GLASSES
In the early eighteenth century, champagne was a sweet wine served in a wide shallow bowl which seems to have been invented in about 1840. The legend that the ‘coupe’ was copied from the bosom of Marie Antoinette, the unfortunate queen guillotined in 1793 during the French Revolution, may not be fanciful. Hugh Johnson in
The Story of Wine
(1989) notes that the SÈvres porcelain factory did take a cast of ‘the august model’ to create four rounded bowls, which were moulded on elaborate bases of three goats’ heads. These bizarre objects were placed on the Queen's Dairy Temple at the Château de Rambouillet near Versailles. One still remains there today.
BRANDY
Brandy is served in a ‘balloon’ glass which allows the brandy to breathe and reach room temperature more quickly: the larger the balloon, the quicker this will happen. I have served brandy in glasses as large as goldfish bowls – these are excellent for the brandy but they are a complete

nightmare to wash up afterwards!
The balloon should be cupped between both hands, and the brandy swirled gently around the glass before drinking. This will help you enjoy the beautiful aroma of this unique spirit as it warms and breathes. Port and Madeira can be served in a traditional sherry glass, or a smaller, tulip-shaped glass.
CUTLERY
A shortage of cutlery is probably the most common problem when entertaining. It is essential (but all too easy to forget) to check before your event that there are enough knives, forks and spoons available to accommodate each individual place setting. Remember that two sets of teaspoons will be needed if you are serving sorbets and coffee.
An ideal wedding present for anyone would be a canteen of cutlery, be it silver-plated or good-quality stainless steel. It will last a lifetime and will be invaluable for entertaining. Neither soup spoons nor fish knives and forks are fashionable these days, having been replaced in many homes with perfectly acceptable dessert spoons and smaller knives and forks. However if you have fish knives and soup spoons, by all means use them.
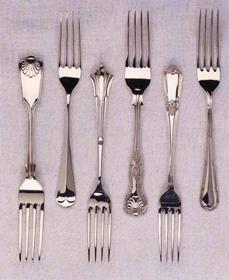
Fiddle Thread Raised Rattail Albany King's Royal Louis XIV Ribbons + bows
TABLE DRESSING
If you want to entertain with style and impress your guests, it is important to dress the table correctly. A well-polished table or a tablecloth is perfectly acceptable for either dinner or lunch. Personally, I prefer a lunch table to be set with a cloth, and a dinner table to remain uncovered with a rich, smooth polished surface upon which the candlelight can be reflected. But there is no definitive ruling, so it's up to your individual taste.
A standard table setting would consist of the following for each person:
A table mat
Cutlery for each course
A side plate and butter knife
Glasses for each wine served plus a glass for water
You will also need a cruet of salt, pepper and mustard, usually shared, and a butter dish (optional).
If you have guests who smoke, remember to provide ashtrays when coffee is served. Some guests may wish to smoke throughout the meal and this is entirely at the host's discretion.
Forks are placed on the left-hand side of the place setting, and knives on the right. The spoon and fork for dessert may be placed either nearest the table mat or, alternatively, at the top of the place setting. Set the butter knife horizontally at the top of the side plate. The butter dish may be placed above the butter knife and the side plate.
A side plate should be placed on the left hand side of the place setting to use for bread and butter. (A roll should be broken in half and then into smaller pieces and buttered individually. Don't be afraid of making crumbs.)
If salad is to be served, it can be placed directly on to the main-course plate if the main course is cold. If the meal is hot then a separate salad plate or bowl should be provided for each person. This should be placed at the top left-hand corner of the place setting. The traditional crescent salad plate would be placed between the main-course plate and the salad plate, curving inwards. Salad can then be transferred from this plate on to the main-course plate before eating.
Throughout our history, a dessert service has been presented after the sweet plate has been cleared from the table. A typical service consists of a plate (fine porcelain and highly decorative), a napkin (often lace or embroidered), a knife, fork and spoon and a small glass finger bowl containing water fragranced with lemon or rose petals. I have seen foreign dignitaries, ambassadors and Members of Parliament drink the water from the finger bowl, and even put their fruit, sugar and cream in it to create their own fruit soup! It can be quite alarming to be presented with a dessert service for the first time but the host sets an example to those in any doubt!
Apart from the place settings, it is important for your table to have a central element. At lunch, it might consist of a simple arrangement of flowers which could incorporate vegetables and fruits as well. Dinner, however, is a more formal meal; a beautiful floral arrangement of seasonal flowers and foliage would be appropriate for the middle of the table, perhaps flanked or surrounded by candelabra or candlesticks. Don't make your arrangement too high – you want your guests to be able to see each other and converse across the table without being distracted by a ‘forest’ of flowers and candles.
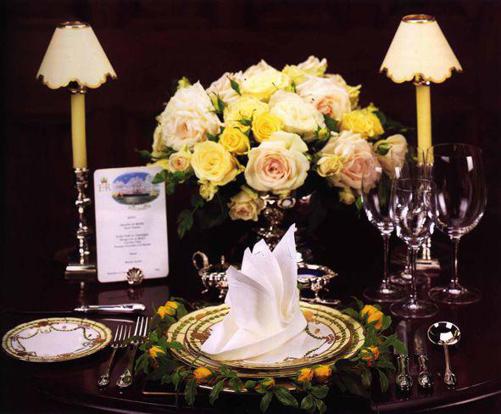
NAPKINS
Although you can use any colour of napkin to suit your chosen colour theme, white will give you the most elegant appearance. There is no substitute for large, starched white linen napkins – they fold well and stand proud at any table setting. Although expensive, they will last for ever and will never go out of fashion – trust me.
Paper napkins are particularly suitable for a children's party, picnic or casual buffet, but not appropriate for a lunch or dinner party.
The folded napkin should stand in the centre of each place setting. I avoid placing napkins on side plates unless the first course is already on the table when your guests sit down. I have chosen to illustrate two of the most classic and stylish folded napkin arrangements.
PRINCE OF WALES’ FEATHERS
‘Fleur de Lys’
1.
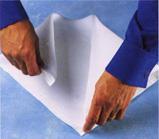
Fold your square napkin into a triangle and bring the left-and right-hand corners towards the top corner.
2.
Fold the resulting diamond in half, from bottom to top, and then fold towards you, in half again.
3.
Turn the napkin over and once again bring the left-and right-hand corners together and tuck in.
4.
Stand the napkin upright and peel down the two side folds.
5.
Finally, peel down the top corner.
1.
