iOS Programming: The Big Nerd Ranch Guide, 3/e (Big Nerd Ranch Guides) (62 page)
Read iOS Programming: The Big Nerd Ranch Guide, 3/e (Big Nerd Ranch Guides) Online
Authors: Aaron Hillegass,Joe Conway
Tags: #COM051370, #Big Nerd Ranch Guides, #iPhone / iPad Programming

In the model file, you described a new entity,
BNRAssetType
, that every item will have a to-one relationship to. You need a way for the user to set the
BNRAssetType
of
BNRItem
s and create new
BNRAssetType
s. Also, the
BNRItemStore
will need a way to fetch the
BNRAssetType
s. (Creating new
BNRAssetType
s is left as a challenge at the end of this chapter.)
In
BNRItemStore.h
, declare a new method.
In
BNRItemStore.m
, define this method. If this is the first time the application is being run – and therefore there are no
BNRAssetType
s in the store – create three default types.
{
if (!allAssetTypes) {
NSFetchRequest *request = [[NSFetchRequest alloc] init];
NSEntityDescription *e = [[model entitiesByName]
objectForKey:@"BNRAssetType"];
[request setEntity:e];
NSError *error;
NSArray *result = [context executeFetchRequest:request error:&error];
if (!result) {
[NSException raise:@"Fetch failed"
format:@"Reason: %@", [error localizedDescription]];
}
allAssetTypes = [result mutableCopy];
}
// Is this the first time the program is being run?
if ([allAssetTypes count] == 0) {
NSManagedObject *type;
type = [NSEntityDescription insertNewObjectForEntityForName:@"BNRAssetType"
inManagedObjectContext:context];
[type setValue:@"Furniture" forKey:@"label"];
[allAssetTypes addObject:type];
type = [NSEntityDescription insertNewObjectForEntityForName:@"BNRAssetType"
inManagedObjectContext:context];
[type setValue:@"Jewelry" forKey:@"label"];
[allAssetTypes addObject:type];
type = [NSEntityDescription insertNewObjectForEntityForName:@"BNRAssetType"
inManagedObjectContext:context];
[type setValue:@"Electronics" forKey:@"label"];
[allAssetTypes addObject:type];
}
return allAssetTypes;
}
Now you need change the user interface so that the user can see and change the
BNRAssetType
of the
BNRItem
in the
DetailViewController
.
Figure 16.12 Interface for BNRAssetType

Create a new
Objective-C class
template file and choose
NSObject
as the superclass. Name this class
AssetTypePicker
.
In
AssetTypePicker.h
, forward declare
BNRItem
, change the superclass to
UITableViewController
, and give it a
BNRItem
property.
@class BNRItem;
@property (nonatomic, strong) BNRItem *item;
@end
This table view controller will show a list of the available
BNRAssetType
s. Tapping a button on the
DetailViewController
’s
view
will display it. Implement the data source methods and import the appropriate header files in
AssetTypePicker.m
. (You’ve seen all this stuff before.)
#import "BNRItemStore.h"
#import "BNRItem.h"
@implementation AssetTypePicker
@synthesize item;
- (id)init
{
return [super initWithStyle:UITableViewStyleGrouped];
}
- (id)initWithStyle:(UITableViewStyle)style
{
return [self init];
}
- (NSInteger)tableView:(UITableView *)tableView
numberOfRowsInSection:(NSInteger)section
{
return [[[BNRItemStore sharedStore] allAssetTypes] count];
}
- (UITableViewCell *)tableView:(UITableView *)tableView
cellForRowAtIndexPath:(NSIndexPath *)ip
{
UITableViewCell *cell =
[tableView dequeueReusableCellWithIdentifier:@"UITableViewCell"];
if (cell == nil) {
cell = [[UITableViewCell alloc] initWithStyle:UITableViewCellStyleDefault
reuseIdentifier:@"UITableViewCell"];
}
NSArray *allAssets = [[BNRItemStore sharedStore] allAssetTypes];
NSManagedObject *assetType = [allAssets objectAtIndex:[ip row]];
// Use key-value coding to get the asset type's label
NSString *assetLabel = [assetType valueForKey:@"label"];
[[cell textLabel] setText:assetLabel];
// Checkmark the one that is currently selected
if (assetType == [item assetType]) {
[cell setAccessoryType:UITableViewCellAccessoryCheckmark];
} else {
[cell setAccessoryType:UITableViewCellAccessoryNone];
}
return cell;
}
- (void)tableView:(UITableView *)tableView
didSelectRowAtIndexPath:(NSIndexPath *)ip
{
UITableViewCell *cell = [tableView cellForRowAtIndexPath:ip];
[cell setAccessoryType:UITableViewCellAccessoryCheckmark];
NSArray *allAssets = [[BNRItemStore sharedStore] allAssetTypes];
NSManagedObject *assetType = [allAssets objectAtIndex:[ip row]];
[item setAssetType:assetType];
[[self navigationController] popViewControllerAnimated:YES];
}
@end
In
DetailViewController.xib
, add a new
UIButton
to the view. Create and connect the outlet and action as shown in
Figure 16.13
. The outlet
assetTypeButton
should be a weak instance variable. (Remember, you create and connect outlets by Control-dragging to
DetailViewController.h
.)
Figure 16.13 Add a UIButton

The following method and instance variable should now be declared in
DetailViewController.h
.
- (IBAction)showAssetTypePicker:(id)sender;
At the top of
DetailViewController.m
, import the header for this new table view controller.
#import "AssetTypePicker.h"
Implement
showAssetTypePicker:
in
DetailViewController.m
.
{
[[self view] endEditing:YES];
AssetTypePicker *assetTypePicker = [[AssetTypePicker alloc] init];
[assetTypePicker setItem:item];
[[self navigationController] pushViewController:assetTypePicker
animated:YES];
}
And finally, update the title of the button to show the asset type of a
BNRItem
. In
DetailViewController.m
, add the following code to
viewWillAppear:
.
// Get image for image key from image cache
UIImage *imageToDisplay = [[BNRImageStore sharedStore]
imageForKey:imageKey];
// Use that imge to put on the screen in imageView
[imageView setImage:imageToDisplay];
} else {
// clear the imageView
[imageView setImage:nil];
}
NSString *typeLabel = [[item assetType] valueForKey:@"label"];
if (!typeLabel)
typeLabel = @"None";
[assetTypeButton setTitle:[NSString stringWithFormat:@"Type: %@", typeLabel]
forState:UIControlStateNormal];
}
Build and run the application. Select a
BNRItem
and set its asset type.
In this chapter, you used SQLite via Core Data. If you’re curious about what SQL commands Core Data is executing, you can use a command-line argument to log all communications with the SQLite database to the console. From the
Product
menu, choose
Edit Scheme...
. Select the
Run Homepwner.app
item and the
Arguments
tab. Add two arguments:
-com.apple.CoreData.SQLDebug
and
1
.
Figure 16.14 Turning on Core Data logging

Build and run the application again. Make sure the debug area and console are visible so you can see the SQL logging. Add a few locations and inventory items; then navigate around the application looking at various items.
Relationships are fetched in a lazy manner. When you fetch a managed object with relationships, the objects at the other end of those relationship are
not
fetched. Instead, Core Data uses
faults
. There are to-many faults (which stand in for sets) and to-one faults (which stand in for managed objects). So, for example, when the instances of
BNRItem
are fetched into your application, the instances of
BNRAssetType
are not. Instead, fault objects are created that stand in for the
BNRAssetType
objects until they are really needed.
Figure 16.15 Object faults
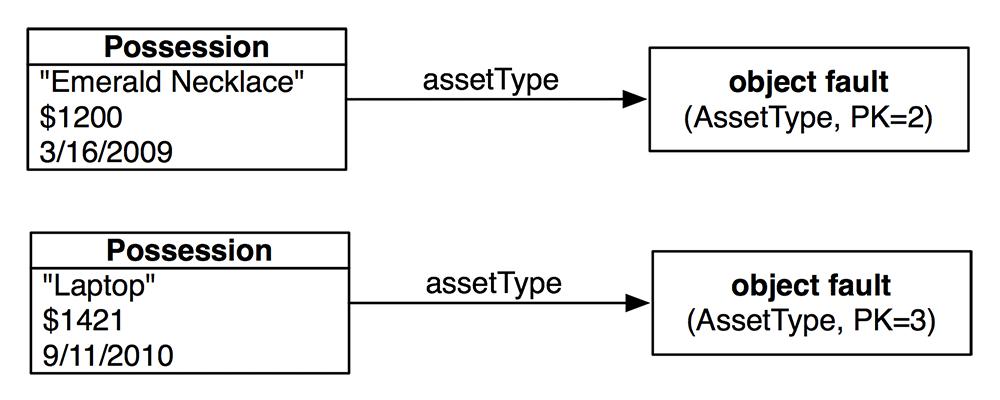
An object fault knows what entity it is from and what its primary key is. So, for example, when you ask a fault that represents an asset type what its label is, you’ll see SQL executed that looks something like this:
(Why is everything prefixed with
Z_
? I don’t know. What is
OPT
? I don’t know, but I would guess it is short for
“
optimistic locking.
”
These details are not important.) The fault is replaced, in the exact same location in memory, with a managed object containing the real data.
Figure 16.16 After one fault is replaced
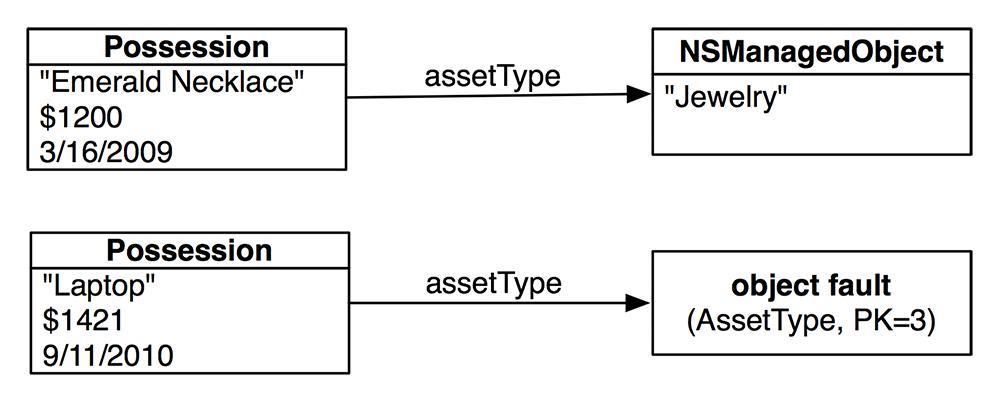
This lazy fetching makes Core Data not only easy to use, but also quite efficient.
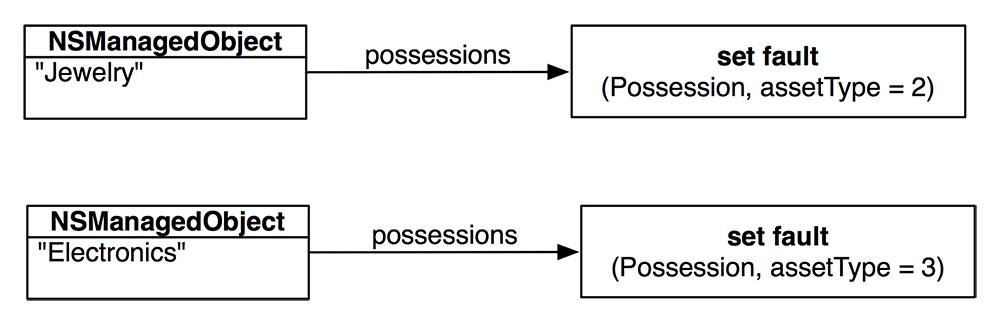
What about to-many faults? Imagine that your application worked the other way: the user is presented with a list of
BNRAssetType
objects to select from. Then, the items for that asset type are fetched and displayed. How would this work? When the assets are first fetched, each one has a set fault that is standing in for the
NSSet
of item objects:
Figure 16.17 Set faults
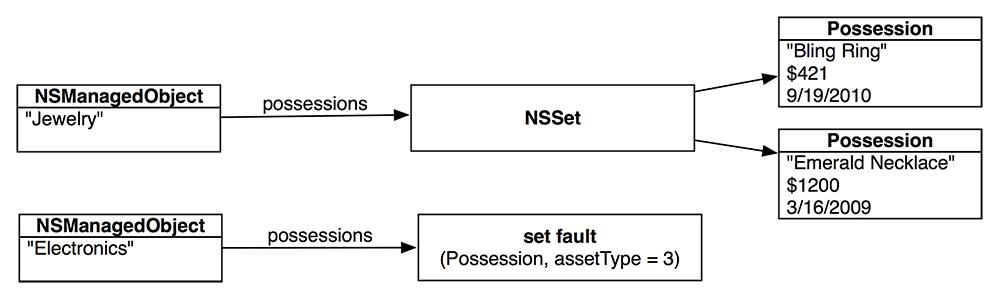
When the set fault is sent a message that requires the
BNRItem
objects, it fetches them and replaces itself with an
NSSet
:
Figure 16.18 Set fault replaced
Core Data is a very powerful and flexible persistence framework, and this chapter has been just a quick introduction to its capabilities. For more details, we strongly suggest that you read Apple’s
Core Data Programming Guide
. Here are some of the things we have not delved into:
- NSFetchRequest
is a powerful mechanism for specifying data you want from the persistent store. We used it a little, but you will want to go deeper. You should also explore the following related classes:
NSPredicate
,
NSSortOrdering
,
NSExpressionDescription
, and
NSExpression
. Also, fetch request templates can be created as part of the model file.
- A
fetched property
is a little like a to-many relationship and a little like an
NSFetchRequest
. You typically specify them in the model file.
- As your app evolves from version to version, you’ll need to change the data model over time. This can be tricky – in fact, Apple has an entire book about it:
Data Model Versioning and Data Migration Programming Guide
.
- There is good support for validating data as it goes into your instances of
NSManagedObject
and again as it moves from your managed object into the persistent store.
- You can have a single
NSManagedObjectContext
working with more than one persistent store. You partition your model into
configurations
and then assign each configuration to a particular persistent store. You are not allowed to have relationships between entities in different stores, but you can use fetched properties to achieve a similar result.