Mac Hacks (31 page)

. Move Your iTunes Library
You
don’t have to keep iTunes files where iTunes wants you to.
Increase your flexibility by choosing where your iTunes files live.
Maybe you’re upgrading to one of Apple’s new Macs with a slick
little SSD (emphasis on “little”). Or maybe you just buy a
lot
of stuff from iTunes Store. No one’s here to
judge; I’m just here to help—specifically, to give your iTunes library a
little more breathing room.
Not
only does iTunes support keeping your library—the actual
media files that are taking up all that space—on an external hard drive,
Apple also quietly built in a way to make it relatively easy for you to
move your growing collection. It goes a little something like this.
First, make sure the new destination for your iTunes library is
plugged in, powered, and all caffeinated up for the big move. (I don’t
actually recommend using caffeine on your hard drive in any way; I have no
idea what it’ll do to your warranty, so let’s not find out today.) Most
people who do this use an external hard drive, because hard drive space
has never been cheaper and it’s still easy to back up with something like
Time Machine or
ChronoSync
.
But some people use a secondary hard drive inside an iMac (yes, you can do
that now) or a Mac Pro.
Speaking of backups, you
did
do a backup of
everything before starting all this, right? (If not, see
[Hack #1]
.) As the saying goes, it’s better to be
safe than woefully heartbroken in the off chance something goes wrong
while moving years and years of iTunes
media.
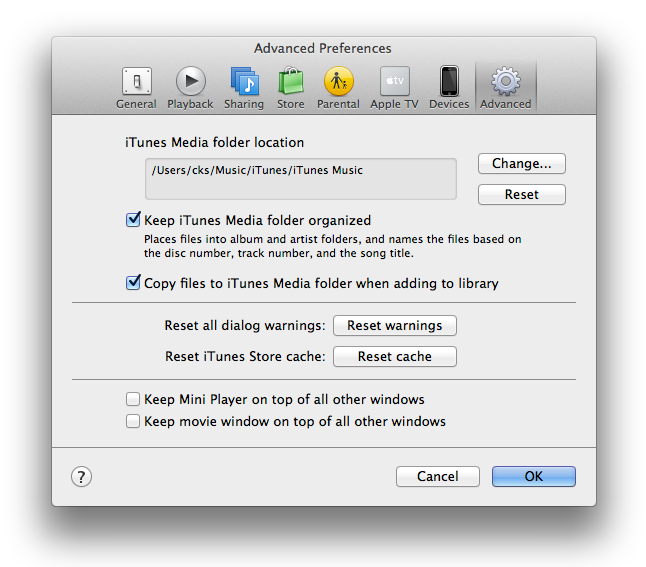
Next, start iTunes and then click iTunes→Preferences→Advanced. Among
the Advanced settings (
Figure 10-6
) is an option called
“Keep iTunes Media folder organized,” which is checked by default. If it
is, you’re in good shape. If it’s not, enable it and then click OK, and
iTunes will take a little time to do exactly that—tidy up all your files
and get them prepared for the move.
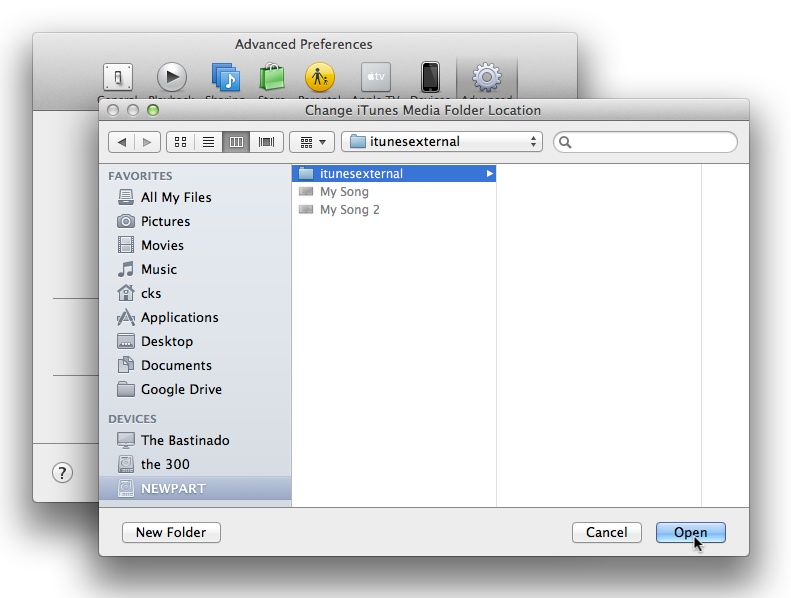
Now, in that same Advanced preferences pane, click the Change button
and a Change Media Folder Location window will appear. This is where you
pick the new home for your iTunes media folder. To do that, click the
final destination on your new storage space (
Figure 10-7
). Then,
if
you want to store other stuff alongside your
iTunes library (this step is purely optional), click the New Folder button
to create a new folder called something like “iTunes Media,” and then
click the Create button. Finally, click Open to confirm your new iTunes
library location, and then click OK to dismiss the preferences dialog
box.
When you click OK, you’ll see a dialog box asking if you want iTunes
to move and rename the files in your iTunes Media folder to the new
location you just specified. This step is a doozy, because it tells iTunes
to copy all your media from the increasingly cramped confines of its
current studio apartment to the six-bedroom open pastures of the new one.
Click Yes and prepare to wait. This step may take some time—anywhere from
a few minutes to a few hours, depending on how much of an iTunes-a-holic
you are...I mean, how large your library is—so be patient. As long as you
have somewhat of a recent Mac, feel free to do other work while iTunes
toils away. Just don’t restart your Mac or, of course, quit iTunes.
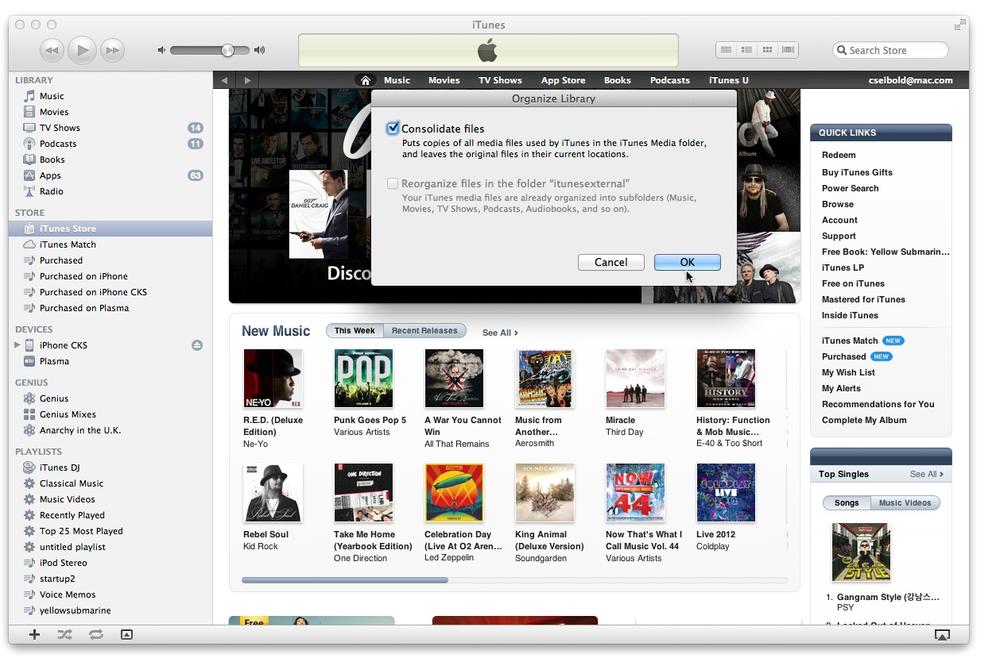
When you’ve done all your stretches and think you’re ready, head to
iTunes and choose File→Library→Organize Library. In the dialog box that
appears (
Figure 10-8
),
check “Consolidate files,” and then click OK to get the iTunes library
migration party started.
When iTunes is done, its progress window will simply disappear, and
you should be all set,
but don’t quit iTunes yet
.
Open a Finder window, go to your library’s
old
location (which is probably inyour Home/Music/iTunes
folder
), and drag that
folder to the desktop or the Trash—anywhere except its old or new
location.
Then, quit iTunes, start it back up, and test a song, movie, or TV
show to make sure the move worked. Once you’re rocking out with your new
library location, feel free to actually trash your old media folder and
bask in the glory of getting all that free space back.
nondestructive—files are only copied, not deleted!
. Get Free and Better-Sounding Music for iTunes
Apple
has promised a major revamp of iTunes (and it’s about
time), but here are two timeless tricks that will help you get more out of
the current and future incarnations of iTunes.
Envious of friends with days’ or years’ worth of music in their
iTunes library but don’t want to infringe on the copyrights of others?
Turns out that there are a variety of ways to fill up your library for
free! Apple releases free music in the iTunes Store every Tuesday.
Typically two or three audio-only tracks and one music video are available
for free download (sometimes more than that, and sometimes fewer). How can
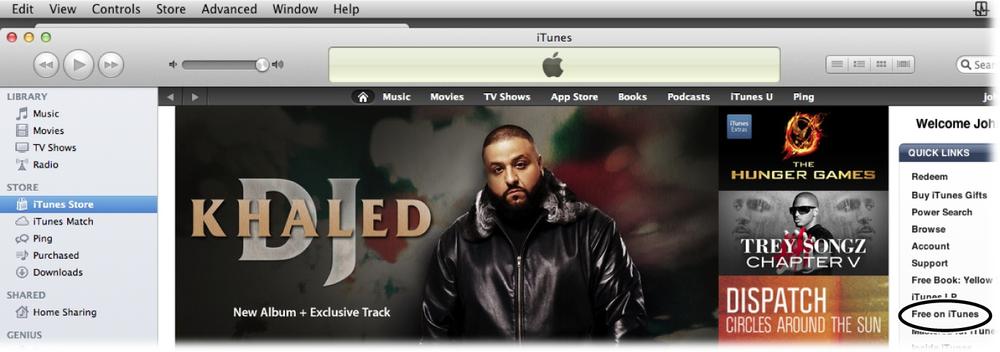
you grab your goodies? Fire up iTunes and select iTunes Store on the left
side of the program’s window (
Figure 10-9
). Once the store
loads, in the Quick Links section, click “Free on iTunes.”
window.
Don’t worry—you don’t need to hit the iTunes store every Tuesday at
12:01 a.m.; the same songs and video are available for an entire week
until they’re replaced by a new set. Their purpose is to introduce you to
artists and their material—Apple is hoping you’ll return to buy more of
their selections.
When grabbing the free stuff, don’t be choosy; take all the free
music available every week. You can delete the songs you dislike, and keep
those you enjoy. (Keep in mind that your taste may change over time—music
you despised when you were younger can become a favorite in later life.)
Once you get the songs from iTunes, you can share them with your other
computers and iOS devices just as you would with purchased music.
Note: Your percentages will vary. Some weeks you’ll wonder why you
bother with the free stuff, and other weeks you’ll obtain music and/or a
video that you’ll enjoy for decades. I typically keep a couple of free
iTunes songs and one video each month of different genres and from a
range of artists, most of whom I’m hearing and watching for the first
time.
iTunes
isn’t the only source of free music—far from it. Amazon.com
has thousands of free MP3s that are available for much longer than a week,
and the variety and quality are actually superior to what’s on iTunes.
Amazon offers some complete albums, as well as a dizzying array of
individual tracks. Do a web search for “amazon free mp3 downloads” to get
started (the specific URL changes often).
Of course, there’s a downside to Amazon’s free offerings: you need
an Amazon account (though you probably already have one). You also have to
be good at searching, using their Cloud Player and/or download manager,
and then importing the downloaded selections into iTunes or listening to
them from Amazon’s cloud.
Those are two good sources for free tunes, but they’re bound to
leave you wanting more. Chances are you’ll try a quick web search for
“free music downloads for itunes,” and you’ll come upon both legal and
questionable sources of freebie tracks. Copyright violations are now
serious business for lawyers, which means you need to be careful about
what you obtain for free. Legal is good, and stealing is bad.
Unintentionally downloading viruses and malware can make your digital and
analog lives miserable, too. So be
extremely
careful
what you download and from whom.
That doesn’t mean that you can’t find free tracks out there, it just
means that if you choose to scour the Web for free music, you have to be
prepared to invest a bunch of time and you’ll likely have to sit through
some excruciating music. For time invested versus payoff, iTunes is the
safest bet: its free offerings are easy to find, a breeze to download, and
there’s new stuff every
week.
Do
your downloaded and imported audio tracks sound crummy on
your computer, regardless of whether you’re using its internal speakers,
headphones, or external speakers? In this section, you’ll learn to love
your iTunes Equalizer.
To open the Equalizer, in iTunes, go to Window→Equalizer. The
program’s default equalization (EQ) settings are pretty good for a lot
of music. For example, most conventional headphones sound best with the
Treble Booster EQ setting (choose it from the menu at the top of the
Equalizer—see
Figure 10-10
), due to the
inherent bass emphasis of these sorts of headphones. But don’t be
satisfied—try tweaking the defaults; over time, you’ll decide which
settings sound best with your equipment and sonic preferences.
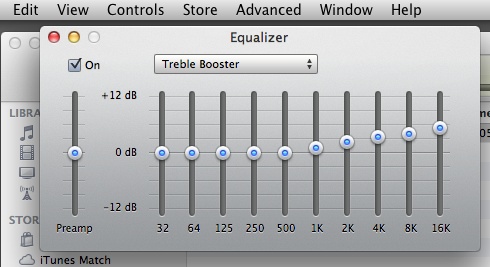
headphones.
If you get frustrated that the built-in EQ settings don’t
sufficiently improve your listening experience, you can make custom EQs
that you can specify for different equipment. You might have one equalizer
setup for headphones, say, another for built-in speakers, and yet
another for external speakers. To create a new preset, move the sliders
up or down in each EQ frequency zone until your headphones (for example)
sound as good as possible. Be patient, and listen carefully. When you
are pleased with your custom EQ, click on the word “Manual” above the
sliders, and then mouse up to Make Preset. Type in your description
under New Preset Name (
Figure 10-11
), click OK, and
that custom EQ preset is there forever (or at least until you decide to
edit the list and delete it).
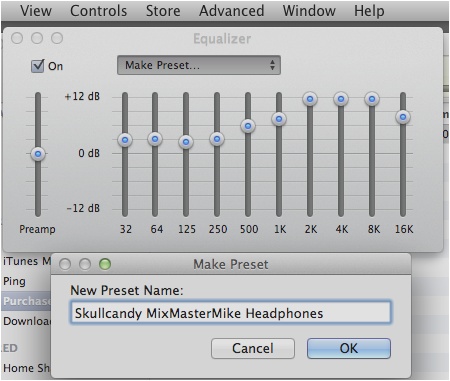
You might be wondering why you’d need to resort to creating a
custom equalizer setting when Apple includes so many of them (more than
20) with iTunes. Don’t be fooled by the apparently obvious names of the
EQ presets: some of them will make your music sound horrible, regardless
of genre and what you’re playing them on. In short order, you may keep a
handy checklist of the built-in EQs that are a complete waste of your
time.
For example, do small speakers sound best with the Small Speakers
EQ applied? Nope—not in my
experience. And the Piano EQ works best with certain types of vocal
performances, and some instrumental tracks sound best using the Spoken
Word setting. You get my drift: experiment and be prepared to dump
several of the preset EQs into the dustbin of disappointment.
A few built-in and some custom EQs will likely satisfy most of
your listening preferences. My consistent favorites—depending more upon
the playback equipment (speakers and such) I’m using than upon the audio
source equalization—are Manual, Flat, Acoustic, Jazz, and Treble
Booster.
Your ears are unique, and you deserve to hear your music the way
you prefer. Regardless of whether you’re listening on a Mac, headphones,
speakers, or whatever, if you can tell the difference between inferior
sound and decent sound, it’s worth spending a few minutes with the
iTunes
Equalizer.
—
John “Nemo” Nemerovski
