Make: Electronics (32 page)
Authors: Charles Platt

Background
Soldering myths
Myth #1: Soldering is very difficult.
Millions of people have learned how to do it, and statistically, you are unlikely to be less coordinated than all of them. I have a lifelong problem with a tremor in my hands that makes it difficult for me to hold small things steadily. I also get impatient with repetitive detail work. If I can solder components, almost anyone should be able to.
Myth #2: Soldering involves poisonous chemicals.
Modern solder contains no lead. You should avoid inhaling the fumes for prolonged periods, but that also applies to everyday products such as bleach and paint. If soldering was a significant health hazard, we should have seen a high death rate among electronics hobbyists decades ago.
Myth #3: Soldering is hazardous.
A soldering iron is less hazardous than the kind of iron that you might use to iron a shirt, because it delivers less heat. In fact, in my experience, soldering is safer than most activities in a typical home or basement workshop. That doesn’t mean you can be careless!
Soldering alternatives
As recently as the 1950s, connections inside electronic appliances such as radio sets were still being hand-soldered by workers on production lines. But the growth of telephone exchanges created a need for a faster way to make large numbers of rapid, reliable point-to-point wiring connections, and “wire wrap” became a viable alternative.
In a wire-wrapped electronics project, components are mounted on a circuit board that has long, gold-plated, sharp-cornered square pins sticking out of the rear. Special silver-plated wire is used, with an inch of insulation stripped from its ends. A manual or power-driven wire-wrap tool twirls the end of a wire around one of the pins, applying sufficient tension to “cold-weld” the soft silver plating of the wire to the pin. The wrapping process exerts sufficient pressure to make a very reliable joint, especially as 7 to 9 turns of wire are applied, each turn touching all four corners of the pin.
During the 1970s and 1980s, this system was adopted by hobbyists who built their own home computers. A wire-wrapped circuit board from a hand-built computer is shown in Figure 3-37. The technique was used by NASA to wire the computer in the Apollo spacecraft that went to the moon, but today, wire-wrapping has few commercial applications.
The widespread industrial use of “through-hole” components, such as the chips on early desktop computers, encouraged development of wave soldering, in which a wave or waterfall of molten solder is applied to the underside of a preheated circuit board where chips have been inserted. A masking technique prevents the solder from sticking where it isn’t wanted.
Today, surface-mount components (which are significantly smaller than their through-hole counterparts) are glued to a circuit board with a solder paste, and the entire assembly is then heated, melting the paste to create a permanent connection.
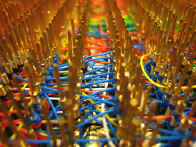
Figure 3-37.
This picture shows some of the wire-wrapping in Steve Chamberlin’s custom-built, retro 8-bit CPU and computer. “Back in the day,” connecting such a network of wires with solder joints would have been unduly time-consuming and prone to faults. Photo credit: Steve Chamberlin.
Tools
Eight most common soldering errors
1.
Not enough heat.
The joint looks OK, but because you didn’t apply quite enough heat, the solder didn’t melt sufficiently to realign its internal molecular structure. It remained granular instead of becoming a solid, uniform blob, and you end up with a “dry joint,” also known as a “cold joint,” which will come apart when you pull the wires away from each other. Reheat the joint thoroughly and apply new solder.
A leading cause of underheated solder is the temptation to use the soldering iron to carry solder to the joint. This results in the cold wires reducing the temperature of the solder. What you should do is touch the soldering iron to heat the wires first, and then apply the solder. This way, the wires are hot and help to melt the solder, which wants to stick to them.
Because this is such a universal problem, I’ll repeat myself:
Never melt solder on the tip of the iron and then use it to carry the solder to the joint.
You don’t want to put hot solder on cold wires. You want to put cold solder on hot wires.
2.
Too much heat.
This may not hurt the joint, but can damage everything around it. Vinyl insulation will melt, exposing the wire and raising the risk of short circuits. You can easily damage semiconductors, and may even melt the internal plastic components of switches and connectors.
Damaged components must be desoldered and replaced, which will take time and tends to be a big hassle (see “Tools: Desoldering” on
page 109
for advice).
3.
Not enough solder.
A thin connection between two conductors may not be strong enough. When joining two wires, always check the underside of the joint to see whether the solder penetrated completely.
4.
Moving the joint before the solder solidifies.
You may create a fracture that you won’t necessarily see. It may not stop your circuit from working, but at some point in the future, as a result of vibration or thermal stresses, the fracture can separate just enough to break electrical contact. Tracking it down will then be a chore. If you clamp components before you join them, or use perforated board to hold the components steady, you can avoid this problem.
5.
Dirt or grease.
Electrical solder contains rosin that cleans the metal that you’re working with, but contaminants can still prevent solder from sticking. If any component looks dirty, clean it with fine sandpaper before joining it.
6.
Carbon on the tip of your soldering iron.
The iron gradually accumulates flecks of black carbon during use, and they can act as a barrier to heat transfer. Wipe the tip of the iron on the little sponge mounted in the base of your soldering iron stand or your helping hand.
7.
Inappropriate materials.
Electronic solder is designed for electronic components. It will not work with aluminum, stainless steel, or various other metals. You may be able to make it stick to chrome-plated items, but only with difficulty.
8.
Failure to test the joint.
Don’t just assume that it’s OK. Always test it, by applying manual force if you can (see Figures 3-38 and 3-39 for the ideal protocol) or, if you can’t get a grip on the joint, slip a screwdriver blade under it and flex it just a little, or use small pliers to try to pull it apart. Don’t be concerned about ruining your work. If your joint doesn’t survive rough treatment, it wasn’t a good joint.
Of the eight errors, dry/cold joints are by far the worst, because they are easy to make and can look OK.
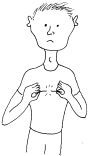
Figure 3-38.
Test result of a bad solder joint.
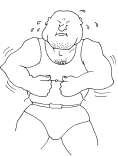
Figure 3-39.
Test result of a good solder joint.
Your Second Solder Joint
Time now to try your pencil-style soldering iron. Once again, you must leave it plugged in for a good five minutes to make sure it’s hot enough. In the meantime, don’t forget to unplug your other soldering iron, and put it somewhere safe while it cools.
This time I’d like you to align the wires parallel with each other. Joining them this way is a little more difficult than joining them when they cross each other, but it’s a necessary skill. Otherwise, you won’t be able to slide heat-shrink tubing over the finished joint to insulate it.
Figures 3-40 through 3-44 show a successful joint of this type. The two wires do not have to make perfect contact with each other; the solder will fill any small gaps. But the wires must be hot enough for the solder to flow, and this can take an extra few seconds when you use the low-wattage pencil-style iron.
Be sure to feed the solder in as shown in the pictures. Remember: don’t try to carry the solder to the joint on the tip of the iron. Heat the wires first, and then touch the solder to the wires and the tip of the iron, while keeping it in contact with the wires. Wait until the solder liquifies, and you will see it running eagerly into the joint. If this doesn’t happen, be more patient and apply the heat for a little longer.
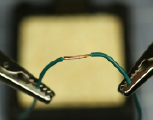
Figure 3-40
.
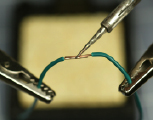
Figure 3-41
.
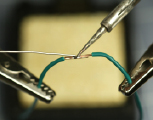
Figure 3-42
.
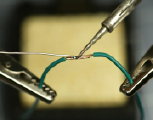
Figure 3-43.
This and the preceding three figures show how joining two wires that are parallel is more difficult, and the low-wattage, pencil-type soldering iron will require longer to heat them sufficiently for a good joint. Thinner solder can be used.
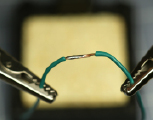
Figure 3-44.
The finished joint has enough solder for strength, but not so much solder that it will prevent heat-shrink tubing from sliding over it.