Read Making Artisan Cheese Online
Authors: Tim Smith
Making Artisan Cheese (17 page)

It is important to cut cheese curds as close as possible to the size that the recipe calls for. If you have different-sized curds, some will turn out drier and others moister, which can lead to problems with the acidity of your cheese as well as its texture. Take your time when cutting curds: You only get one chance to do it right.
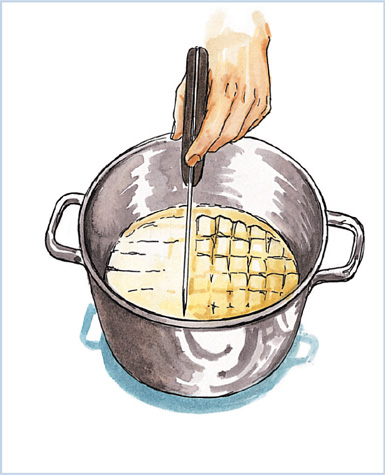
Cutting the Curd
Cutting the curd takes place once the rennet has come to a complete set. The process of cutting is simple: Using your curd knife, cut rows ½" (about 1 cm) apart. Next, turn your pot 90 degrees, and using the same spacing, cut at right angles to your original cuts. The final cut is tricky, because you are trying to break the curd into cubes. The best approach is to use your knife to cut through half of the pot at a 45-degree angle. Turn the pot 90 degrees again, and finish cutting so that you have cheese pieces shaped roughly like cubes. When you start cutting, you will notice a tremendous release of whey. This is syneresis: the contraction of the curd and the release of the whey.
Remember that the size of the curds will affect the texture of the cheese. Smaller curds will result in a drier, firmer cheese, whereas larger curds will create a cheese with a smoother, softer texture. In the case of Swiss Emmental, ¼" (6 mm) is the standard size to cut the curd, about the size of a piece of long-grain rice. Traditionally, the curds of Camembert are ladled into the molds in large unbroken pieces, and there is no cutting. These two cheeses could not be more dissimilar: Camembert with its smooth velvety texture, and Emmental with its tight, firm texture.
Using Direct-Set Cultures
There are a variety of sources from which you can purchase direct-set cultures. In some cases the suppliers will provide you with a single, prepackaged amount of culture that is ready for use, based on two gallons of milk. All you do is add the starter to the milk and stir. In other instances, suppliers sell bulk amounts that are intended for commercial use. In these instances, you will need to measure the culture using the suggested guidelines:
teaspoon per 1 gallon (3.8 L) milk
¼ teaspoon per 2–5 gallons (7.6–19 L) milk
½ teaspoon per 5–10 gallons (19–37.8 L) milk
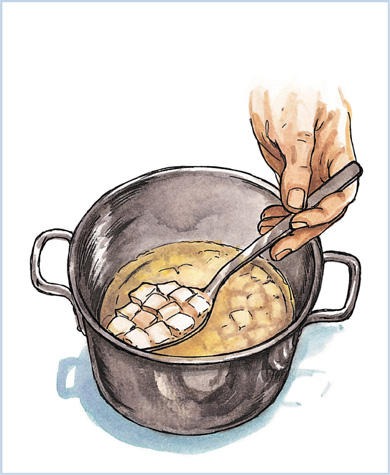
Scalding and Stirring Curds
After renneting, the next step is to remove as much whey from the cheese as required. The whey contains lactic acid, which is the food for the starter culture. If the whey is not removed, the curds will become too acidic to make cheese with. The process for removing the whey involves scalding and stirring.
Scalding raises the temperature of the cut curds to a target temperature specific to the type of cheese being made. As the temperature rises, the rate of the whey draining from the curds increases. This has an added benefit of depriving the starter culture of nutrients, effectively slowing down its rate of growth. The longer the curds stay at the target temperature, the smaller the curds will become and the drier the cheese will be.
In conjunction with the scalding is the stirring of the curds. Stirring is done so that the curd particles are kept in suspension in the kettle or pot. Without stirring, the curds would combine and form large clumps, which will hinder the release of the whey and give the cheese an inconsistent texture.
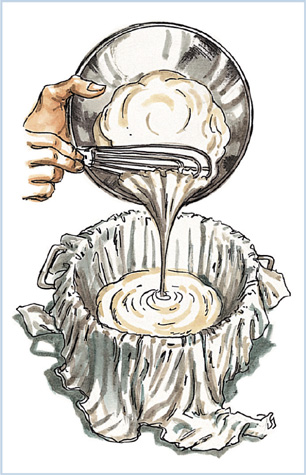
Removing the Whey by Draining
Draining is the final step in removing the whey from the curds. Typically it is done in a colander lined with cheese cloth or butter muslin. The procedure is simple: Once your curds have reached the desired texture, you simply pour your cut curds into the cheese cloth–lined colander and let gravity do all of the work.
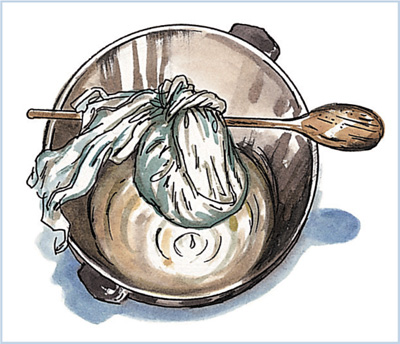
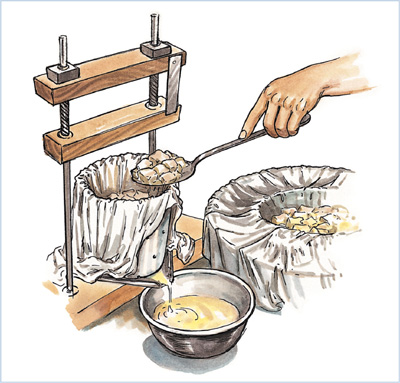
In some cases you may want to tie the cheese cloth into a ball around the cheese, and hang it from a wooden spoon that rests on the edges of a stock pot.
In other cases, your next step is to remove the curds from the pan and place them directly into a mold for pressing. When making Cheddar or washed-curd cheeses, an additional step is required.
Milling
Milling is the process of breaking apart the drained curd with your hands into small pieces of a uniform size before preparing it for salting. The size of the pieces will affect the texture and flavor of the cheese as well as the amount of salt that needs to be added.
Salting
As mentioned earlier, salt plays a variety of roles in cheese making: as a preservative, a flavor enhancer, and a dehydrator. For the cheeses covered in this chapter, there are two methods for salting.
DRY-SALTING
Typically associated with British-style cheeses such as Cheddar and Cheshire, dry-salting entails mixing dry salt with the curds at the end of the draining process, before placing the cheese in the mold and press. Typically, this process is done by sprinkling salt into the curds and mixing it with your hands. Once blended into the curds, the salt will help to shrink the curd pieces through dehydration, allowing the curds to knit closer together in the mold.
BRINE-SALTING
A brine is a supersaturated solution of salt and water, in which cheeses are literally bathed. (Brine solution consists of 2 pounds [905 g] of salt stirred into and dissolved in 1 gallon [4.5 L] of water, heated to 190°F [88°C].) The types of cheeses that are usually brined are hard cheeses, such as Gouda and Emmental. Brining occurs directly after a cheese is removed from the press. The cheese is literally dunked into this salty bath. Once in the brine, the cheese begins to absorb salt, and the proteins begin to harden and form the rind.
Pressing
Pressing is the final stage in whey removal and the process that gives cheese its shape and texture. Pressing is a necessary step for all of the firm to hard cheeses, such as Cheddar, Gouda, and Emmental. When pressing your cheeses, keep in mind it is a delicate balance between too much and not enough pressure. A cheese that is underpressed will become too dense because the whey will not have a chance to drain properly. Too much pressure will cause the outer rind to split, allowing bacteria to ferment under the rind.
In general, the warmer the curds, the lighter the pressure required, because the whey will move more freely out of warmer curds. Although there are specific suggestions for pressing in each recipe, the general guideline is that for a harder cheese, you will want a longer pressing time. High-fat cheeses will also require a longer pressing time, because the fat retains more moisture. On your initial pressing, the draining fluid should be clear in color with a slow, steady flow. If the fluid has a milky white color, you are using too much pressure.
