Making It: Radical Home Ec for a Post-Consumer World (12 page)
Read Making It: Radical Home Ec for a Post-Consumer World Online
Authors: Kelly Coyne,Erik Knutzen

TO TREAT YELLOWED WHITES:
Nature doesn’t make white cloth. Fabric is bleached to whiten it and often rinsed with blue dye in the factory to make it sparkling white. That blue dye washes out over time, leaving whites with a yellow cast. Optical brighteners in modern detergents counteract this yellowing, but so does laundry bluing, a time-honored but largely forgotten product that counteracts yellowing by depositing a tiny bit of blue dye on the surface of fabrics during the rinse cycle. It’s nontoxic and has many other odd uses, from turning flowers blue to growing crystal gardens. Look for it in the laundry section, where it is sold in smallish blue bottles, hidden away on the top shelf with other laundry oddities. The biggest brand is Mrs. Stewart’s Laundry Bluing. It used to be common but, like washing powder, can be hard to find these days, depending on where you live. We order it online.
To use laundry bluing, follow the instructions on the container. Basically, you dilute a tiny amount of bluing—like ½ teaspoon—in 1 or 2 cups of water and add that to your laundry’s rinse cycle. You dilute it first because you’d stain your clothes if you poured straight bluing on them.
FOR SAFER BLEACHING:
Store-bought oxygen bleaches are a nontoxic way of keeping your laundry bright when using homemade soap. They often require presoaking and are most effective when used regularly on white loads, as a maintenance measure, rather than after the fabric has become hopelessly dingy. A 3 percent solution of hydrogen peroxide, the sort sold in drugstores for first aid, has a similar chemical makeup to oxygen bleach. It’s not cost effective unless you can get it on the cheap, but you can use it as bleach. Use about a cup per load of wash, or concentrate it by presoaking a few items with the same amount of peroxide in a bucket of water.
SUN BLEACHING:
The sun is the most powerful bleaching agent of them all. On a sunny day, hang your whites out to dry or spread them on clean shrubbery.
FABRIC SOFTENER
Use ½ to 1 cup distilled white vinegar in the rinse cycle instead of fabric softener to deodorize and soften fabrics. The vinegar scent vanishes when the fabric dries. White vinegar helps rinse soap out of fabric more effectively than water alone and prevents soap buildup in your washing machine. You don’t have to use it with every load, but you should definitely use it in your loads of whites to keep soap deposits from turning them dingy. Find white vinegar in inexpensive gallon bottles near the salad dressings in the supermarket.
PERFUMES
It takes a powerful perfume to survive a wash and rinse cycle and to live on to scent dry clothing. That’s why the perfumes in commercial detergents can be so obnoxiously strong. Natural fibers washed with plain soap don’t smell like much, but the important thing is that they don’t smell.
LAUNDRY DETERGENT FOR GRAY WATER
If you send your wash water to the garden, or plan to someday, kudos to you! Just be aware that you can’t use homemade laundry soap or even eco-friendly detergents in your washer. Eco-detergents might be formulated to be harmless in seawater, but they are not good for soil, and homemade laundry soap is similar. It’s made up mostly of salts, and salt and plants don’t get along at all. Instead, you must use a detergent specifically formulated for gray water, and the only brand we know of is Oasis Biocompatible Super-Concentrated Laundry Liquid by Bio Pac. You might find it in a health food store, or you can order it online. An alternative to Oasis is the soap nut. As of this writing, we’ve not tested soap nuts in our own gray water system, but we’ve been told by reliable sources that they are gray water compatible.
Whether you are using Oasis or soap nuts, be sure not to use any laundry boosters (like baking soda, borax, or washing soda) with them, since these boosters are all salts.
Essential oils, the natural alternative to artificial perfumes, don’t survive the washing process unless used in huge quantities, and they’re expensive. Feel free to put a few drops in your laundry mix just to make it smell good when you open the bottle and when you’re loading the wash. It sounds silly, but nice scents can make laundry day more pleasant. Just don’t expect the scent to be there at the end.
If you want your clothes to be scented, it’s more effective to tuck sachets full of dried herbs and spices, cotton balls soaked with essential oils, cedar chips, perfumed soaps, or boxes of incense in your dresser drawers or in mesh bags in the closet. If you iron, scent distilled water with essential oil and spray it on as you go.
TREATING STAINS
In general, soaking fabrics in cold water prevents stains from setting; hot water sets a stain permanently. Keep the stained garment in a bucket of cold water until washing day. Presoaking in the washer also helps. If you are using borax or washing soda in your laundry mix, let the stained load presoak in the washer for a half hour or more. Both powders will help lift stains. The same is true for commercial oxygen bleaches. But specific stains require specific treatment, as follows:
COFFEE AND TEA:
Don’t dab these with soap—it may set the stain. Instead, scrub with a paste of borax or washing soda. Or soak in a solution of either borax or washing soda, using a couple of tablespoons in a bucket of cold water. (Remember to use gloves when handling washing soda, and take the time to test the washing soda on an inconspicuous area of fabric, because it is harsh. Don’t use washing soda on anything with wool or silk fibers.) When you’re out and about, club soda works pretty well on coffee and tea stains because, like borax and washing soda, it’s alkaline.
WINE, BERRIES, TOMATO SAUCE:
These are acidic stains. Treat the same way as coffee and tea.
BLOOD AND MILK:
Protein-based stains respond well to the methods above, especially to washing soda. The real trick with blood is catching it quickly, rinsing it, and then presoaking in cold water until you can do the wash. For stubborn blood stains, soak in 3 percent hydrogen peroxide or an oxygen bleach.
Soap Nuts, a Natural Alternative
Soap nuts are the fruits of trees in the
Sapindus
genus, usually
Sapindus mukorossi
(though all
Sapindus
make soaping fruits), which contain saponins, natural surfactants that can be used as a soap substitute. Soap nuts have been gaining ground in green cleaning circles in recent years, because they are environmentally friendly, non-irritating to the skin, minimally processed, and biodegradable. A handful of these dried fruits, which look somewhat like small dates, are put into a cloth sack and thrown in with the laundry. The same bag of soap nuts can be used up to five times before the nuts are drained of their cleaning power, at which point the fruits can be composted.
Currently, most soap nuts are imported from India, China, and Indonesia, where they’ve been used for washing for many years. While we’re not keen on the fact they must take a transcontinental journey to our washer, we have to remember that the oils we use to make soap are imported as well, borax is mined, and baking soda and washing soda are industrial products, so the environmental calculus is rather complex.
A more pressing concern is how the soap nuts from any given supplier are produced. Are they sustainably harvested? Not all are. Some are harvested by clear-cutting. Practice due diligence when selecting a supplier. Soap nuts are rarely found in stores, even health food stores. It’s likely that you’ll have to order them by mail. We’d like to see
Sapindus mukorossi
grown closer to home, perhaps in your own backyard. They could be cultivated in the southern parts of the United States, where native trees from the Sapindaceae family, like the western soapberry, already grow. Soapberries are smaller and less soapy than the fruits of
S. mukorossi,
but they can be used in the same way.
As we mentioned, soap nuts are usually deployed in the laundry in a small muslin bag. This is the most direct method, and the one recommended by most soap nut companies. From a
DIY
point of view, though, it’s more interesting to infuse soap nuts in hot water. The resulting liquid is a mild, all-purpose cleanser that can be used as laundry detergent, liquid soap, and shampoo.
TO MAKE A SOAP NUT INFUSION:
Place 1 cup soap nuts in 1 quart water, bring to a simmer, and cook gently for 10 minutes. Don’t let the mixture come to a hard boil or it will foam all over the stove. You might notice they give off a peculiar vinegary odor when being cooked, but that scent doesn’t transfer to the wash. After 10 minutes, let it sit to cool, then transfer the amber liquid to a jar, straining out the fruits. As you’re straining, press the cooked fruits with the back of a spoon, or squeeze them with your hands, to release all the juices.
The liquid can sit at room temperature for about 2 weeks before it starts to ferment. For longer storage, keep it in the refrigerator.
TO USE THE INFUSION:
Add 2 tablespoons of soap nut liquid to each load of wash. Whether used whole or in liquid form, soap nuts produce few suds and thus are safe for
HE
machines. They work equally well in hard or soft water, and don’t require the use of fabric softeners or vinegar rinses, but do be sure to use an oxygen bleach with every white load to keep fabric bright.
GREASE:
Soap and detergent lift grease. Rub grease stains with liquid detergent, wet bars of laundry soap, or even dishwashing liquid. Washing soda also removes grease.
PERSPIRATION STAINS:
Try spraying white vinegar on armpit stains and letting the garment sit a few minutes before washing. Ring-around-the-collar is body grease and perspiration combined. Rub this directly with a bar of laundry soap or scrub with dish soap or straight liquid detergent.
GRASS AND RUST:
These stains respond best to treatment with acids like vinegar or lemon juice.
In general, make sure stains are gone before you put your clothes in the dryer, or the heat will make the stain permanent.
26>
Basic Mending
Knowing how to sew a little by hand is a useful skill. You can mend favorite garments and sew up simple things like curtains even if you don’t have a sewing machine. Mending was traditionally done on laundry day, and it’s a good tradition to revive. Inventory your clothes before washing; set aside clothes with loose buttons or small rips that might get bigger during washing.
YOU’LL NEED
NEEDLES.
These come in all sorts of sizes for different purposes. In general, you’d use smaller, finer needles for delicate fabric and sturdy needles for tough fabric, but for casual mending you can get by with just about anything.
THREAD.
Choose thread that matches the material you’re sewing: cotton for cotton, light thread for delicate fabric, heavy thread for coarse fabric, etc. Thread weakens with age, so if you intend to sew with a 10-year-old spool of thread you fished out of your junk drawer, give the strand a few sharp yanks to test its tensile strength. You don’t want to waste your time mending with rotten thread.
Gather your garments, needles, and thread. For the strongest stitches, double the length of thread you’re using. Thread the needle and knot the two ends together. When hand-sewing, keep your thread short, less than your arm’s length, so it doesn’t tangle and knot as you sew.

RUNNING STITCH
This is a fast and easy stitch used to join two pieces of material, usually temporarily because it’s not very strong. You can use the running stitch instead of pins to temporarily secure two pieces of material together, which is called basting. The running stitch is also a gathering stitch. If you run it along the length of a piece of fabric and then give the thread a tug, the material will collect into gathers. The wider the spacing of the stitches, the wider the gathered folds.
Sewing the running stitch is just a matter of threading the needle over and under the fabric at regular intervals, as illustrated on the opposite page. It’s stitching 101.
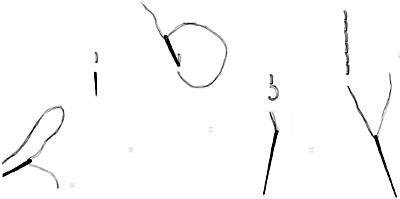
BACK STITCH
This is a strong stitch for general hand-sewing and mending. If you execute it with embroidery floss, you can use it to make decorative patterns on clothing or pillows, to spell names, or to outline simple shapes.
The back stitch is easier to do than to describe in words. Let the diagram be your primary guide. Basically it is a one-step-forward, one-step-backward process. To start, you might want to anchor your stitching securely by taking three tiny stitches, one over the other, at the starting point. That way, you don’t have to rely on the knot at the end of your thread. Next, make a stitch that shows on top of the fabric,
A
and bring your needle back up through the fabric one stitch length away from this first stitch.
B
Instead of continuing to stitching forward at this point, you backtrack and plunge your needle back through the fabric at the end point of stitch 1.
C
So this new stitch is stitched backward, rather than forward. Bring the needle up through the fabric one stitch length away from this stitch
D
and, again, stitch backward to fill the space behind your needle. Your goal is to create an even line of stitches with no space between them.
E
Continue in the same manner until you reach the end of your stitching. Then secure your thread by once again taking three tiny stitches at the end point, or tying a knot, or both.
SEWING A BUTTON
Start off by anchoring your thread exactly where you want the button. Lay the button in position, then poke the needle up from underneath the fabric and through one of the button’s holes. Set aside the button and take three tiny, overlapping stitches at that point to secure the thread.
F
Then place the button into position again.

Flat buttons come with two or four holes. If you have a four-hole button, attach it by sewing parallel loops through opposite pairs of holes rather than crisscrossing your threads to make an X shape. Crossed threads wear against one another and make the button fall off again sooner.
Here’s the general procedure for attaching the button: Bring the needle up through one of the button’s holes and take a moment to ensure the button is placed properly. Then send the needle back down the opposite hole, looping the thread three or four times between the two holes. If you have a four-hole button, repeat this process for the remaining two holes, so that you end up with the button held down by two parallel sets of stitches, not an X.
But wait!
Before you begin stitching down your button by the general method above, consider the thickness of the button and the fabric you’re attaching it to. Every button needs a little “play”—if it’s sewn down too tightly, it will be hard to use. The thicker the fabric and the bigger the button, the more play you need. Think of the difference between a coat button and a shirt button. Sometimes you can allow enough play by just remembering to keep your stitches loose when you’re attaching the button. For greater play, you need to form a shank.
Forming a shank is a two-step process. Step one is to build in some slack into the stitching process by laying a needle or a matchstick on top of the button,
G
right between the holes. By stitching over this object, you’ll guarantee that your stitching will have an even amount of slack. Use a matchstick for heavier fabrics, a needle for lighter fabrics. Stitch the button down as described above. When you’re done, remove the needle or matchstick. Now the sewn button should be a little wiggly. For step two, form a secure shank on the underside of the button by winding your needle and thread several times around the button stitches (that is, between the bottom of the button and the fabric).
H
Finish off by taking the needle to the underside of the fabric and making three tiny, overlapping anchoring stitches there to secure the thread.
A QUICK PATCH
Iron-on patches don’t hold up under heavy use. Scratch that. They don’t hold up too much at all. If you want to repair your favorite jeans, it’s not hard to make a simple patch. All you have to do is find a scrap of patching material. Be sure the material is of a similar weight and texture to your garment. For instance, patch denim with denim or something just as heavy. If you patch it with something lighter, the patch won’t last, and it will look odd, too.
If the hole you’re patching looks like it might rip wider, because it’s more of a tear than a worn-out spot, make a few stitches at either end of the tear to stop it from expanding. Those stitches don’t have to be pretty, because they’re going to be hidden.
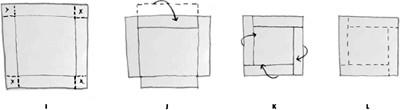
Measure the hole you’re trying to cover. For the sake of simplicity, we’re going to make a square or rectangular patch. Cut the patch about ½ to 1 inch wider than the hole on all sides. Cut a V-shape notch out of each corner
I
so the folded fabric doesn’t overlap and bunch on the back side. Fold back ¼ inch of material on all sides of the patch to hide its scraggly edges.
J,K
Use an iron to press down the edges; you want them to lie flat.
Pin the patch into place,
L
or baste it down with a few stitches. Using the backstitch, stitch all around the edges of the patch, keeping within ¼ inch of the edge so that the folded edges underneath are caught by the needle. Make your stitches as small as you can manage, because many small stitches will hold the patch better than large stitches.