Making It: Radical Home Ec for a Post-Consumer World (38 page)
Read Making It: Radical Home Ec for a Post-Consumer World Online
Authors: Kelly Coyne,Erik Knutzen

63>
A Wort Chiller

PREPARATION:
1 hour
An immersion wort chiller is another critical piece of equipment for home brewing that can be made easily at home. A wort chiller is a copper coil that you stick into your hot beer or mead at the end of the boil. Cold water passes through the copper coil to cool the liquid rapidly.
When you minimize the time that elapses between the end of the boil and the point when the wort is cool enough to throw in the yeast, you reduce the chance that wild yeast will take up residence in your brew or, worse, that contamination will cause the brew to turn to vinegar. A wort chiller is basically a simple heat exchanger. All you need are a few brass fittings and a length of copper pipe to put it together.
All the parts listed can be found in the plumbing supply aisle. Some of the names of the parts are exotic, but trust us—they’re common, and the store staff can help you find them.
YOU’LL NEED
- 3/8
-inch tube bending spring - 25-50 feet 3/8-inch copper pipe
A
(Copper is expensive, but the longer the coil, the more efficient it will be—let your pocketbook be the deciding factor.) - 2
(3/8
-inch) compression x ½-inch
FIP
B - Wrench
- 2 (3/4-inch) male hose x ½-inch
MIP
adapter
C - Teflon tape
- 2 garden hoses, length variable (see instructions)
PUTTING IT TOGETHER
Find a cylindrical object to use as a form to coil the pipe. We used an 8-quart pot that fit inside our larger 32-quart brew pot. The wort chiller needs to fit in the brew pot without hitting the sides, and you’ll need to leave a straight length of pipe leading from both ends of the coil, as seen in the illustration on page
254
, both long enough to reach over the top of the brew pot.
Tube bending springs are available in the plumbing tool isle and are used to bend copper pipe without causing a crimp in the pipe. To use, slip the spring over the copper pipe and bend only the part of the pipe covered by the spring. Carefully coil the pipe, wrapping it in a tight coil around the cylindrical form you’ve chosen, leaving only the aforementioned straight sections to reach over the top of the pot. Make a 90-degree bend at both ends of the pipe, as shown in the illustration below.
Attach the compression fittings using the wrench. Wrap the threads of the two 3/4-inch male hose x ½-inch
MIP
adapters with the Teflon tape and attach to the compression fittings.
With a permanent marker, mark the fitting that extends down to the bottom of the wort chiller as “out” and the topmost one as “in.”
TO USE THE WORT CHILLER
The wort chiller comes into play at the end of the brewing process. The wort or mead has been boiling and will need to be cooled rapidly so that yeast can be added. When there is only 15 minutes left of cooking time for the brew, drop the wort chiller in the brewing pot. The hot brew will sterilize it.
When the boil is done, take the brew pot (with the chiller immersed in it) to the water hose, or bring the hose to it. Hook the water hose to the “in” fitting of the chiller and hook a second hose to the “out” fitting. We use a long hose for the out fitting so that we can run the water anywhere in the garden. (We like to use the water to irrigate trees.) If you’re brewing indoors, you can buy two short hoses normally sold as water supply hoses for washing machines. You will need to find an adapter to hook the in hose to your particular kitchen or bathroom faucet. Direct the out hose to the bathtub or sink. Turn on the tap and let water run through the coils until the temperature of your brew drops to the range specified by your recipe.
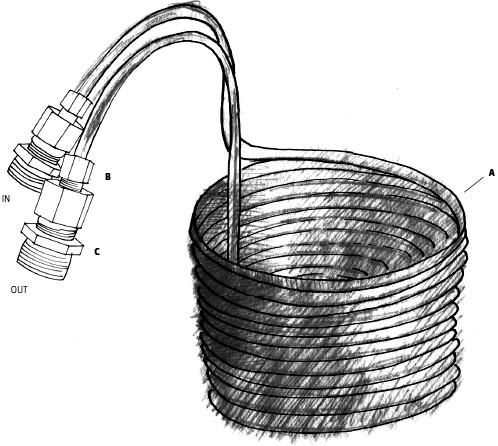
Wort chiller
64>
A Solar Cooker
PREPARATION:
2 hours
What’s a solar cooker? It’s a slow cooker powered by the sun and a fun way to cook during the summer when the sun is high and the kitchen is hot. We use ours to make staples, like rice and polenta. All you have to do is mix up the ingredients early in the morning and set the pot out to cook. Most foods will be ready as soon as lunchtime, but if you’re not around, they’ll keep until dinner. Due to the low operating temperatures, it’s almost impossible to burn or overcook food in a solar cooker.
We used this design to make our own solar cooker, so we can vouch for its effectiveness. It’s a panel-style cooker constructed out of foil and cardboard. Anyone can make one with a little patience and a utility knife. We like it a lot because it’s designed to collapse flat. This means it can be easily stowed away in the winter, and it also travels well for picnics or camping. It’s called the CooKit.
The CooKit was designed by Roger Bernard and a team of engineers associated with Solar Cookers International, a nonprofit organization that disseminates solar cooker plans worldwide to help decrease reliance on cooking fuels. It’s simply the best panel cooker we’ve seen anywhere, and we’re happy and grateful that Solar Cookers International has given us permission to reproduce their plans here. Visit
solarcookers.org
for more designs and solar cooking advice.
YOU’LL NEED
TO ASSEMBLE THE COOKER:
- 36 x 48-inch (or larger) sheet of cardboard (Look for discarded furniture and appliance boxes.)
- Roll of heavy aluminum foil
- Spray mount, craft glue, or flour paste glue
- Paintbrush or foam brush
- Sharp utility knife
- Ruler
FOR COOKING:
- Black, lidded pot or casserole (It must be black. Look for black speckleware or enamelware. Cast iron is too thick. The cooker will accommodate a range of pot sizes.)
- Oven roasting bag (These heat-resistant plastic bags are sold by the box in supermarkets.)
- 1-inch (or larger) binder clip
HOW TO MAKE FLOUR PASTE
Mix 3 tablespoons white flour with just enough water to make it liquid. Meanwhile, heat 1 cup water on the stove. When the water is hot, add the flour-water mixture and bring to a boil. Stir constantly to prevent burning. Let cool just a bit, then it’s ready to use like any other glue. The unused portion can be stored in a bottle in the fridge for a few days.
PUTTING IT TOGETHER
TO ASSEMBLE THE COOKER
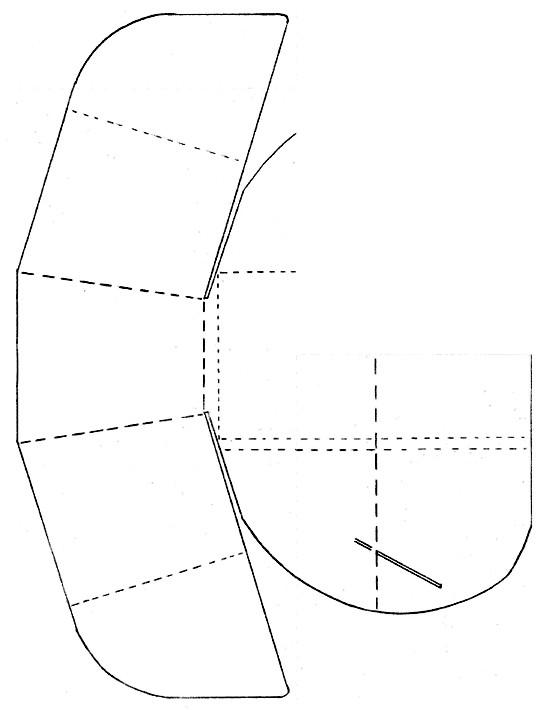
Transfer the diagram to the right onto a large sheet of cardboard using a pencil to mark out the external measurements. Start with broad measurements, like overall length and width, then make the smaller internal measurements, then connect the lines. If the measurements are correct, all the shapes and angles should take care of themselves. The only place you have to work freehand is on the outer curves, but the curves do not have to be perfect or symmetrical for the cooker to work. If you’re nervous about laying it out this way, you could draw a grid of 1-inch squares on the cardboard and transfer the design over, matching square to square.
Once you have the pattern transferred, cut where the diagram indicates a solid line. Before you start cutting, make sure you have a fresh, sharp blade in your utility knife. It will save you a world of frustration. To make the folds, which are marked by dotted lines, score the cardboard by slicing through the paper on one side, being careful not to push the knife blade all the way through.
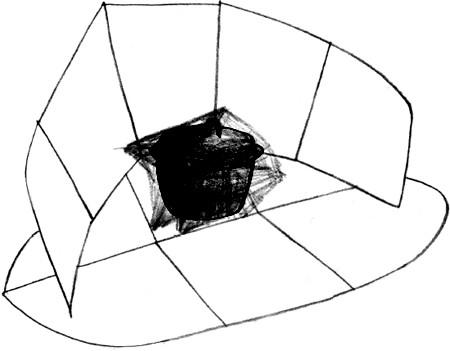
After you cut out the shape and score the fold lines, cover the interior of the cooker with foil. Spray or brush on the glue in sections that match the width of your foil, and lay down a sheet at a time, shiny side up. It helps to have pieces of foil already cut and ready to go, because you have to work quickly. Overlap each sheet a little. It doesn’t have to be pretty. Once the glue dries, bend the cooker into shape.
WHEN TO USE THE COOKER
Unless you live in the tropics, panel cookers are best used when the sun rides high in the sky—the summer months. Stand outside and look down at your shadow. As a rule of thumb, when your shadow is shorter than you are, it’s solar cooking season. Ambient temperature is not as important as having a good, clear sunny day. If it’s cold, but sunny, you can still cook.
SETTING UP THE COOKER
Use a black pot, because black attracts the most solar heat. Other types of pots won’t work nearly as well. The roasting bag helps seal in the heat. Fill your pot with whatever you’re cooking (see the recipes on page
259
for a start), put the pot in the roasting bag, twist the top of the bag closed, and secure the bag with a binder clip or similar object. Set the pot in the CooKit and point the cooker toward the sun. You might have to move the cooker periodically to follow the sun, but the wings of the panel cooker have a broad reach, so you should not have to reposition often. Dishes that cook over the course of 2 or 3 hours will need no repositioning, while longer-cooking dishes will require more cooker adjustment to track the sun. You can weight the corners of the CooKit to keep it from blowing over in the wind.
SAFETY NOTE
Make sure you wear oven mitts if you need to move the pot. It gets very hot. And be prepared for a rush of hot steam if you peek inside.
Anything that can be slow cooked at low temperatures will work in your CooKit. The sun is strongest between 10:00 a.m. and 2:00 p.m. That’s when most solar cooking is accomplished. Put the food out by 9:00 a.m. to take advantage of the sun at its zenith. It’s difficult to dry out or burn food in a solar cooker, so you can collect the food anytime after it’s done. The sun will keep it warm. The food will cool as soon as the sun’s rays are no longer on the pot; if you want hot food, you have to collect it while the cooker is still in the sun.
While the sun is on the pot, the temperature inside will be high enough to pasteurize food (150°F), meaning there’s no need to worry about spoilage during long cooking. However, if the solar cooker ends up in shadow, or the sun goes down and the food is forgotten for a few hours, then it’s subject to the same risk of spoilage as any food left sitting out. If you suspect your food has been sitting at temperatures less than 125°F for 4 hours or more, you should heat the food thoroughly before serving or consider discarding it for perfect safety.
Basic Solar Cooker Recipes
COOKING RICE
You can cook brown and white rice in the solar cooker using the same method. White rice cooks faster and is the best choice when time is short or the conditions substandard. Use 2 parts rice to 3 parts water. There’s little evaporation, so you use less water than you would on a stove. Combine the cold water and rice in the pot, add a pinch of salt, wrap the pot in the roasting bag, and stick in the CooKit. Cooking times vary quite a bit, depending on the weather and the time of day you’re cooking. You’ll probably have rice ready to eat in 2 or 3 hours. Go ahead and peek in the pot to check. If it’s still a little crunchy, just tie up the bag again and wait a little longer. If you set it out in the morning, you should have hot rice for lunch. And since the temperature is low, you’ll never have to worry about burning the rice.
COOKING POLENTA
Polenta in a solar panel cooker is truly miraculous. Imagine perfectly cooked polenta with no stirring, lumping, or burning. Combine 4 parts water with 1 part cornmeal in the cooking pot. Use cold water and stir in the dry cornmeal briskly, adding it to the water a little at a time, so that no lumps form. Add a pinch of salt. Put the pot in the bag and clip it shut, put it in your cooker, and a couple of hours later, Bob’s your uncle. Perfect polenta. Top with some Parmesan cheese or other goodies.
WATER PASTEURIZATION
If you’re camping, or an emergency situation makes you doubt the purity of your tap water, you can pasteurize water in your solar cooker. If you heat water to 150°F for a short period, all bad bugs will be killed. The majority of them are dead at 140°F. Average temperatures inside a solar cooker in full sun range from 180° to 275°F. A quart of water heated in a solar cooker in a black pot and bag should be pasteurized in about an hour.

E
RIK SAYS
. . . For that matter, you can also treat water, in emergency situations, by putting it in clear glass or plastic bottles (quart size) and laying the bottles on their side on a black surface in the sun. The combination of heat and ultraviolet rays will purify the water in as little as a couple of hours. Purify water this way and you can still use the solar cooker to make dinner!