Pro Puppet (11 page)
Authors: Jeffrey McCune James Turnbull

Let’s look at what has happened during our run. First we see that the agent has cached the configuration for the host. By default, Puppet uses this cache if it fails to connect to the master during a future run.
Next, we can see our resources being applied. First thesudopackage is installed and then the/etc/sudoersfile is copied across. We can see that during the copy process Puppet has backed up the old file, a process Puppet calls file bucketing. This means that if we’ve made a mistake and overwritten the file incorrectly we can always recover it.
 Tip
Tip
Puppet can back up files remotely to our master using thefilebuckettype. Seehttp://docs.puppetlabs.com/references/stable/type.html#filebucket. We’ll show you how to do this in
Chapter 3
.
The last line of the catalog run tells us this process took 10.54 seconds to complete.
If we look on the Puppet master, we can see the results of the run logged there too.
notice: Starting Puppet server version 2.6.1
info: Autoloaded module sudo
info: Expiring the node cache of node1.example.com
info: Not using expired node for node1.example.com from cache; expired at Fri Apr 30
 08:44:46 -0400 2010
info: Caching node for node1.example.com
notice: Compiled catalog for node1.example.com in 0.02 seconds
Here we can see that Puppet has loaded oursudomodule and compiled the catalog fornode1.example.com. This catalog is then sent down to the agent and applied on the target host.
If the Puppet agent is running as a daemon, it would then wait 30 minutes and then connect to the master again to check if the configuration has changed on our host or if a new configuration is available from the master. We can adjust this run interval using therunintervaloption in the/etc/puppet/puppet.confconfiguration file on the agent host.
[agent]
runinterval=3600
Here we’ve adjusted the run interval to 3600 seconds, or 60 minutes.
So that’s it - we’ve used Puppet to configure our first agent. You’ve also been introduced to the theoretical underpinnings of Puppet and how to:
- Install Puppet
- Configure Puppet
- Use Puppet to manage some simple configuration on a single host
In the next chapter, we’ll extend our Puppet configuration to multiple agents, learn more about Puppet’s configuration language and learn how to build more complex configurations.
- Introduction to Puppet
http://docs.puppetlabs.com/guides/introduction.html - Installation -
http://docs.puppetlabs.com/guides/installation.html - Configuration Guide -
http://docs.puppetlabs.com/guides/configuring.html - Configuration Reference -
http://docs.puppetlabs.com/references/stable/configuration.html

In
Chapter 1
we installed and configured Puppet, created our first module, and applied that module and its configuration via the Puppet agent to a host. In this chapter, we’re going to extend this process to build some more complete modules and hosts with Puppet for a hypothetical company, Example.com Pty Ltd. Each host’s functionality we build will introduce new Puppet concepts and ideas.
Example.com Pty Ltd has four hosts we’re going to manage with Puppet: a Web server, a database server, a mail server and our Puppet master server located in a flat network. You can see that network in
Figure 2-1
.
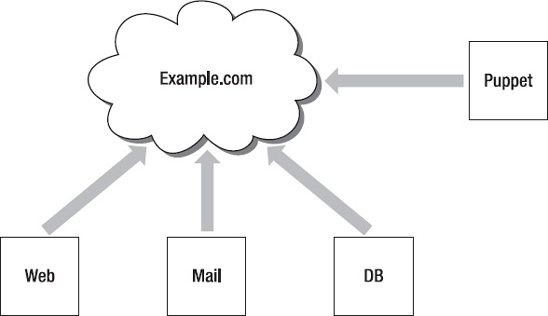
Figure 2-1.
The Example.com Pty Ltd Network
Like many organizations, though, Example.com is not a very homogenous environment and each host uses a different operating system, as follows:
mail.example.com– (Red Hat Enterprise Linux 5)db.example.com– (Solaris 10)web.example.com– (Ubuntu 10.04)puppet.example.com– (Ubuntu 10.04)
To solve this problem, we’ll begin by working through how we use Puppet in a multiple operating system environment. Be sure you’ve installed the base operating system on these hosts as described in
Chapter 1
, because we’ll perform some basic configuration on the hosts. We’ll start with configuringSSHfor each host, then we’ll install and configure some role-specific applications for the hosts as follows:
- Postfix (
mail.example.com) - MySQL (
db.example.com) - Apache and a website (
web.example.com) - Manage the Puppet master with Puppet (
puppet.example.com)
As we configure each host, we’ll introduce some of the different features and functions available in Puppet. By the end of the chapter you’ll have a firm grasp of the basics. In subsequent chapters, we’ll build on this knowledge and introduce some of Puppet’s more advanced features.
Before proceeding, we must have the proper setup, so we need to install the Puppet master and agent and then create node definitions for each of our hosts.
Note
As we mentioned in
Chapter 1
, the Puppet software is called the “agent.” Puppet calls the definition of the host itself a “node.”
First, we need to install the Puppet master and agent. We’re going to install the Puppet master onpuppet.example.comand the Puppet agent on all our hosts, includingpuppet.example.com. We’re installing the agent on the Puppet master because we’re going to use Puppet to manage itself! We then need to connect, create and sign certificates for each host. To do this, you should follow the installation instructions for the relevant operating system from
Chapter 1
on each of the four hosts. For example, for installation on the Red Hat Enterprise Linux host, use the instructions in the
Installing on Red Hat Enterprise Linux and Fedora
section. You can then move on to configuring the nodes (aka hosts).
Tip
If you use a provisioning tool like Kickstart or Preseed, you can also include Puppet installation and signing as part of your build process. You can see an example of how to do that athttp://projects.puppetlabs.com/projects/1/wiki/Bootstrapping_With_Puppet.
After installing the Puppet master and associated agents, we need to create node definitions for each of our hosts in thenode.ppfile. We created this file in the/etc/puppet/manifests/directory in
Chapter 1
. As you can see in
Listing 2-1
, we’ve created empty node definitions for each of the nodes in our network.
Listing 2-1.
Node defintions in nodes.pp
node 'puppet.example.com' {
}
node 'web.example.com' {
}
node 'db.example.com' {
}
node 'mail.example.com' {
}
We haven’t included any configuration on our node definitions – Puppet will just recognize the node as it connects and do nothing.
As you might imagine, if you’ve got a lot of nodes, thenodes.ppfile could become quite large and complex. Puppet has some simple ways of dealing with this issue, described next.
The first method works best for large number of similar hosts, such as Web servers, where the configuration of the host is largely identical. For example, if our environment had multiple hosts called web1, web2, web3, etc., we could specify:
node 'web1.example.com', 'web2.example.com', 'web3.example.com' { }
In version 0.25.0 and later, we can also specify these nodes in the form of a regular expression:
node /^web\d+\.example\.com$/ { }
This would match any host starting withwebwhere
xxis a digit or digits, such asweb1orweb20.
Puppet also has the ability to use external sources for your node data. These sources can include LDAP directories, databases or other external repositories. This allows you to leverage existing sources of information about your environment, such as asset management systems or identity stores. This functionality is called External Node Classification, or ENC, and we’ll discuss it in more detail in
Chapter 3
.
You can also specify a special node calleddefault. This is, as you’d imagine, a default node. If no other node definition exists, then the contents of this node are applied to the host.
node default {
    include defaultclass
}
Lastly, Puppet has a simple node inheritance structure. You can use this to have one node inherit the contents of another node. Only one node can be inherited at a time. So, for example, we might want the nodewebhost to inherit the contents of a node calledbase.
node base {
    include  sudo, mailx
}
node 'web.example.com' inherits base {
    …
}
Here we’ve defined thebasenode to include the modulessudoandmailxand then specified that thewebnode inherits the contents of this node. This means thewebnode would includesudoandmailxin addition to any classes included in its own node definition. Inheritance is cumulative and you can specify an inheritance structure like so:
node base {
    …
}
node webserver  inherits base {
    …
}
node 'web.example.com' inherits webserver {
    …
}
Here thewebservernode inherits the contents of thebasenode, and then in turn theweb.example.comnode cumulatively inherits the contents of both nodes.
Caution
When starting out with Puppet it is common to structure the assignment of classes to nodes using inheritance and a base node. This structure allows classes common to every node to be placed in the base node. This organization structure may pose a problem in the future as the number of nodes and the scale of puppet increases and base classes need to be added or removed from only a subset of all nodes. In order to avoid future refactoring, avoid using node inheritance in preference of a flat node classification tree. A good alternative to the base node and class inheritance is to employ conditional statements, which we’ll introduce later in this chapter, to determine which classes a node should and should not receive instead of relying on node inheritance.
The concept of node inheritance is a good place to talk about an important and sometimes tricky concept in Puppet: variable scoping. Let’s imagine we’ve decided to configure some variables in our nodes, for example:
node base {
  $location = "dc1"
  …
  $location = "dc2"
}
In most programming languages, the$locationvariable would start out with a value of"dc1"and then, when it was next assigned, it would change to a value of"dc2". In Puppet, these same two statements cause an error:
err: Cannot reassign variable location at /etc/puppet/manifests/node.pp:4
Why is this? Puppet is declarative and hence dynamically scoped. Allowing variable reassignment would have to rely on order in the file to determine the value of the variable and order does not matter in a declarative language. The principal outcome of this is that you cannot redefine a variable inside the same scope it was defined in, like our node. Let’s take another example, of a class this time instead of a node:
class ssh_sudo {
      $package = "openssh"
      package { $package: ensure => installed }
      $package = "sudo"
      package { $package: ensure => installed }
}