Sew What! Bags: 18 Pattern-Free Projects You Can Customize to Fit Your Needs (17 page)
Read Sew What! Bags: 18 Pattern-Free Projects You Can Customize to Fit Your Needs Online
Authors: Lexie Barnes

1.
DECIDE YOUR SIZE
. Follow our dimensions, or make this pouch any size. This is a really fun way to use your scraps. If you’re making a pouch to hold something specific, measure the length and width of the items and add an inch or so on all sides for seam allowance and ease (
see page
15
).
Note:
Because this project is challenging, we’ll explain it first without a strap. To add the strap,
see page 72
.
CUT YOUR FABRIC
ZIPPER SAVVY
It helps if the length of the pouch matches up with a standard zipper size. You can use a longer zipper and trim it to fit, but be careful sewing over the teeth or you might break the sewing-machine needle.

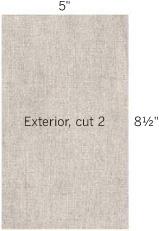
2.
CUT YOUR FABRIC
. Cut four pieces of fabric the same size (two for the exterior and two for the lining). Cut a strap, and embellishment, if desired.
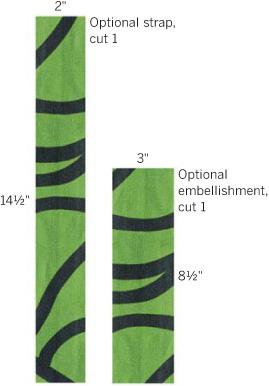
EMBELLISHMENT IDEA
If you want to add a decorative fabric, like the one on our pouch, cut some fabric the length of the pouch and about 3" wide. Press under the long sides of the strip ¼" or ½" and edgestitch the strip to the right side of one of the exterior pieces, about 1" from what will be the bottom edge (not the zipper edge).
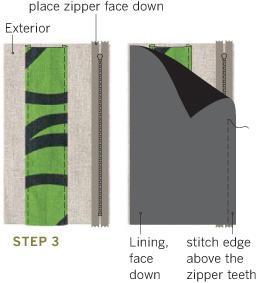
3.
PIN AND STITCH ONE SIDE OF THE ZIPPER
. Lay one piece of exterior fabric right side up and place the zipper, face down, on top of it, lining up the edges. Next, lay a piece of lining fabric on top of zipper, right side facing down. Pin and stitch the pieces together along the zipper edge, close to the teeth. Turn the two fabric pieces down and away from the zipper so the wrong sides are together. Press both edges away from the zipper.
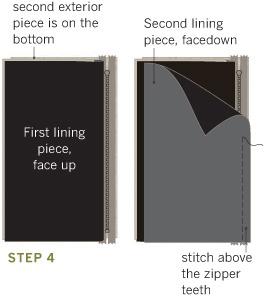
4.
REPEAT ON OTHER SIDE
. Lay the second exterior fabric piece right side up. Place the stitched piece on top, with the zipper and exterior panel facing down. (The exterior pieces will be right sides together, and the first lining piece will be on top.) Line up the edge of the zipper tape at the top. Place the second piece of lining on top, right side facing down, edges lined up. Pin and stitch the pieces together, close to the zipper teeth. Open the zipper a little bit for turning inside out later on.
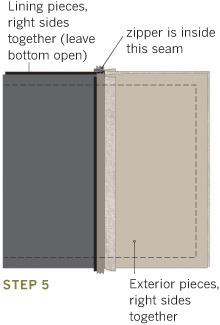
5.
STITCH THE SIDES
. Open out the pieces with the zipper in the center. The exterior pieces should be right sides together on one side of the zipper, and lining should be right sides together on the other side. If you want to add a strap, refer to Get a Grip! on page 72. Pin and stitch along three sides, leaving the bottom of the lining open. Trim the edges and zipper, if needed.
SNIPPY TIP
Use pinking shears to trim the edges of the pouch, to help keep them from fraying.
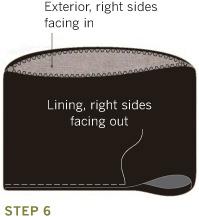
Get a Grip!6.
FINISH THE LINING
. Reach inside the pouch and unzip the zipper all the way (it will be upside down, but you can push the zipper slider to one side). Turn the lining right side out by folding it back over the exterior pieces. With the exterior inside the lining, turn under the bottom edge of the lining by about ¼" (with the folded edges tucked in toward each other). Stitch along the folded edges to close the bottom, making sure not to stitch the exterior pieces (it might help to pull them out through the zipper). Now turn the pouch right side out through the zipper opening and tuck the lining inside.
You can easily turn a zippered wristlet into a wristlet by adding a strap near the zipper. Here are some pointers:
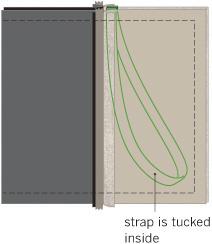
Measure out how long you’d like the strap to be and cut your fabric for the strap. We cut ours about 2" wide, which makes a ½"-wide strap when folded and stitched (
see page
42
).