Stitch 'n Bitch: The Knitter's Handbook (14 page)
Read Stitch 'n Bitch: The Knitter's Handbook Online
Authors: Debbie Stoller

5
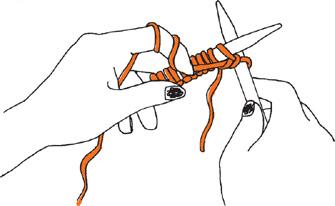
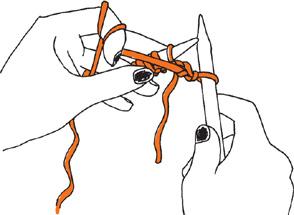
Push the right needle back up again (it should now be behind the left needle). You have an X once more.
6
Push the old loop up and off the left needle.
Take a bow, Purlana Purlstein! Keep on keepin’ on until you’ve purled each stitch on the needle.
How to Make Stockinette Stitch
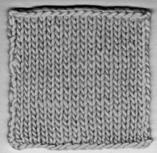
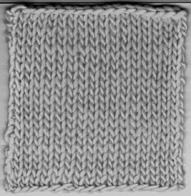
Now that you’ve learned to purl, you should really give yourself a pat on the back, because you now know how to make all the stitches there are in knitting. When you knit across one entire row, and then turn around and purl your way back across the next row, then knit the third row, and purl the fourth row, and on and on—you create what’s known as stockinette stitch. Basically, you’re making fabric with all the V parts of the stitches on one side (the front, or “right” side of your fabric) and all the bump parts of the stitches on the other side (the back, or “wrong” side), which makes the front side look really nice and smooth. Flip it over to the side where all the purl bumps are, and you’ve got reverse stockinette. Stockinette stitch looks quite different from garter stitch. It can be pretty exciting to knit your first stockinette stitch swatch, because the fabric looks so purty and professional. In fact, stockinette stitch is by far the most popular stitch pattern out there.
T
HE
R
AGE FOR
G
AUGE
To make a swatch in stockinette, cast on 20 stitches, knit a row, then purl the next row, and continue alternating this way for 30 rows. Then bind off, knitwise.
Take a look at your swatch. It’s as smooth as a baby’s butt on one side, and as bumpy as a teenager’s forehead on the other. But there’s something else that can be learned from this swatch, and that’s called
gauge
. Gauge is the number of stitches per inch that you get with a particular size of needles, a particular thickness of yarn, and your particular pair of hands.
To calculate your gauge: Lay your swatch flat and measure how wide it is. Try to make your measurement exact—at least to the nearest quarter-inch. Now take the number of stitches you have—in this case, 20—and divide it by the width of your swatch, in inches. So, if your swatch measured 4 inches wide, your gauge would be 20 divided by 4, or 5 stitches per inch. On the other hand, if your swatch measured 5 inches wide, your gauge would be 4 stitches per inch. Different knitters get different gauges even when they are using the exact same yarn and needles; a tighter knitter will squeeze more stitches into an inch than will a looser knitter.
Most patterns will give you a gauge, such as “16 stitches per 4 inches using size 8 needles.” That means you should make a swatch using those size 8 needles and the yarn the pattern recommends. And no, don’t gauge your gauge by casting on 4 stitches, knitting a couple of rows, and seeing if your swatch measures an inch wide. Instead, cast on 16 stitches, knit at least an inch or two of fabric, and see how close that comes to being 4 inches wide. Better yet, cast on something like 24 or 30 stitches, knit up a square, and measure over the center 16 stitches.
What do you do if it doesn’t come out the right size? Do you have to start knitting tighter or looser to get your stitches to fit the pattern’s gauge? No, you don’t have to change anything about the way you knit. Instead, use smaller or larger needles and reknit the swatch. Keep on sizing down or sizing up until the swatch measures what it should. Use that needle size to knit your entire piece.
Making a gauge swatch before you begin any project is super-important. Nevertheless, I’m sure that at some point in your knitting life you’re going to knit a project without making a gauge swatch. And I’m just as sure that some day, after spending months knitting what was to have been a nice, comfortable sweater you end up with a belly-baring nightmare. And when that day comes, don’t say I didn’t warn you.
Small gauge
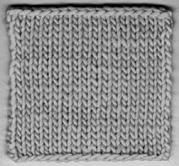
Medium gauge
Large gauge
These three swatches were all knit using the same yarn, but with different size needles. The small one (top) was knit with size 5; middle with size 8; and bottom with size 10½
.
Stockinette stitch
R
EMINDER
:
Bring the yarn to the back of your needles when you begin a knit row, and bring the yarn to the front of your needles when you are purling. Otherwise, you’ll end up with all kinds of craziness on your needles.
How to Make Rib Stitch
Stockinette stitch fabric is very good at being stretchy and smooth, but not so good at lying flat. Fabric knit in stockinette stitch likes to curl at the edges, which makes it great for covering tube-shaped body parts, like torsos, arms, and legs. But if you knit yourself a scarf in stockinette stitch, you’ll end up with something that looks more like a tube; the edges will roll in. So for things like a blanket or a scarf—or the bottom edges of sweaters and sleeves that you don’t want rolling up—you’ll need something that lies flat.
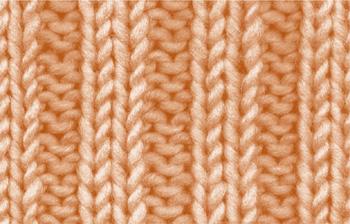
That’s where the rib stitch comes in. Fabric made in rib stitch—or
ribbing
—is much stretchier than stockinette stitch fabric—almost like an accordion—and it lies very nice and flat. Like stockinette, ribbing is made using knit and purl stitches, but instead of placing all the Vs and the bumps on just one side of the fabric, you align them vertically, to form long columns, or “ribs,” of V stitches with valleys of purl bumps in between.
CLOSE TO THE EDGE: MAKING NICE EDGE STITCHES
Sometimes the stitches at the very edge of your work get all loose and wacky. That’s why some folks like to use a special stitch at the beginning and ends of their rows, called an edge stitch. One way to do this is to knit the last stitch of every row, always. Another way is always to slip the first stitch from one needle to the other without knitting it. But the method I like best is one I learned from my favorite knitting author, Maggie Righetti (see
page 119
), and it’s the one I teach to all the Stitch ’n Bitchers I meet:
1.
Knit (or purl) the first stitch of the row the usual way.
2.
Put your needle into the next stitch like you’re getting ready to knit (or purl) it, but don’t do anything else. Stop and pull the yarn tight. Then go on knitting like there’s no tomorrow.
Do this at the beginning of every row, and you’ll have the most beautiful edges you ever did see. Plus, you’ll get one edge stitch for every row (rather than one edge stitch for every two rows, which you’ll get if you slip stitches at the ends of rows), and that’s nicer to have when it comes time to sew two knit edges together.
2 × 2 rib stitch
To make what’s called a
2
×
2 rib
, here’s what you do: Cast on some stitches in a number that is evenly divisible by 4 (that simply means to cast on 16 stitches, or 24, or 40), and then do the following: