The Art and Craft of Coffee (23 page)
Read The Art and Craft of Coffee Online
Authors: Kevin Sinnott

• Expect to change your grind. Baristas know that their grinds will change due to atmospheric condition changes. Ground coffee attracts moisture and can literally swell, which can slow or even stop the espresso extraction. The only solution is to grind more coffee more coarsely.
• Don’t grind too much espresso at once. Fine ground coffee loses its freshness, aroma, and flavor within minutes after grinding. Grind just a little more than you need. (If you run your grinder empty, the last grounds will be too coarse.)
• Empty your grinder each day after use. Grounds that stay in the grinder overnight will get stale.
• Enjoy espresso immediately after brewing. Unlike drip coffee, which can sit for up to thirty minutes and still taste fresh, espresso drinks depend on their short-lived foam and heat. Even slow-sipping espresso connoisseurs want a just-made shot to start. The same is true for lattes, cappuccinos, and other espresso-based beverages.
• Follow the Italian ristretto method by erring on the side of slightly shorter shots. In general, with coffee, best results come from underextraction rather than overextraction. I suggest this rather than longer (lungo) pulls, which result in whitish foam and more acidity. Lungo espressos save money for large operations. But for small scale “at home” operations, it doesn’t provide the same benefit. Use more coffee for strength, not longer pull times.
• Use more than seven grams per shot if stronger espresso tempts you.
For Water, Think Low—Not No—Minerals
Use water with low mineral content when possible. Espresso machines are so prone to mineral buildup that the guidelines for other brewers don’t apply. Try a reverse osmosis water purifier, which removes approximately ninety-eight percent of minerals from water. Even salt-softened water can work. Don’t worry about minerals prolonging contact time, as in with drip brewing. The forced pressure of the water through the grounds eliminates this concern. Distilled water, in my opinion, is still not appropriate. Think low, not no minerals.
< A perfect shot can easily be two perfect shots. Many espresso enthusiasts quickly realize with the same effort, they can double their output, either making a larger beverage for themselves or one to share.
Instructions
1. Fill the tank with softened water up to your unit’s fill line.
2. Turn on to preheat the machine. Espresso machines must warm up to function properly.
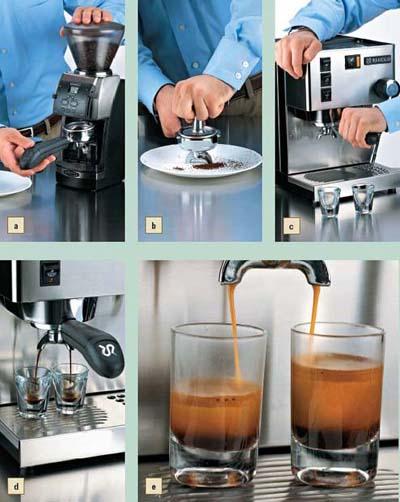
3. Place metal screened filter, called a portafilter, into the metal receptacle located under a sill positioned over where you place your shot glass or cup
(a)
. This receptacle is called a group. Many machines come with double-size portafilters featuring two exit spouts, designed to make two shots at once. This comes in handy. Many of us regularly make two shots. In fact, I always do, not only for a more powerful cup or for two people but because viewing multiple shots allows me to better analyze how well I’ve set the grind.
4. Make a shot using no coffee, running hot water only through your portafilter while it’s in the machine. This is important to bring all the parts up to temperature.
5. Grind a small amount of coffee, a bit more than you need, in a grinder that features click stops for fine adjustment.
6. Remove the head from the machine and place the grounds in the espresso machine’s filter.
7. Tamp the grounds firmly
(b)
. Repeat twice more (for a total of three times) to make sure the grounds are tightly packed. Brush loose grounds from the group’s lip. This procedure is called polishing the shot. Some home machines are designed for less-tight tamping, but unless this is specified in the instructions, use a tight tamp.
8. Place the filter into the machine above the cup with a twist to ensure a correct, tight fit
(c)
.
9. Press the “on” or “brew” button to make your first (or seasoning) shot using coffee. Discard it immediately without analyzing for grind. It is simply to season the filter.
10. Grind more coffee and refill the portafilter. Place
it in the machine.
11. Press the “on” or “brew” button and time this shot. It should take 25 to 30 seconds to make a 1-ounce (30 ml) shot. Most espresso shot glasses have marks that say when. In other words, they show when 1 ounce (30 ml) has come through. An automatic machine may automatically stop.
12. Observe the coffee’s drip as it falls into the glass. It should not fall straight but have a slight curve and bulge. Baristas call a correctly falling shot a
mouse’s tail
. Does yours look like a mouse’s tail?
(d)
13. Observe the shot. It should be a rich golden color with no holes and a nice head of foam or crema on top
(e)
.
14. Taste it. Is it flat? Bitter? If it took less than 20 seconds, it will likely be thin, weak, and flat tasting. If it took more than 30 seconds, it will likely be thick, strong, and bitter tasting.
15. Grind some more coffee and adjust your shot. To prolong the espresso shot’s duration, grind finer. To speed it up, grind coarser. Expect to repeat this process several times before you make a shot that will impress a friend or your own taste buds.
Pulling the Perfect Shot Tutorial
7 COFFEE SERVING AND RECIPES
YOU’VE
gone to a ton of effort to make the best coffee possible. Now it’s time to serve. The reality is that presentation and serving can add or detract from taste. There are ideal temperatures at which to serve and enjoy coffee and plenty of ways to maximize taste. It means paying attention to details and learning different coffee recipes, but it’s worth it.
So much coffee consumption happens before, during, and after food. But which foods go best with which coffees? What’s the best use for cream and sugar?
By the end of this chapter, you’ll know how to do the following:
• Pair foods with coffees
• Use cream and sugar to enhance rather than mask coffee’s flavor
• Create a litany of coffee cocktails and after-dinner coffee cordials
And that will complete your education as a coffee entertainer. Let’s drink!
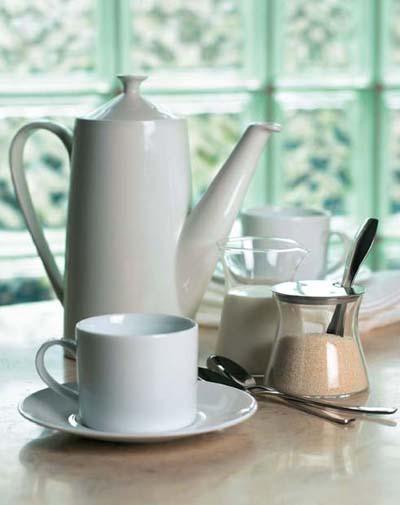
< Coffee service: thermal carafe, coffee mug and saucer, sugar, and cream.
Coffee Presentation and Serving Equipment
Brewed coffee is a volatile liquid; it cools and evaporates quickly. For best results, drink coffee immediately after brewing. If you can’t drink it right away, place it in a vessel that keeps it hot and preserves as much flavor as possible. Because coffee flavor deteriorates quickly, give storage some thought so you can enjoy more than one cup.
Warming Plates and Thermal Carafes
The earliest coffee drinkers kept their serving vessels warm by lighting a flame underneath. Modern automatic drip makers feature a heated plate on which the serving carafe sits. This method does a credible job of keeping the coffee hot and preserving its flavor. Heat rises, and usually the carafe’s non-airtight lid allows for steam and brew evaporation—but not the coffee’s heat—to escape. It can reliably keep coffee hot for about twenty minutes. Plus, the glass vessel is usually easy to clean after brewing.
Thermal carafes came about during the early twentieth century. They work on the theory that the substance being stored provides its own best heat. The vessel doesn’t add heat but simply insulates the heat already being produced. The advantage of these thermal carafes is that they spread heat evenly throughout the brew, keeping it warm for up to an hour with no discernible flavor loss. On the flip side, they don’t keep the coffee as hot as when initially brewed and they are often difficult to clean.
Recommendation: If you typically drink your coffee within a half hour of brewing it, a warming plate is fine and its carafe more easily kept clean. If the coffee will sit for up to an hour after brewing, a thermal carafe is a better choice.
Coffee To Go
Even the most refined coffee drinkers need to buy coffee on the go sometimes. Keep in mind that the material of the to-go cup may affect the coffee’s flavor profile. Coffee to go tastes best in the wax-coated, temperature-resistant paper cups. Paper cups offer the extra advantage of being recyclable. Styrofoam is the less desirable choice. Styrofoam is made of a material called polystyrene. The styrene in this compound may leach out into the hot coffee, as much as 0.025 percent. This is enough for some coffee drinkers to notice both an off aroma and taste. Since styrene is fat soluble, even more could leach into beverages containing cream or whole milk. If you must get your coffee to go in Styrofoam, never microwave it to re-heat it, as it may cause even more styrene to migrate into the coffee.
Coffee and Food
Ever wonder why cafés and coffeehouses all serve high-carbohydrate rolls and doughnuts? The high fat content in bready foods nicely counters the high acidity in coffee. After the widespread growth of dark roasts in the 1990s, some coffee industry experts claimed that light roasts better matched with food. But the restaurants and coffee shops that specialize in rolls and coffee determined that even dark roasts have enough acidity to make a good match.
Does the correlation between red and white wine and certain food exist between light and dark roast coffees and certain foods? Sweetness, complexity,
and bitter notes called tannins most frequently influence a wine/food match. In this way, coffee is similar. But whereas red wines often contain more tannins and are
more
complex than white wines, dark roast coffees often contain more tannins but are
less
complex than light roasts. As with wine, coffee/food matching is an endless discussion with myriad possibilities.
Consider these two key questions when planning a menu that includes coffee:
Q: Will you serve the coffee during the meal or after with dessert?
A: When served with a meal, the coffee must complement the main course. For example, a light roast would pair nicely with a meat course such as steak. A darker roast would pair better with lighter fare. Dessert coffees can be lighter bodied (of either dark or light roast), with a weaker flavor, and may include liqueurs.
Coffee’s a great after-dinner beverage. Some dieticians claim that cold beverages interfere with digestion—and that hot ones do not—making coffee a good choice to cap off a meal. If you don’t serve dessert, a light-bodied coffee adds a delicate note and can enhance digestion.
Q: Will the coffee’s flavor overpower the foods?
A: Don’t choose coffee to complement your food and then brew it so that it overpowers, or on the other end of the spectrum, it gets lost amidst the food flavors. Heavier bodied coffee will stand up to foods more easily. Save lighter bodied, more delicate coffees for serving alone or with light foods.
Darker roasts, with their tannic flavors, pair well with higher-fat foods. Light roasts, apt to be complex, pair well with lighter foods because their complexity makes them seem like an added course. Foods containing salt and fat tend to neutralize the coffee’s acidity, making harsh coffees a good match to a croissant with butter.
Serving Temperature
Wine experts often tell us that people drink wines at temperatures too cold or too warm to enjoy its full flavor. The same can be true of coffee. Coffee is likely around 180ºF (82ºC) or hotter when it reaches your cup. Experts often wait a few minutes before drinking, knowing that the mouth’s ability to recognize the full flavor palate increases when a liquid is slightly cooler. Most experts agree that 140º F (60ºC) is an ideal temperature to discern coffee’s complexity. That said, it is always good form to serve coffee as soon as possible after brewing.