The Art and Craft of Coffee (10 page)
Read The Art and Craft of Coffee Online
Authors: Kevin Sinnott

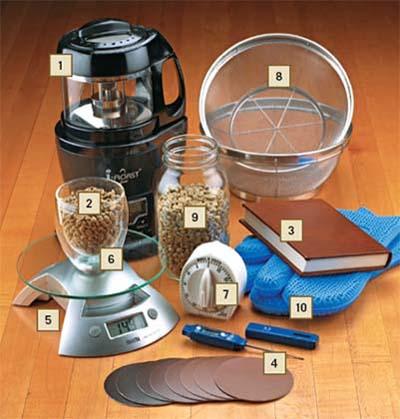
Digital kitchen scale to weigh your beans to ensure that you follow the amount recommended for your roaster
Dry measuring cup to use the amount specified in your electric model’s instructions
Kitchen timer or clock to accurately track how long the beans have been roasting
A set of steel colanders for cooling the hot roasted beans
Storage containers with tight-fitting lids to keep the precious beans fresh. Mason jars work well.
A powerful heating element such as a stovetop (gas) or electric hot plate (not shown)
Heat-safe gloves (or protective oven mitts) to safely handle hot beans
A fire extinguisher (not shown) because roasting fires do happen
Choosing the Right Home Roaster
There are many home coffee roasters on the market, each with its own distinctive methods of heating beans. How much do you want to roast each time? How dark to you like your beans? In the remaining pages of this chapter, we explore the various models available and offer a practical guide to using each style.
Stovetop Roasting
In a stovetop roaster, coffee is roasted in an open or special closed pan placed on a gas stove burner. The person roasting the beans manually stirs with a crank handle to evenly distribute the beans during roasting. This method requires direct contact between a pan surface and the beans. Stovetop roasting takes advantage of something you already have—a heat source. A variation of this method uses an oven pan with perforated holes.
Pros
• Long roast time. Like drum roasters, the stovetop roasters have a long roast cycle (likely the longest of all roasters), taking up to twenty minutes. This gives you a nice window and margin to stop the roast at just the right bean doneness.
• No noise. The only sounds come from the stove, the crank, and the crackling beans, which makes it easy to hear the nuanced first crack versus the faster second crack.
• Complex flavor. Longer roasts create coffee with more complexity. The stovetop roaster does this as well, if not better, than any other home method.
Cons
• Flame guesswork. At what level do you set the flame on the burner? It definitely takes trial and error. Keep track of how long it takes to roast a full cycle (anywhere from twelve to twenty minutes). Don’t count cooling time, which is not part of the roast cycle.
• Crank speed. How fast do you turn the crank? The trick is to find a speed that allows the beans enough contact with the hot pan bottom but keeps all of the beans moving. You’ll know to crank faster if you get scorched beans or if tipping occurs, in which the ends of beans turn black from too much hot surface contact.
• Inability to check beans’ doneness. Stovetop roasters (or corn poppers doing double duty) require you to open the top to check on your beans, which also lets steam and heat escape. It’s difficult to see the beans, even with the hatch open, so it takes trial and error to know when to stop roasting.
• Risk of flat taste. Just as stovetop roasters offer the opportunity to develop complexity, they also increase the risk of creating coffee that tastes flat. This happens after roasting beans at too low of a temperature for too long.
Materials
Thick metal enclosed coffee roasting pan with crank handle on top
Stovetop
Green coffee beans
Digital scale
Kitchen timer or clock
Roasting notebook
Heat-safe gloves
2 steel colanders
Mason jar (or other glass container)
Fire extinguisher, in case of roasting fire
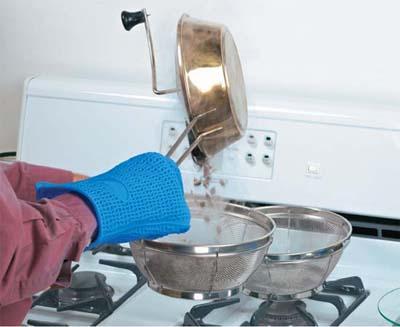
< A stovetop roaster takes advantage of something you likely already have: a stove.
Expert Notes on Stovetop Roasting
Here are a few tips for stovetop roasting:
• Remove the chaff from the beans during cooling. Unfortunately, chaff can get messy. Consider cooling the beans outdoors or over a sink to contain the mess. (Chaff makes excellent compost.)
• Pull your roast into cooling just before the beans reach their desired doneness. This takes practice, but it’s worth it to learn because coffee beans will continue to roast for at least a minute into the cooling stage.
• Break apart a roasted bean. If it is lighter inside than outside, try reducing roasting heat. If the interior is darker than the exterior, increase roasting heat.
• Roast beans for longer than ten minutes and less than twenty minutes to maximize your beans’ potential flavor development and complexity and to prevent them from going flat.
Instructions
1.
Place the cool roasting pan on the stovetop, centering it over the burner.
2.
Weigh the green coffee beans using your digital scale based on the amount the manufacturer predetermined that the roaster can handle.
3.
Open the hinged top hatch on the pan’s top and pour the beans into the roaster
(a)
. Immediately turn the crank to evenly distribute the beans
(b)
.
4.
Turn the burner to medium heat. Begin timer as you manually turn the crank slowly and constantly.
5.
After 5 to 10 minutes, the beans will begin popping, indicating the start of the first crack stage. Note the time in your roasting notebook.
6.
Listen closely to the beans. After a couple of minutes, all of the beans will have popped, followed by a brief silence. A minute or so later, a new, faster crackling sound, akin to logs on a fireplace, will start. It’s often accompanied by hissing. At this point, open the hatch and look at the beans. Note their color and the time.