The Art and Craft of Coffee (12 page)
Read The Art and Craft of Coffee Online
Authors: Kevin Sinnott

2.
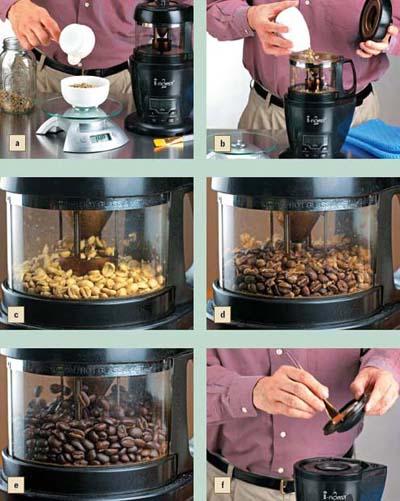
Using your digital scale, measure the manufacturer’s recommended amount of green beans for the roaster’s capacity
(a)
. Do not exceed the recommended volume.
3.
Pour the beans into the roaster
(b)
. Gently shake to spread them evenly. Press start. Start your timer here as well.
4.
Observe the beans as they turn yellow
(c)
.
5.
As soon as a crackling sound begins, the coffee has reached the leading edge of first crack. Note the time. All beans should be at first crack within 1 to 2 minutes
(d)
. Once all the beans have reached first crack, a brief silence will occur, followed by second crack, distinguished by a more rapid crackling sound. The beginning of second crack delivers a Full City roast
(e)
. Beyond this temperature darker roasts such Vienna and French occur.
6.
When your beans have reached their desired doneness, press the cooling button to override the roaster’s heating (or allow your roaster to automatically cool when the timer ends). Your roaster will switch to its cooling cycle and begin circulating fresh, cool air. (If using a corn popper that doesn’t have a cooling cycle, wear oven mitts and carefully remove the roaster’s canister and pour the hot beans into a heat-safe colander.)
7.
When the cooling cycle ends, the roaster will turn itself off. Immediately remove the beans from the machine and allow them to cool for at least 1 hour before packaging for storage.
8.
Once they cool completely, transfer to a mason jar or another airtight container.
9.
Clean the chaff from all roaster parts after each use
(f)
.
Fluid-Air Roasting Tutorial
Using a Thermometer with Your Home Roaster
The directions above were purposely written minus any temperature guidelines. The internal bean temperature is probably the best and most useful data for roasting, and yet it is the most difficult information to reliably obtain (even for commercial roasters). Installing a thermometer will ensure that you can get some temperature reading during roasting.
It is impossible to actually stick a thermometer inside a coffee bean to know its exact temperature. The best we can do is approximate by measuring the air temperature directly next to a bean or group of beans. Note, the temperature reading is almost always close to but not exactly the beans’ actual temperature. Heat from the roasting machine itself and other factors will interfere with a true reading. With this caveat in mind, it is still useful to install a thermometer. The goal is to find a fast-reacting one; you want to know the temperature now, not what it was a minute ago.
The best place to insert the thermometer probe is within a cluster of beans, away from direct roaster heat. Using a thermometer in drum roasters is difficult because you need to keep the probe in the beans, yet away from moving parts. However, the most challenging roaster design from which to get an accurate reading is an air roaster because of the need to find a location away from moving air, where beans cluster.
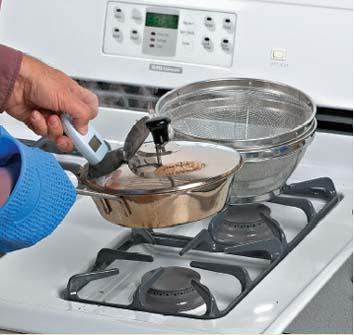
It is tricky to do this with just two hands, but it is possible to lift the hatch on a stovetop roaster and insert a thermometer to check bean doneness. This needs to happen quickly so the beans won’t scorch while the crank stands idle.
Make the Machine Work for You
Some rogue home roasters will modify their machines by drilling holes into the body so their thermometers can access the beans from an ideal location. Naturally, this invasive method voids all machine warranties, so do this only if you accept full responsibility for damage. You also can purchase a thermometer with a flexible, narrow probe that will wind around and into your roaster—with no physical modification necessary.
Quick Home-Roasting Temperature Guide
Determining when your home-roasted beans are done requires a combination of sensory cues from the visual, aural, and aromatic. Refer to this quick guide when monitoring your roasting batches.

PART TWO THE BREW

4 GRINDING
GRINDING
beans and brewing coffee are arguably the most important parts to the art and craft of coffee. No matter how great the coffee beans, how carefully they’ve been cared for, or the skill with which they were processed, packaged, shipped, and roasted, they don’t become “coffee” until ground and brewed. The good news? If you can fill a coffee scoop, press a button, and use a kitchen scale, you can make great coffee.
By the end of this chapter, you will know how to do the following:
• Differentiate grinder types
• Select the grinder that’s appropriate for you
• Grind coffee properly
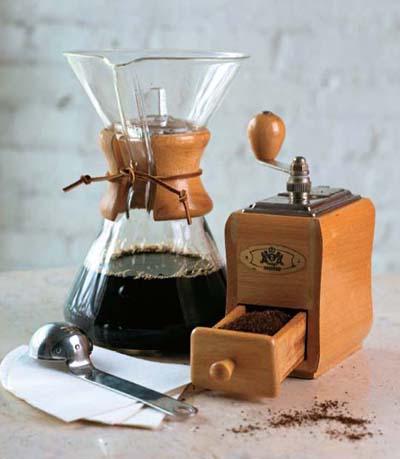
< Manual grinders aren’t just for antique buyers.

Grinders and Grinding
Since you presumably start with beans rather than already-ground coffee, we’ll cover grinding before brewing. If you use preground beans, skip to
chapter 5
, “Brewing,” which starts on page 89.
Why can’t you just put coffee beans into a filter, run hot water over them, and brew coffee? Theoretically you can. The question is, when does it become the finished, brewed beverage known as coffee? If you simply soak beans in hot water, eventually the water turns brown. By the time it becomes dark, rich coffee, it will be cold. Someone discovered many years ago that mashing the beans into smaller pieces (what we call grinding) speeds up the brewing process.
Here are average coffee ground particles shown to scale:
Pulverized average particle size: 100 microns
Espresso average particle size: 200 microns
Fine/vacuum average particle size: 500 microns