The Art and Craft of Coffee (8 page)
Read The Art and Craft of Coffee Online
Authors: Kevin Sinnott

How to Cup Coffee
Cupping is best done in a relaxed style. It requires a head free of colds or other barriers to smell and taste buds free of strong competing flavors. Ample time is the only practical way to allow for multiple tastings as the coffee cools, so it is important to allot enough time. Allow a minimum of one hour to cup up to six coffees.
Keeping a Journal of How to Cup
A coffee buyer I know has kept a cupping journal for more than forty years. She has recorded impressions of every Sumatra crop since her start in the industry (when women were first allowed into the cupping rooms). She can conjure in great detail the 1982 Mandheling crop. She can spot up and comers and predict future great coffees by tracking which farms are problem solving and developing the best beans. If you don’t keep a log, as she says, a cup of coffee lasts only minutes. With a log, your coffee lasts as long as the ink remains on the page.
To Spit or Not to Spit?
That is a question for which there is no answer, or rather, the answer is a personal choice. Professional cuppers keep a spittoon nearby. For them, it is necessary because they cup many coffees in a day (and still need to get a full night’s sleep). If only cupping a few favorites, I recommend fully enjoying the coffee by drinking it. Always keep a spittoon or other receptacle nearby in case a coffee doesn’t taste good. Consider using a large glass, bowl, or other receptacle that you can empty and reuse. Also, sparkling water does wonders for refreshing the palate. Keep a bottle on hand flor sipping between cuppings.
Instructions
1. Fill a kettle (you can never have too much hot water) with filtered, good-tasting water and set it to boil on the stove.
2. Set out small glasses, one for each coffee sample. Place a few large water glasses at the center of the arrangement.
3. Place 2 tablespoons (10 g) of fresh finely ground coffee in each rocks glass for each 6-ounce
(180 ml) sample
(a)
. The tall water glasses should not have coffee in them.
4. Once the water boils, turn off the burner and wait for 1 minute.
5. Pour 6 ounces (180 ml) of hot water into each cup. Do not stir the grounds. Fill the tall glasses two-thirds of the way with hot water
(b)
. You will rinse your cupping spoons in these glasses, as needed.
6. Allow the coffee to steep for four minutes. Then, with a large cupping spoon, break the crust of grounds on each coffee sample
(c)
. As you do this, place your nose as close as possible to the sample and inhale the coffee’s aromas. In your cupping log or a note pad, record your observations.
7. With the spoon, remove and discard the floating pieces of crust from each sample.
(d)
(The wet grounds clump together and are easy to remove.)
8. Rinse the spoon in a hot water bath. Dip the clean spoon into one sample and carefully slurp it into your mouth. The louder the slurp, the more likely you are doing it authentically, as they do in Amsterdam’s cupping houses
(e)
.
9. Note the various taste sensations in your cupping log or note pad. Rinse your spoon before moving to a new sample.
10. Taste all the samples, noting all flavors in your cupping log. I know professional cuppers whose logs go back forty years or more.
11. Repeat the slurping as the coffee cools. You may be surprised at the difference in your results. Coffee taste can change dramatically after it cools.
12. Once you have sniffed and tasted all coffees hot, warm, and at room temperature, you are finished.

3 COFFEE ROASTS AND ROASTING
ROASTING
is a simple, linear cooking art, yet it is filled with variables that can make dramatic differences in your coffee. Roasting artisans have the process down pat. If you want to control every aspect of coffee enjoyment, roasting at home is the way to go.
Unless you grow your own coffee, which is impossible for most of us, roasting completes the circle of coffee involvement. It’s also fun, and perhaps even more than brewing, allows you to witness the alchemy of turning these little fruit seeds called coffee beans into real, sweet-smelling treasure chests filled with aromatic, flavorful oils.
Roasting at home doesn’t mean you’ll never buy roasted coffee. In fact, you just may develop a new appreciation for the artisans and their roasting prowess. Whether you decide to become your own roast master for life or be just an occasional roaster who otherwise buys already-roasted coffee beans, you will never forget your first roasting experience.
By the end of this chapter, you will understand the following:
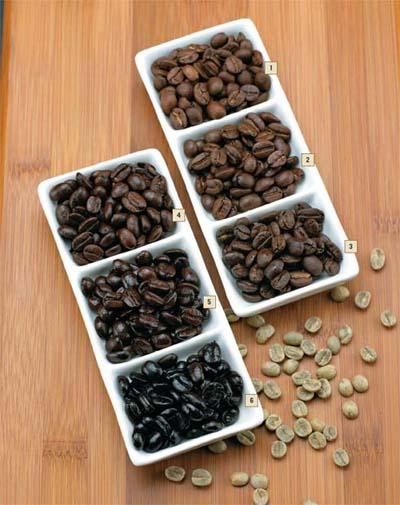
• Distinguishing characteristics of six different roasts
• Pros and cons of and how to use stovetop roasting, drum roasting, and fluid-air roasting
• The process of home roasting and how to determine whether it’s right for you
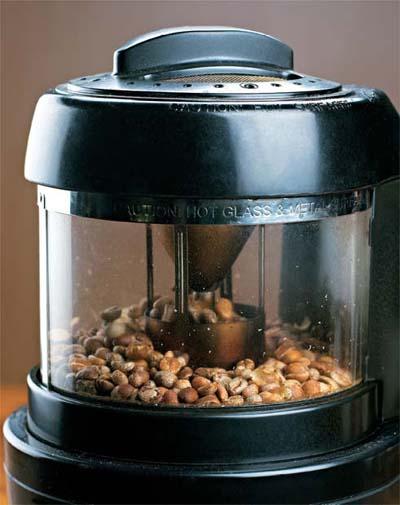
< Hot-air coffee roasters create a hot-air bed that lifts the beans, constantly recirculating them. This method effectively, quickly, and evenly roasts all the beans.
Commercial and Micro-Roasting
Until the 1970s, large commercial roasters, the pinnacle of modernized robotic industrialization, roasted most coffee in the United States. Gas-fired drum roasters supplied the coffee for your supermarkets. An octopus of pipes hosed from large vats of green beans fed the largest machines. Good roasters, even large commercial ones, existed, feeding good quality beans into their goliath roasters. In fact, the majors could (and certainly still can) roast good, high-quality coffee beans. In terms of consistency and ability to monitor and repeat a roast, large-batch roasters are second to none.
But as roasters grew larger, the coffee they produced often seemed to lack something. In the 1970s, a couple of interesting and synergistic events occurred. First, as big roasters roasted larger batches and centralized operations, they required huge green bean lots. This left the smaller farmers’ yields unsold. Meanwhile, a new generation of small or micro-roasters (roasting machines that roast five or ten pounds [2.3 or 4.5 kg] at a time) came to market. The mentality started to change, as better, cheaper, point-to-point transportation and other factors allowed a small-roaster operation in Cleveland, for example, to purchase beans directly from a Guatemalan farm.
On top of that, Baby Boomers—people of the “me” generation—were now adults and wanted special products of all kinds to celebrate their individuality and self-indulgence. Their parents sought simplified, generic products for their post-war lives, but Boomers wanted and were willing to pay for quality. That mentality gave birth to the specialty coffee business, with micro-roasting a natural outgrowth of the movement. Small-batch roasters could purchase specialty beans at bargain prices, roast them fresh, and sell them in their new boutique stores or in supermarkets savvy enough to see a market for this alternative to centrally roasted large-batch (mostly) canned coffees. Boomers (and even some older consumers) quickly began to appreciate the attention to quality and freshness of these new micro-roasts.
NOT TOO SCIENTIFIC
All of this may sound science-based, yet little of coffee is scientific compared to other cooking arts. Many people still take into account intuition, superstition, and urban myth when roasting coffee. It makes sense: It’s hard to know exactly what happens to coffee beans as they roast.
Take temperature, for example. To know a bean’s internal temperature, all you need to do is stick a probe into a bean, right? Not exactly. Remember that beans are hard and brittle, especially as they roast. The best we can measure bean temperature is by inserting a probe into a group of roasting beans, to get a temperature reading at least close to the inside temperature. It’s so difficult to know bean temperature that many commercial roasters use visual tryers, removable scoops that catch beans as they roast and allow the roast master to pull a sample to check its status against a visual color tile (see photo at right).

Roast tiles are used to gauge the color of roasted beans. With practice, you can determine a bean’s roasting doneness by sight, looking at its lightness/darkness and color, by sound, by its crackling character and speed, and by smell in addition to temperature.
The Science of Roasting
The heat required to roast coffee equals the heat with which people in the industry argue about how to do it. Some adherents use low heat to drive moisture from the beans until pyrolysis, or first crack. Then they finish the beans to the desired roast by increasing heat. Others use high heat early, searing the beans like a steak, then low heat after first crack, as the beans should have a high enough internal temperature to finish by themselves.
Roasting brings raw, green coffee beans to a state called pyrolysis, which generally occurs at from 400˚F to 420˚F (204˚C to 216˚C), and liberates about 150 to 200 BTUs (158 to 211 kilojoules) of heat. Roasting has been called the moment of truth because until coffee is roasted, its taste remains unknown.
It takes time to get to pyrolysis. As beans roast, they progress through various stages. At 220˚F (104˚C), they shrivel up and lose moisture and weight. They then swell to twice their size. At 380˚F (197˚C), they turn pale brown. At 400˚F (204˚C), they turn medium brown. During this process, free amino acids react with reducing sugars resulting in more than 110 aromatic compounds. Also, during roasting, the beans lose then gain sugars, and their acidity decreases, then returns to its starting pH level. Light-roasted coffees have lower pH levels. By the time coffee finishes roasting, more than 700 identified compounds—cumulatively called coffee flavor—exist.