The Art and Craft of Coffee (11 page)
Read The Art and Craft of Coffee Online
Authors: Kevin Sinnott

7.
Use bean color to determine when they are done.
8.
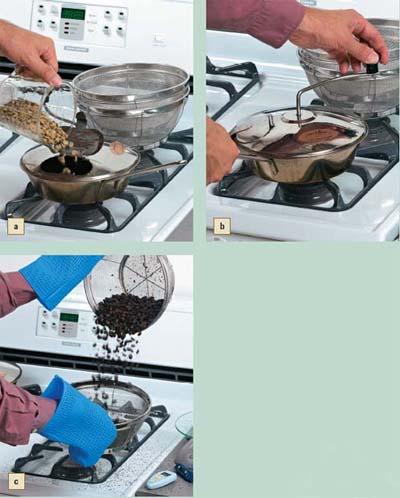
Don the heat-safe gloves. When your beans reach desired doneness, open the hatch and immediately pour them into one heat-safe colander
(c)
.
9.
Pour the hot beans from one colander to the other until they are cool to touch (about 5 minutes). This process loosens the chaff, so it tends to float around. Blow the chaff away from the beans during tossing to remove as much of it as possible.
10.
Once the beans cool enough to touch, transfer them into the mason jar (or other glass container). Leave the jar open and exposed to air for a few hours. Cap the jar before day’s end. Do not leave the jar open overnight.
Stovetop Roasting Tutorial
Drum Roasting
In drum roasting, a perforated cylinder holds the beans, which get heated from below by radiant heat. The cylinder constantly rotates to evenly distribute heat across the beans. In addition, a steady stream of hot air blows through the cylinder’s center, creating a heating environment much like a convection oven, encouraging a consistent, uniform roast. The majority of commercial operations use a drum method to roast their coffee.

Drum roasters are now available to home afi cionados. Drum roasters run quietly and roast more slowly, which is designed to match the traditional flavor development of a commercial roaster in smaller home batches. The perforated cylinder on this Behmor drum roaster constantly rotates to evenly distribute heat across the beans (See photos on page 67).
Pros
• Long roast time. Drum roasters usually take between fifteen and twenty minutes to roast. This is good in general, but it can be stressful trying to hit the cooling cycle button at just that magic moment.
• Perfect yield. Drum roasters typically roast a half-pound of coffee, which many coffee drinkers consider just the right amount for their use. More generous hobbyists roast extras for friends—increasing their social standing considerably.
• Developed, complex flavor. Many in the coffee industry believe drum roasters offer great complexity of flavors. Whether this is due to longer roast times or type of heat compared to fluid-air roasting is the subject of intense debate. It calls for more taste tests.
• No noise. Most drum roasters are extremely quiet, allowing the roast master to listen for the subtle distinction of the first and second cracks.
Cons
• Bad visibility. Many drum roasters don’t allow you to view the beans as they roast. This is a big disadvantage. Commercial drum roasters feature tryers, catchers that allows the roast master to remove bean samples to check their doneness. But most consumer drum machines don’t have this feature, restricting you to listening and smelling.
• Slow cooling. Drum roasters typically dump the justroasted beans onto a turntable. Commercial machines feature forced air to speed cooling, but most home machines don’t. Rapid cooling ensures that your beans stop roasting when you choose to stop roasting them. Most experts believe rapid cooling improves flavor.
Materials
Green beans
Digital scale
Drum roaster
Heat-safe gloves
Mason jar (or other glass container)
Fire extinguisher, in case of roasting fire
Expert Notes on Drum Roasting
Here are some tips on drum roasting:
• If your home drum roaster does not offer incylinder cooling, use oven mitts or heat-safe gloves to carefully pour roasted beans into colander following the roast. Then pour them into a second colander. Repeat this back-and-forth process to cool the beans. Some advanced home roasters prefer this method to in-machine cooling, claiming it is faster and therefore better at halting the roasting process.
• If the roaster offers pre-timed cycles, choose one that will likely roast darker (longer) than you wish. You can always stop a cycle in the middle.
• True believers in home roasting can go as far as modifying a gas barbeque grill to roast up to three pounds (1.4 kg) of beans per load. One roaster even gutted his backyard grill and paid a local sheet metal worker to fashion a proprietary perforated metal drum designed to spin using a rotisserie attachment. His grill roaster has been so successful that he’s become a weekly attraction at his local farmers’ markets.
Instructions
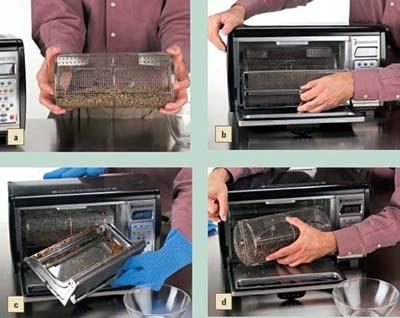
1.
Measure the recommended amount of green beans using your digital scale and pour them into open end of the cylinder.
2.
Gently shake cylinder to evenly distribute the beans
(a)
.
3.
Seat the cylinder (drum) into the machine’s track to ensure it turns properly. Add the chaff collector
(b)
.
4.
Start the drum roaster. Always begin with a cool machine unless otherwise directed by the manufacturer.
5.
Wait for the popping sound to begin, indicating the first crack stage.
6.
Once the beans finish popping, a brief silence will occur before the beans begin their second crack, a faster sound reminiscent of crackling fireplace logs. Begin the cooling cycle at any time from this point.
7.
Don your heat-safe gloves. After the cooling cycle ends, open and empty the chaff collector
(c)
.
8.
Carefully remove the drum from the machine
(d)
and pour the beans into a glass jar for storage.
9.
Following each roast, blow any remaining chaff out of the machine.
Drum Roasting Tutorial
Fluid-Air Roasting
In this method, developed in the mid-1900s, beans roast by floating on a bed of hot air. Its commercial predecessor was the Jabez-Burns Thermalo drum roaster noteworthy for using a stream of heated fluid air shot through the drum’s center, producing similar results. In the fluid-air roasting method, hot air lifts the unroasted beans until they float; the suspension of the beans ensures even roasting. The process is similar to that of an electric popcorn popper, and in fact, can work using a popcorn popper. The noise of the circulating air often masks the crucial popping sounds, but the ability to see the beans during roasting means you more likely know when they are done.
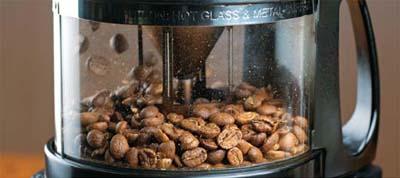
Look for the airborne beans on the left, lifted high by the hot air shooting upwards from below.
Pros
• Ease. Fluid-air roasting is most efficient roast method because it roasts in a linear method and thus is the easiest for which to design a machine. Best of all, home air roasting requires no fancy gear. A simple air popcorn popper will do.
• Roasting speed. Air roasting is fast and heats beans evenly, bringing out the coffee’s bright acidity and reducing any tipping (or scorching of the beans) that frequently happens in drum roasts. Air roasting generally takes between five and twelve minutes.
• Visual presentation. Most fluid-air roasters use glass canisters for roasting. Not only does the roast master get the pleasure of seeing the beans roast but also can use this tool to watch the beans and judge their doneness.
• Quick cooling. Most air roasters feature quick-responding cooling cycles. Many experts believe that quick cooling reduces bitterness.
Cons
• Speed. The air roaster’s quick roasting speed may improve flavor, but it means a quick response when the beans finish roasting. Seconds count, and an early or late response at the moment of truth can ruin the batch.
• Too much noise. It takes significant air movement to keep a bed of beans floating, and that means noise, often enough to make it difficult to hear first and second crack.
• Low yield. Most air roasters can roast only a small amount of beans, perhaps enough for a pot or two of coffee.
• No flavor complexity. Some claim that air roasting, while simple and straightforward, does not develop the same complexity and flavor depth of a good drum roast. Most who share this view think it has something to do with air’s convection heating, although some direct contact heat does occur as the beans touch each other.
Materials
Fluid-air coffee roaster
Digital scale
Green coffee beans
Kitchen timer or clock
Heat-safe gloves
Steel colander, optional
Mason jar (or other glass container)
Fire extinguisher, in case of roasting fire
Overriding the System
Many advanced users prefer to decide exactly when to stop the roast rather than let the preprogrammed appliance do it for them. To override the preset cycles, choose the longest roast cycle, perhaps longer than you expect. Once the beans achieve their desired roast, simply hit cool to manually end the process.
Instructions
1.
Start with a cool roaster, unless otherwise specified by the manufacturer.