Vegetable Gardening (134 page)

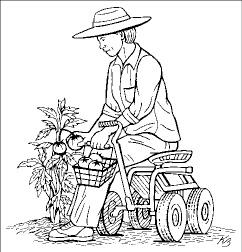
Figure 20-2:
A wagon with a seat and storage space is useful in the garden.
 Baskets:
To gather all that great produce you grow and harvest, invest in a wire or wicker basket. Wire baskets are easier to use because you can wash the produce while it's still in the basket. Wicker and wooden baskets, though less durable than metal, are more aesthetically pleasing and stylish in your garden. Piling your produce in either basket is a lot more functional than trying to balance zucchinis in your arms while carrying them from your garden to your kitchen.
Wheelbarrows and Garden Carts
Invariably you need to move heavy items such as soil and fertilizer from one spot to another in your yard or garden. The two main options for moving stuff that's "larger than a bread box" are wheelbarrows and garden carts. The basic difference between the two vehicles is the wheels.
Wheelbarrows
have one wheel and an oval, metal tray;
garden carts
have two wheels and a rectangular wooden tray.
Wheelbarrows are maneuverable in tight places, can turn on a dime, and are easy to dump. A contractor-type wheelbarrow has a deeper box and is worth the extra investment because of its superior quality. For a lightweight wheelbarrow, try one with a box made out of plastic.
Garden carts are better balanced, can carry larger loads, and are easier to push than wheelbarrows. A larger-sized garden cart can easily handle loads of compost, soil, rocks, and bales of hay. Some garden carts have removable back panels that make dumping easier.
Power Tillers
The old-fashioned rear- or front-tined
power tiller
was designed to help large-scale gardeners save time turning their gardens in spring and fall. The large power tillers (more than a 5-horsepower engine) are best if you have 1,000 square feet or more to till. They also can be indispensable tools for forming raised beds and breaking sod.
 If you only need to use a large tiller once a year, consider renting one from a local rental store or hiring someone to till for you.
Because home gardens have become smaller in recent years, tiller manufacturers have responded by designing a new group of tillers called
minitillers
(see Figure 20-3). These two-cycle, 1- to 2-horsepower tillers weigh only 20 to 30 pounds, are easy to handle, and can till in tight places. Not only do they have tilling tines, but they come with other attachments such as lawn aerators, edgers, and lawn dethatchers.
Minitillers work best in previously worked, loamy soil without large stones. Unlike their larger cousins, minitillers are easy to handle when you're weeding between rows of vegetables and close to plants. However, they aren't good for breaking new ground or tilling stony or heavily weeded areas in your garden. Because they're lightweight, they till raised beds and small gardens very well. Electric models are available if you don't like the noise and smell of a two-cycle engine.
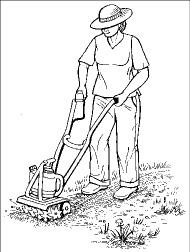
Figure 20-3:
A minitiller is perfect for smaller home gardens.
Though not essential for your garden, if you like power equipment and need a little help keeping your garden looking good, check out minitillers. (See the appendix to find out where you can get minitillers.)
Chapter 21: Nearly Ten Ways to Extend Your Growing Season
In This Chapter
 Starting your veggies earlier in the season
Extending your harvest into the cold-weather season
After you start vegetable gardening, you may get hooked on having fresh vegetables from your garden year-round. Unless you live in a mild climate, such as zones 9 and 10 (see the appendix for more on zones), the best way to get the most vegetables from your garden is to use season-extending devices. These devices protect your vegetables from deadly frosts in fall and enable you to get an earlier start in spring. Of course, selecting the right vegetables to grow also is vital to your success.
In general, greens, root crops, and cool-season cole crops are the best vegetables to grow in cold weather. (See the specific chapters on these vegetables for growing information.) However, you can extend the length of time that you harvest warm-season crops — such as melons, tomatoes, and peppers — by using the season-extending methods in this chapter. Whatever plants you grow, these techniques enable you to harvest fresh vegetables for most of the year.
Choose Clever Planting Locations
Where
you plant your vegetables has as much to do with avoiding frosts and cold weather as
when
you plant. Every yard has pockets or areas that warm up earlier in spring and stay warmer later into the fall. For example, the nook near my kitchen window on the south side of my house is such a location. That area is the first place that snow melts, and plants in this location grow well past the time when frost has killed vegetables in my main garden. Find these nooks in your yard, plant cold-hardy vegetables like spinach and broccoli, and enjoy harvesting earlier and later than anyone else on the block.
Some good nook areas to check out in any yard are the south-side walls of buildings, especially if you can find a spot that's protected from wind. Courtyards are notoriously good microclimates. (See Chapter 3 for more on microclimates.) Other good spots include areas around evergreen shrubs (as long as enough sun pokes through them to grow the plants) and near paved surfaces such as driveways or walkways — especially if the pavement is dark colored.
Time Your Planting Wisely
 Timing is important when you grow vegetables. Here are some guidelines to follow:
If you want early vegetables, start your seeds indoors in late winter or early spring (as I explain in Chapter 13). Then you can transplant the young seedlings into a season extender, such as a cold frame, cloche, or hot cap (all of which I describe later in this chapter).
If you want your vegetables to last longer into winter, start them at the end of the summer, but be sure to start them early enough that by the dark months (December and January), they'll be full-sized and edible. During these months, don't expect much growth, even in warm areas, because the light is less intense and the day is much shorter. You'll be extending the
harvest
season, not the
growing
season. (Unless, of course, you're in a warm location and trying to overwinter these vegetables for a spring harvest; see Chapter 19 for details.)
Protect Plants with Hot Caps
Hot caps are a great way to protect individual prized plants from the cold. A
hot cap
is usually a clear plastic, pyramid-shaped cone with an opening in its top to let hot air out. You can buy these cones at garden centers, or you can create your own by cutting the bottoms out of clear plastic milk jugs. If you do create your own, be sure to cut a vent at the top of the milk jugs to let hot air out on sunny days. Or use them only at night. You can cover the hole with a blanket at night if you expect chilly temperatures.
Add Elegance to Your Garden with Glass Cloches
If you really want something elegant in your garden, you can spend up to $50 on tinted glass hot caps, affectionately called
cloches,
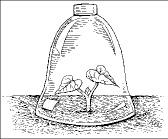
as shown in Figure 21-1. They're sturdy and beautiful, and yes, they protect tender plants from the cold — even a little better than plastic hot caps do. However, cloches don't have vents, so during sunny days you need to remove them or prop them up to let cool air in.
Figure 21-1:
A glass cloche.
Buy or Build Cold Frames
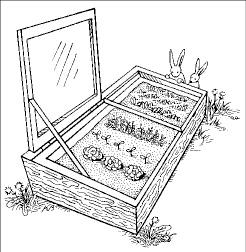
Cold frames
essentially are mini-greenhouses. They're usually wooden boxes covered with windowpanes or clear plastic (see Figure 21-2). Some professional gardeners as far north as zone 5, where winter temperatures can dip down to -20 degrees Fahrenheit, can harvest vegetables every month of the year by planting cold-weather-tolerant crops in cold frames.
You can purchase a premade cold frame for $100 to $200, or you can create your own simple cold frame by following these steps:
Figure 21-2:
A sample cold frame.
1. Build a 3-foot-x-6-foot box from untreated lumber. Cut the box so that the back is 18 inches high, sloping to a front height of 14 inches.
This sloping angle enables more sun to reach the plants, and it sheds rain and snow as well.
2. Hinge an old window sash over the top of the cold frame or make a frame by using tightly stretched clear plastic, which creates a sealed growing environment.
You can insulate the cold frame by adding rigid foam insulation around the insides of the cold frame and by weather stripping along the top edge.
3. Position the cold frame so that it faces south.
It's best to put a cold frame next to a structure, such as a house, toprotect it from cold winds.
Even though the purpose of a cold frame is to trap heat, on sunny days, even in winter, a cold frame can get so hot that it burns the plants. Check your cold frame once a day on sunny days, opening or venting the top slightly to allow hot air to escape.