Windows Server 2008 R2 Unleashed (177 page)
Read Windows Server 2008 R2 Unleashed Online
Authors: Noel Morimoto

908
CHAPTER 24
Server-to-Client Remote Access and DirectAccess
FIGURE 24.32
DirectAccess Server Connectivity Setup.
ptg
NOTE
The DirectAccess Setup Wizard has an informational note that it detected that the
internal network is IPv4-based and will enable IPv6 transition technologies as part of
the setup. The DirectAccess server will be configured as the ISATAP server.
10. Click Next.
11. On the Certificate Components page, for Select the Root Certificate to Which
Remote Client Certificates Must Chain, click Browse. In the list of certificates, click
the companyabc-DC1-CA root certificate, and then click OK.
12. For Select the Certificate That Will Be Used to Secure Remote Client Connectivity
over HTTPS, click Browse. In the list of certificates, click the certificate named IP-
HTTPS, and then click OK. The results are shown in Figure 24.33. Click Finish.
13. In Step 3 Infrastructure Servers, click Configure.
14. On the Location page, click Network Location Server Is Run on a Highly Available
Server, type https://nls.companyabc.com, click Validate, and then click Next. You
should get a green check mark with a Validation Successful message.
15. On the DNS and Domain Controller page (shown in Figure 24.34), note the entry for
the name companyabc.com with the IPv6 address
2002:c9b:a602:1:0:5efe:192.168.3.200. This is the 6to4 IPv6 address for the DC1
domain controller. All DirectAccess client requests to the domain companyabc.com
will be forwarded to this domain controller. The nls.companyabc.com is also listed
with a blank DNS server, which ensures that DirectAccess clients will not forward
the requests to this host.


DirectAccess Scenario
909
24
FIGURE 24.33
DirectAccess Server certificate components.
ptg
FIGURE 24.34
DirectAccess Infrastructure Server Setup for DNS.
NOTE
The blank DNS for the Network Location Service (NLS) is needed so that DirectAccess
clients can use the URL to determine if they are inside the corporate network or on the
Internet. When inside the network, the DirectAccess clients will be able to access the
site. When remote and connected via DirectAccess, the clients will be unable to reach
the site due to the blank DNS entry, although they can reach all other internal resources.
910
CHAPTER 24
Server-to-Client Remote Access and DirectAccess
16. Click Next.
17. On the Management page, if there were internal management servers, such as
Microsoft System Center Configuration Manager 2007 (SCCM) servers that needed to
reach the DirectAccess clients, they would be entered in this portion of the setup.
Leave this blank and click Finish.
18. In Step 4 Application Servers, click Configure.
19. On the DirectAccess Application Server Setup page, leave Require No Additional End-
to-End Authentication.
NOTE
If end-to-end protection were required, Step 4 is where the permitted application servers
would be added. This scenario is doing end-to-edge, so no configuration is needed.
20. Click Finish.
21. Click Save, and then click Finish to launch the configuration wizard.
22. In the DirectAccess Review dialog box, click Apply. The configuration will be applied.
ptg
23. In the DirectAccess Policy Configuration message box, click OK. The configuration
has now been applied. The configuration is stored in %WinDir%\DirectAccess\ in
an XML file named DirectAccessConfig.xml.
There will be two new Group Policy Objects, each named DirectAccess Policy-
One has security filtering that applies it only to the DirectAccess server by computer name
(DA1$). The other has security filtering that applies it only to the DirectAccess clients in
the DirectAccessClients security group. The DirectAccess server (DA1) and the DirectAccess
clients (WS3) will need to be rebooted or have gpupdate.exe run to have their group poli-
cies applied.
Testing DirectAccess
To test the DirectAccess functionality, the WS3 computer will be added to the
DirectAccessClients computer group. This applies the DirectAccess client group policies.
To add CLIENT1 to the DirectAccess client computers security group, complete the
following steps:
1. On the DC1 domain controller, launch Server Manager.
2. Expand Roles, Active Directory Domain Services, Active Directory Users and
Computers, the domain companyabc.com, and select the container Users.
3. Right-click the group DirectAccessClients and select Properties.
DirectAccess Scenario
911
4. Select the Members tab, and then click the Add button.
5. In the Select Users, Contacts, Computers, or Groups dialog box, click Object Types,
check Computers, and click OK.
6. Under Enter the Object Names to Select (Examples), type WS3, and click OK.
7. Click OK to save.
24
8. Restart the WS3 computer to have the changes take effect.
The DirectAccess group policies will now be in effect on the WS3 computer.
You might need to run gpupdate.exe on the DirectAccess server DA1 to get the group
policies to take effect on it.
On all the internal servers, the commands net stop iphlpsvc and net start iphlpsvc
will need to be run to restart the IP Helper service and have the new ISATAP configuration
be recognized. This includes DC1, SERVER1, and DA1. When the IP Helper service starts,
the systems will resolve the isatap.companyabc.com DNS entry installed by the
DirectAccess setup and will enable their ISATAP interfaces.
NOTE
Of course, many administrators will simply reboot all the systems, which will have the
ptg
same effect as restarting the IP Helper service and applying group policies.
Following the configuration and the restart of the IP Helper service on all the compo-
nents, the IPv6 network should be fully functional. All systems should be able to reach
each other using the IPv6 addresses as well as the IPv4 addresses. If there is a problem
with the IPv6 access, DirectAccess will not function.
NOTE
The ping.exe tool can be used to verify that IPv6 is working. The -6 option forces ping
to use IPv6. The -4 option forces ping to use IPv4. The command to ping a computer
DC1 using IPv6 is ping dc1.companyabc.com -6. The command to ping a computer
DC1 using IPv4 is ping dc1.companyabc.com -4. Each computer should be success-
fully pinged with both commands. This can be a very useful technique when trou-
bleshooting DirectAccess and IPv6.
As shown in the arrows in Figure 24.35, we will test (A) the connection to the internal
network, (B) the connection to the public network, and, finally, (C) the connection to the
home network.
912
CHAPTER 24
Server-to-Client Remote Access and DirectAccess
192.168.3.201
Application Server
192.168.3.211
SERVER1
12.155.166.2
12.155.166.3
12.155.166.1
Internal Network
Public Network
DirectAccess Server
DNS
DA1
ns1.isp.amaris.org
A
B
192.168.3.200
NAT
NLS Server
C
https://nls.companyabc.com
Home Network
AD, DNS, and CA
DirectAccess Client
DC1
WS3
FIGURE 24.35
Testing client connection to networks.
For Test A, the connection to the internal network, execute the following steps:
1. Connect the DirectAccess client WS3 to the internal network.
2. Select Start, enter cmd, and press Enter.
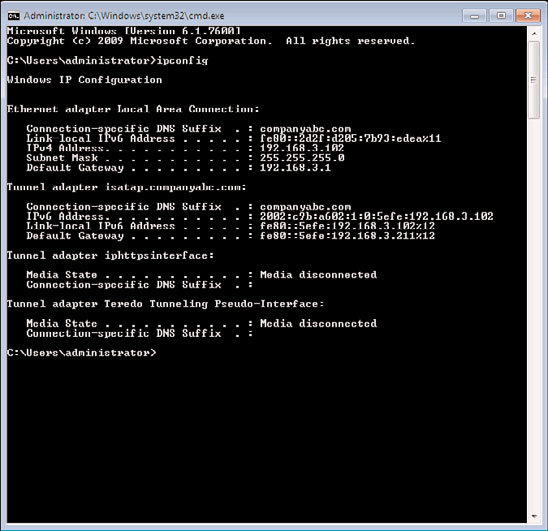
3. At the command prompt, enter ipconfig and press Enter. Figure 24.36 shows that
WS3 has been assigned an IPv4 address (192.168.3.102) on the internal network and
ptg
that an ISATAP address has been automatically generated in the ISATAP tunnel adapter.
FIGURE 24.36
Test A—internal network.

DirectAccess Scenario
913
4. Launch Explorer and access a share on the application server to demonstrate access.
This demonstrates that WS3 is connected to the internal network and is able to access
resources and that the IPv6 transitional technologies are working internally, specifically
ISATAP.
For Test B, the connection to the public network, execute the following steps:
24
1. Connect the DirectAccess client WS3 to the public network.
2. Select Start, enter cmd, and press Enter.
3. At the command prompt, enter ipconfig and press Enter. Figure 24.37 shows that
WS3 has been assigned an IPv4 address (12.155.166.101) on the public network and
that a 6to4 address has been automatically generated with the 6to4 2002: prefix in
the 6to4 tunnel adapter.
ptg
FIGURE 24.37
Test B—public network.
4. Launch Explorer and access a share on the application server to demonstrate access.
This demonstrates that WS3 is connected to the public network and is able to access
resources and that the IPv6 transitional technologies are working publicly, specifically 6to4.
For Test C, the connection to the home network, execute the following steps:
