Windows Server 2008 R2 Unleashed (263 page)
Read Windows Server 2008 R2 Unleashed Online
Authors: Noel Morimoto

1330
CHAPTER 32
Optimizing Windows Server 2008 R2 for Branch Office
Communications
2. In the Local Group Policy Object Editor, expand Local Computer Policy, Computer
Configuration, Administrative Templates, Windows Components, BitLocker Drive
Encryption, and then select Operating System Drives.
3. In the right pane, double-click Require Additional Authentication at Startup.
4. Enable the BitLocker Group Policy settings by selecting the Enabled option, and
then click OK, as displayed in Figure 32.10.
ptg
FIGURE 32.10
Enabling additional authentication options for BitLocker support.
5. Apply the new Group Policy settings by typing gpupdate.exe /force at the com-
mand prompt.
BitLocker Drive Encryption utilizing a USB device can now be configured by completing
the following steps:
1. Click Start, Control Panel, and double-click BitLocker Drive Encryption.
2. Enable BitLocker Drive Encryption by clicking Turn On BitLocker on the BitLocker
Drive Encryption page.
3. Review the message on the BitLocker Drive Encryption Platform Check page, and
then click Continue with BitLocker Drive Encryption to start the BitLocker process.
4. If necessary, the installation will prepare the system for BitLocker, then click Next.
Configuring BitLocker Drive Encryption on a Windows Server 2008 R2 Branch
1331
Office Domain Controller
5. Because a TPM does not exist in this example, select the option Require a Startup
USB Key at Every Startup, and then click Next. This option can be found on the Set
BitLocker Startup Preferences page.
6. Ensure a USB memory device has been inserted into the system. Then on the Save
Your Startup Key page, specify the removable drive to which the startup key will be
saved, and then click Save.
32
7. The Save the Recovery Password page is then invoked. The administrator has the
ability to save the BitLocker recovery password on a USB drive or to a folder on the
system. In addition, the third option allows for printing of the password. Choose
the desired storage alternative for saving the recovery password, and then click Next
to continue.
NOTE
It is a best practice to make additional copies of the recovery password and store them
in a secure location like a vault. For maximum security, the recovery password should
not be stored on the local system nor should the password be printed on paper. In
addition, do not store the recovery password and the startup key on the same media.
ptg
8. On the Encrypt the Volume page, ensure the Run BitLocker System Check option is
enabled, and then click Continue. The system check guarantees BitLocker can access
and read the recovery and encryption keys before encrypting the volume.
NOTE
Do not bypass the option to run a system check before encrypting the volume. Data
loss can occur if there is an error reading the encryption or recovery key.
9. Insert the USB memory device containing the startup key into the system, and then
click Restart Now. The Encryption in Progress status bar is displayed showing the
completion status of the disk volume encryption.
NOTE
The USB device must be plugged in to the system every time the system starts to boot
and gain access to the encrypted volume. If the USB device containing the startup key
is lost or damaged, you must use the Recovery mode and provide the recovery key to
start the system.
Enabling BitLocker Drive Encryption on Additional Data Volumes
There might be situations when BitLocker Drive Encryption is warranted not only on the
volume containing the operating system files, but also on the data volumes. This is espe-
cially common with domain controllers in branch offices where a lack of physical security
and theft are concerns.
1332
CHAPTER 32
Optimizing Windows Server 2008 R2 for Branch Office
Communications
When encrypting data volumes with BitLocker, the keys generated for the operating
system volume are independent of the drive volume. However, encryption of a data
volume is similar to the encryption process of the operating system volume.
Follow these steps to enable BitLocker Drive Encryption for server data volumes:
1. Click Start, Run, and then type cmd. Click OK to launch a command prompt.
2. From within the command prompt, type manage-bde -on
NOTE
Replace the
encrypt. In addition, replace the
USB device. The USB device is utilized to store the recovery key.
The data volume must be unlocked each time the server is rebooted. This can be accom-
plished through a manual or automatic process. The syntax to manually unlock a data
volume after every restart consists of the following two options:
ptg
. manage-bde -unlock
. manage-bde -unlock
The first option uses the recovery password, whereas the second option takes advantage of
passing the recovery key to decrypt the data volume. As mentioned in the previous para-
graph, it is possible to enable automatic unlocking of a data volume by utilizing the
following syntax at the command prompt:
manage-bde –autounlock –enable
This command creates a recovery key and stores it on the operating system volume. The
data volume is automatically unlocked after each system reboot.
Utilizing the BitLocker Recovery Password
There might be situations when you need to leverage the recovery password to gain access
to a volume that is encrypted with BitLocker. This situation might occur when there is an
error related to the TPM hardware, one of the boot files becomes corrupt or modified, or
if TPM is unintentionally cleared or disabled. The following instructions outline the
recovery steps:
1. Restart the system and the BitLocker Drive Encryption console will come into view.
2. Insert the USB device containing the recovery password, and then press Esc. If the
USB device is not available, bypass step 2 and proceed to step 3.
3. Press Enter. You will be prompted to enter the recovery password manually.
4. Type in the recovery password, press Enter, and then restart the system.
Understanding and Deploying BranchCache
1333
Scenarios for when the Recovery Password Is Required
There are a number of different scenarios where a BitLocker recovery would need to be
performed; these include (but are not limited to):
. Changing or replacing the motherboard with a new TPM
32
. Changing the status of the TPM
. Updating the BIOS and or any other ROM on the motherboard
. Attempting to access a BitLocker-enabled drive on a different system.
. Entering the wrong PIN information too many times
. Losing or damaging the USB startup key
Removing BitLocker Drive Encryption
The course of action for turning off BitLocker Drive Encryption is the same for both TPM-
based hardware configurations and USB devices. When turning off BitLocker, two options
exist. You can either remove BitLocker entirely and decrypt a volume or you can
temporarily disable BitLocker so changes can still be made. The following steps depict the
ptg
process for removing and disabling BitLocker:
1. Click Start, Control Panel, and double-click BitLocker Drive Encryption.
2. Turn off BitLocker Drive Encryption by clicking Turn Off BitLocker on the BitLocker
Drive Encryption page.
3. The What Level of Decryption Do You Want dialog box will be invoked. Choose
either Disable BitLocker Drive Encryption or Decrypt the Volume.
Understanding and Deploying BranchCache
BranchCache is a new feature in Windows Server 2008 R2 and Windows 7 that is designed
to optimize wide area network (WAN) bandwidth usage by branch offices. To accomplish
this, BranchCache copies content from central office content servers and caches the
content at the branch office. Once cached, clients no longer have to traverse a WAN
connection to access content. Instead, the content is accessed directly from within the
branch office from caches on other peer Windows 7 machines or servers running the
BranchCache feature of Windows Server 2008 R2. Therefore, BranchCache helps improve
content access times by branch office servers and clients while also reducing the amount
of traffic on a WAN link.
NOTE
BranchCache is only supported on Windows Server 2008 R2 and Windows 7.
1334
CHAPTER 32
Optimizing Windows Server 2008 R2 for Branch Office
Communications
Important BranchCache Concepts
When working with BranchCache, the following important concepts should be taken into
consideration:
. There are two modes of operation in BranchCache: Distributed Cache mode and
Hosted Cache mode. If cached content is only being distributed using client comput-
ers, this is called Distributed Cache mode. Hosted Cache mode, however, is when the
content cache is being hosted by a server that is located within the branch office.
. BranchCache supports the optimization of file access as well as downloads over
HTTPS and IPSec.
. BranchCache protects content that is cached by encrypting it. Content can then
only be accessed by using identities, which are provided by the originating server to
authenticated clients that are members of the same domain as the content server.
Distributed Cache Mode
Distributed Cache mode is a peer-to-peer caching scheme that is used to cache intranet
website (communicating over HTTP or HTTPS) or file server (communicating over the
standard SMB protocol) content within a branch office without the need of a local hosted
cache server.
ptg
Server-Side Configuration
By default, BranchCache is not enabled. To enable it on a Web server or a file server, the
following steps need to be performed:
1.
Web (IIS) Server
—You would need to enable the BranchCache feature using Server
Manager.
2.
File Server (SMB)
—You would need to enable the BranchCache for Remote Files role
service, which is part of the File Services role using Server Manager.
Additionally, for file servers, the following things need to be completed:
1. Configure the Hash Publication for BranchCache GPO setting (Computer
Configuration\Policies\Administrative Templates\Network\Lanman Server).
Set this to: Allow Hash Publication Only for Shared Folders on Which
BranchCache Is Enabled.
2. Specify the HashStorageLimitPercent Registry value
(HKLM\CurrentControlSet\Service\LanmanServer\Parameters). This is the
maximum percentage of physical disk space used to store the publication hashes.
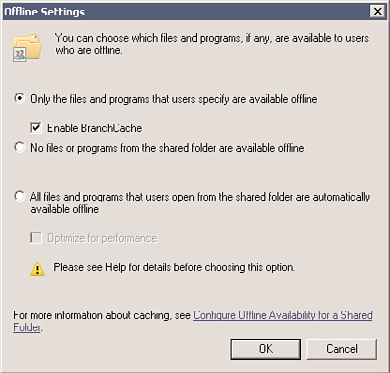
3. Lastly, tag your file shares by enabling BranchCache support for them. On the
Caching tab, select Only the Files and Programs That Users Specify Are Available
Offline. Then select Enable BranchCache, as shown in Figure 32.11.
Client-Side Configuration
Like the server-side configuration, the BranchCache feature must be enabled on Windows
7 clients. To enable this feature in Distributed Cache mode, there are two methods. The
Understanding and Deploying BranchCache
1335
32
FIGURE 32.11
Enabling file share BranchCache support.
first method is via Netsh. For example, run a command prompt (Run As Administrator)
and execute:
ptg
netsh branchcache set service mode=DISTRIBUTED
NOTE
Executing the previous command not only turns on and configures BranchCache, but
also configures Windows Firewall with the appropriate rules to allow BranchCache to
operate in this mode.
Needless to say, running a Netsh command is not the most efficient way of turning on
BranchCache. That is why most people will use the second method for configuring
BranchCache on clients in Distributed Cache mode, which is a GPO. Use the following
steps to complete this task:
1. Enable the Turn On BranchCache GPO setting (Computer
Configuration\Policies\Administrative Templates\Network\BranchCache).
2. Enable the Set BranchCache Distributed Cache Mode GPO setting (Computer