Read Windows Server 2008 R2 Unleashed Online
Authors: Noel Morimoto
Windows Server 2008 R2 Unleashed (178 page)

914
CHAPTER 24
Server-to-Client Remote Access and DirectAccess
1. Connect the DirectAccess client WS3 to the home network.
2. Select Start, enter cmd, and press Enter.
3. At the command prompt, enter ipconfig and press Enter. Figure 24.38 shows that
WS3 has been assigned an IPv4 address (192.168.137.147) on the home network and
that a Teredo address has been automatically generated with the Teredo 2001: prefix
in the Teredo tunnel adapter.
ptg
FIGURE 24.38
Test C—home network.
4. Launch Explorer and access a share on the application server to demonstrate access.
This demonstrates that WS3 is connected to the home network and is able to access
resources and that the IPv6 transitional technologies are working publicly, specifically
Teredo.
In the course of the testing, no additional configuration was needed, no logon credentials
needed to be supplied, and resources were transparently available. This is the seamless nature
of DirectAccess, which completely hides the connection complexity from the end user.
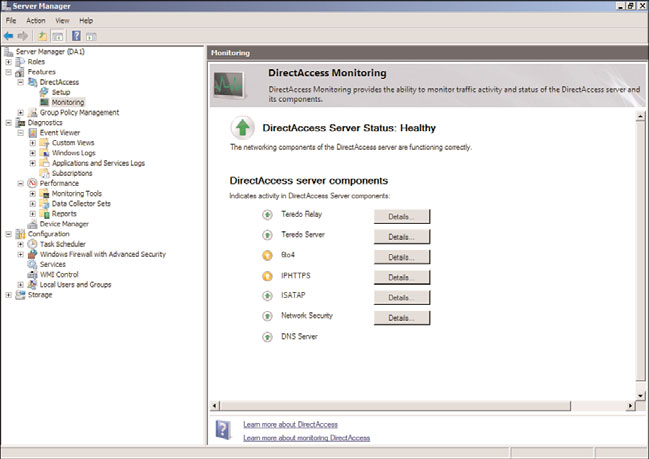
Monitoring the DirectAccess Server
The DirectAccess server includes an excellent tool to monitor the activity of the
DirectAccess clients. Shown in Figure 24.39, it provides an overall status of the
DirectAccess server, status and activity of the individual DirectAccess components, and
detailed statistics on the components. The figure shows that the Teredo components are
active, indicating that there are DirectAccess clients using Teredo but none using IP-HTTPS.
DirectAccess Scenario
915
24
FIGURE 24.39
DirectAccess component status.
ptg
The DirectAccess monitoring provides information on the traffic activity, data, and control
traffic counters for the following components:
. Teredo Relay
. Teredo Server
. 6to4
. IPHTTPS
. ISATAP
. Network Security
. DNS Server
The status is updated every 10 seconds. The status indicators for the components will
change depending on the health and activity of the component. The various states are
as follows:
. Green indicates current activity in the component.
. Orange indicates the component is idle.
. Yellow indicates the component is experiencing issues.
. Red indicates that the component has failed.
To use the DirectAccess server monitoring, run the following steps:

916
CHAPTER 24
Server-to-Client Remote Access and DirectAccess
1. Launch Server Manager on the DirectAccess server DA1.
2. Expand Features, DirectAccess, and select Monitoring.
3. The details window will show the component status screen. As connections are
made, the status will update every 10 seconds to show the activity.
4. To see the performance metrics for any given component, click on the Details
button to launch Performance Monitor with the appropriate counters. For example,
click ISATAP Details.
5. Select the Change Graph Type pull-down menu to change between the different
graph types. The Line Graph is shown in Figure 24.40. From the selected Packets/sec,
it looks like there was a maximum of six thousand packets per second during the
measuring window.
ptg
FIGURE 24.40
DirectAccess performance monitoring.
The DirectAccess Monitoring tool gives access to dozens of key performance metrics in
graphical or tabular format. These metrics are invaluable for monitoring and troubleshoot-
ing the DirectAccess infrastructure.
The connection manager allows VPN administrators to deploy an easy-to-use, preconfig-
ured interface for their end users.
. Connection Manager Client Dialer
. Connection Manager Administration Kit (CMAK)
Connection Manager
917
The Connection Manager (CM) client dialer is installed on the VPN clients, whereas the
CMAK can be installed anywhere and be used to generate the CM profiles.
Connection Manager Client Dialer
The Connection Manager client dialer is software that is installed on each remote access
24
client. It includes advanced features that make it a superset of basic dial-up and VPN
networking. CM simplifies the client configuration for the users by enabling them to do
the following:
. Select from a list of phone numbers or IP addresses to use, based on physical location.
. Use customized graphics, icons, messages, and help.
. Automatically create a dial-up connection before the VPN connection is made.
. Run custom actions during various parts of the connection process, such as precon-
nect and postconnect actions.
A customized CM client dialer package (CM profile) is a self-extracting executable file
created by the CMAK. The CM profile can be distributed to VPN users via CD-ROM, email,
website, or file share. The CM profile automatically configures the appropriate dial-up and
VPN connections. The Connection Manager profile does not require a specific version of
ptg
Windows and will run on the following platforms: Windows 7, Windows Vista, Windows
XP, Windows 2000, Windows NT 4.0, and Windows Millennium Edition.
Connection Manager Administration Kit
The Connection Manager Administration Kit (CMAK) enables administrators to preconfig-
ure the appearance and behavior of the CM. With CMAK, client dialer and connection
software allow users to connect to the network using only the connection features that are
defined for them. CMAK also enables administrators to build profiles customizing the
Connection Manager Installation package sent to remote access users.
The CMAK feature is installed independent of any Windows Server 2008 R2 roles. To
install CMAK, add the CMAK feature by following these steps:
1. On the server that will generate the CM profiles, launch Server Manager.
2. Click on Add Features to launch the wizard.
3. Select Connection Manager Administration Kit, and click Next.
4. Click Install.
5. Click Close.
To use the CMAK to create CM profiles, you run the CMAK wizard. To create a profile,
execute the following steps:
1. Select Start, Administrative Tools, and click Connection Manager Administration Kit.
2. Click Next.
3. Select the operating system for the target client (in this case, Windows 7 or Windows
Vista) and click Next.
918
CHAPTER 24
Server-to-Client Remote Access and DirectAccess
4. Select New Profile and click Next.
5. Enter a service name—in this example, Company ABC VPN.
6. Enter a filename (in this example, abcvpn) and click Next. The filename must be
eight characters or less.
7. Select Add a Realm Name to the User Name to enter a domain name.
8. Enter the FQDN of the Active Directory domain (in this example, companyabc.com)
and click Next.
9. Click Next to skip merging information from other profiles.
10. Select the Phone Book from this Profile check box to add support for VPN connection.
11. Select the Always Use the Same VPN Server option button in the VPN server name or
IP address section.
12. Enter the VPN server’s external FQDN or IP address, which is vpn1.companyabc.com
in this example.
NOTE
The CMAK supports multiple addresses for VPN servers. A text file of the various
addresses must be created in the proper format. The Allow the User to Choose a VPN
Server Before Connecting check box is selected and the text file is imported using the
ptg
Browse button.
13. Click Next.
14. Click Next.
15. Uncheck the Automatically Download Phone Book Updates check box, and click Next.
16. Click Next.
17. Click Next to skip the routing table updates configuration.
18. Click Next to skip the proxy configuration.
19. Click Next to skip the custom actions.
20. Click Next to accept the default logon graphic.
21. Click Next to accept the default phone book graphic.
22. Click Next to accept the default icons.
23. Click Next to leave the default Help file.
24. Enter the custom support number for users to dial when experiencing problems
connecting, and click Next.
25. Click Next to skip the import of a custom licensing agreement.
26. Click Next to skip the import of additional files.
27. Click Next to build the profile.
28. Note the directory where the profile was saved—in this example, c:\Program
Files\CMAK\Profiles\Windows 7 and Windows Vista\abcvpn\abcvpn.exe.
29. Click Finish to close the wizard.
Best Practices
919
The profile executable is now ready to be distributed to clients and executed to create the
Company ABC VPN Connection. This example was relatively simple, but for many organi-
zations, the ability to add various customizations such as the Help file, licensing agree-
ment, or predefined VPN addresses will help drive down support costs.
24
Remote and mobile connectivity has increased over the years because the extended office
now includes hotels, airports, client sites, other campus buildings, and even wireless
coffee shop users. With the expansion of the network from which users need to connect
to a Windows Server 2008 R2 environment, the improvement of security, reliability,
compatibility, and performance becomes extremely important for an organization. The
Windows Server 2008 R2 VPN technologies meet the needs of these increasingly mobile
and remote users.
Windows Server 2008 R2 contains all the VPN technologies from the previous version of
Windows and adds DirectAccess as a compelling solution for enterprises with extensive
infrastructure already in place.
These new technologies allow the Windows Server 2008 R2 VPN to extend further with
ptg
increased security and reliability, while making the end user experience painless.
The following are best practices from this chapter:
. Use the Network Policy Server to validate and remediate the health of clients.
. Use certificates for authentication where possible.
. For increased security, choose DirectAccess, SSTP, or L2TP with IPSec as the VPN
protocol.
. Use PEAP as the preferred authentication protocol.
. Use the more secure MS-CHAP v2 if password authentication must be used.
. Use DirectAccess to provide remote users a simpler no-touch method of securely
connecting back to the office.
. Use the DirectAccess Monitoring to troubleshoot and monitor DirectAccess clients.
. Always install the computer certificate on the RRAS server before adding the RRAS role.
This page intentionally left blank
ptg
IN THIS CHAPTER
Remote Desktop Services
. Why Implement Remote
Desktop Services
. How Remote Desktop Works
. Understanding the Name
Change
. Understanding Remote
Desktop Services
Remote Desktop Services (previously named Terminal
. Planning for Remote Desktop
Services) is a component of Microsoft Windows (server and
Services
client operating systems) that enables users to remotely run
. Deploying Remote Desktop
applications or manage a server from any machine that has
Services
the Remote Desktop Connection (RDC) client and network
access. In a Remote Desktop Services session, whether a
