Windows Server 2008 R2 Unleashed (186 page)
Read Windows Server 2008 R2 Unleashed Online
Authors: Noel Morimoto

NOTE
In the Remote Desktop section on the Remote tab of the System Properties dialog box,
there are two different settings for enabling Remote Desktop. The first option, Allow
Connections from Computers Running Any Version of Remote Desktop (Less Secure),
allows a client using any version of the Remote Desktop Connection client to connect to
Remote Desktop Services. The second option, Allow Connections Only from Computers
Running Remote Desktop with Network Level Authentication (More Secure), only allows
a client that is using a version of the Remote Desktop Connection client that supports
Network Level Authentication (NLA) to connect to Remote Desktop Services.
Alternatively, Remote Desktop for Administration can also be enabled via GPO using the
following policy options:
. Computer Configuration\Policies\Administrative Templates\Windows
Components\Remote Desktop Services\Remote Desktop Session
Host\Connections\Allow allows users to connect remotely using Remote Desktop
Services.
Deploying Remote Desktop Services
955
. Computer Configuration\Policies\Administrative Templates\Windows
Components\Remote Desktop Services\Remote Desktop Session
Host\Security\Require requires user authentication for remote connections by
using Network Level Authentication.
Or, administrators can also use PowerShell and the following commands to enable Remote
Desktop for Administration:
. (Get-WmiObject -Class “Win32_TerminalServiceSetting” -Namespace
root\cimv2\terminalservices).SetAllowTsConnections(1)
. (Get-WmiObject -class “Win32_TSGeneralSetting” -Namespace root\cimv2\
terminalservices -Filter “TerminalName=’RDP-
tcp’”).SetUserAuthenticationRequired(1)
NOTE
Although the Server Manager method described previously will also configure the
required host firewall rules for Remote Desktop, the other two methods leave it to the
administrator to configure the necessary firewall rules.
25
ptg
Enabling Remote Assistance
To configure remote assistance, follow these steps:
1. Log on to the desired machine with local administrator privileges.
2. Click Start, right-click the Computer shortcut, and then click Properties.
3. Next, select the Remote Settings task and in the Remote Assistance Settings section,
select the Allow Remote Assistance Connections to This Computer option.
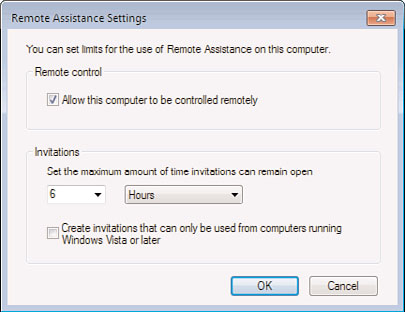
4. Click the Advanced button to configure whether remote control will be allowed, the
maximum amount of time an invitation can remain open, and if invitations can only
be used from computers running Windows Vista or later, as shown in Figure 25.2.
FIGURE 25.2
Enabling a computer for remote assistance.
956
CHAPTER 25
Remote Desktop Services
NOTE
The previous steps assume that a Windows 7/Vista client is being used. For Windows
XP clients, the steps will be slightly different.
5. Click OK in the Advanced window, and click OK on the System Properties page to
complete this process.
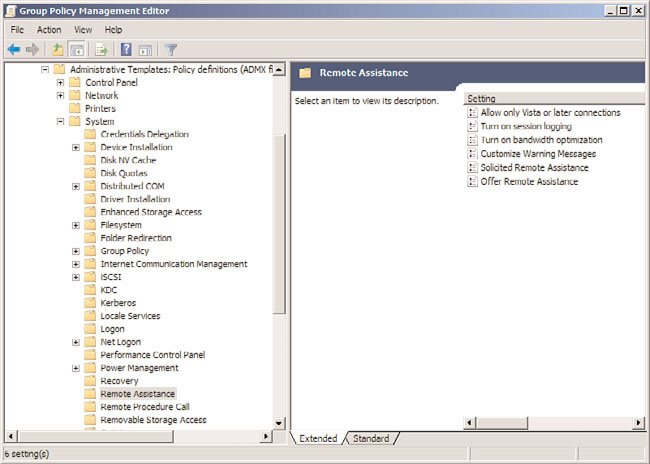
Remote assistance for clients that are members of a domain can be configured using
Group Policy. All of the remote assistance settings are located in Computer
Configuration\Policies\Administrative Templates\System\Remote Assistance, as
shown in Figure 25.3.
ptg
FIGURE 25.3
Group Policy administrative templates for remote assistance.
Deploying the RD Session Host Role Service
When deploying the RD Session Host role service, three things (at a minimum) must be
done, in order, before an RD Session Host server can be used to host applications:
1. First, the RD Session Host role service must be installed.
2. Next, the applications that are to be hosted by the RD Session Host server must be
installed.
3. Finally, you must grant users or groups the required privileges to connect to the RD
Session Host server and configure RD Licensing, covered in the “Deploying RD
Licensing” section later in this chapter.
Deploying Remote Desktop Services
957
Installing the RD Session Host Role Service
To install the RD Session Host role service, follow these steps:
1. Log on to the desired server with local administrator privileges.
2. Click Start, and then click Run.
3. In the Run dialog box, type in ServerManager.msc and click OK.
4. In the Roles Summary section, click the Add Roles task.
5. After the Add Roles Wizard loads, click Next.
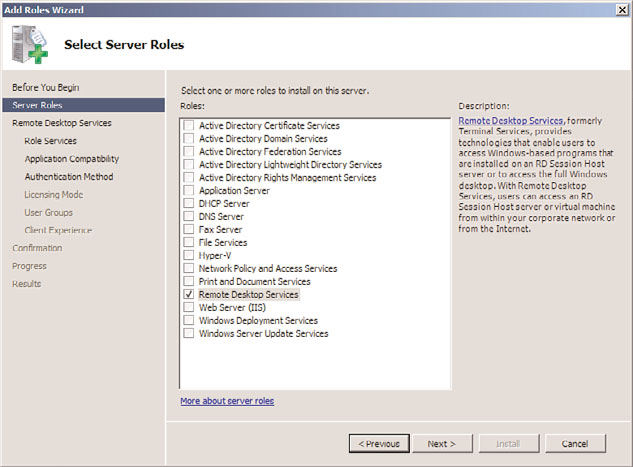
6. On the Select Server Roles page, select the Remote Desktop Services role, and click
Next, as shown in Figure 25.4.
25
ptg
FIGURE 25.4
Selecting the Remote Desktop Services role.
7. On the Remote Desktop Services page, click Next.
8. Now, on the Select Role Services page, only select the Remote Desktop Session Host
role service. This is the only role service that is being installed at this time. Click Next.
9. On the Uninstall and Reinstall Applications for Compatibility page, click Next.
10. Now, on the Specify Authentication Method for Remote Desktop Session Host page,
select an authentication option for this RD Session Host server (the decision about
which method should be made based on what type of clients will be connecting),
and then click Next.
11. On the Specify Licensing Mode page, select the Configure Later licensing option
(Remote Desktop licensing is reviewed later in this chapter in the section “Deploying
RD Licensing”), and then click Next.
958
CHAPTER 25
Remote Desktop Services
12. On the Select User Groups Allowed Access to This RD Session Host Server page, leave
the default Administrators group, and then click Next.
13. On the Configure Client Experience page, choose the desired level of “Client
Experience” functionality that will be available to remote clients when they connect
to this RD Session Host server, and then click Next.
14. On the Confirm Installation Selections page, review the selections made, and then
click Install.
15. On the Installation Results page, review the results, and click Close.
16. When prompted to restart the server, click Yes.
17. After the server restarts, log on to the server with local administrator privileges.
18. After logging on, the Installation Results page is displayed. Review the results on the
page and confirm that the Terminal Server installation has succeeded.
Installing Applications
Applications should be installed on an RD Session Host server only after the RD Session
Host role service has been installed. Applications that are installed prior to installing the
RD Session Host role service might not function properly for all users. In addition, applica-
tions must only be installed on an RD Session Host server when it is in a special installa-
tion mode. To put an RD Session Host server into this installation mode, use either of the
ptg
following methods:
. Use the Install Application on Remote Desktop Session Host option under Programs
in Control Panel.
. Use the following command before installing an application: change user /Install.
If the change user /Install command is used and then the server needs to be changed
back to Execute mode, use the following command: change user /Execute. The server
should be in Execute mode before users access the newly installed application. To see the
current mode, use the following command: change user /Query.
NOTE
When installing applications that use an .msi package from Microsoft, an RD Session
Host server typically doesn’t need to be switched to Install mode. Instead, just install
the application using the .msi package or the related installation executable.
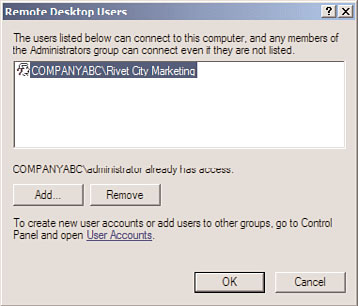
Granting Users or Groups Access
To grant users or groups access to an RD Session Host server, as shown in Figure 25.5, use
the following steps:
1. Log on to the desired server with local administrator privileges.
2. Click Start, and then click Run.
3. In the Run dialog box, type in ServerManager.msc and click OK.
4. After the Server Manager console is displayed, select the Configure Remote
Desktop task.
Deploying Remote Desktop Services
959
FIGURE 25.5
Granting a domain local group access to this RD Session Host server.
5. In the Systems Properties dialog box, on the Remote tab, and in the Remote Desktop
section, click the Select Users button.
25
6. Next, click the Add button, and in the Select Users or Groups dialog box, choose to
find the users or groups you want to grant access to, and click OK.
ptg
7. Click OK, and in the System Properties dialog box, click OK.
NOTE
Completion of the previous steps actually just results in the modification of the local
Remote Desktop Users group. When managing a number of RD Session Host servers
in a farm, it is recommended that access to these servers be controlled using a
Restricted Groups policy in a Group Policy Object.
Additional RD Session Host Server Configuration Tasks
In addition to just installing the RD Session Host role service, there are several additional
configuration tasks that administrators might want to complete on an RD Session Host
server. These tasks are described in the following sections.
Denying New User Logons
Called “Terminal Services Server Drain mode” in Windows Server 2008, an RD Session
Host server can be configured to prevent new user sessions from being created. Reasons
why an administrator might want to prevent new user sessions from being created include