Windows Server 2008 R2 Unleashed (190 page)
Read Windows Server 2008 R2 Unleashed Online
Authors: Noel Morimoto

1. Log on to the desired server with local administrator privileges.
2. Click Start, Administrative Tools, Remote Desktop Services, Remote Desktop
Connection Manager.
3. Next, in the Actions pane click the Configure Virtual Desktops Wizard option.
4. Once the wizard has loaded, click Next.
5. Now, on the Specify an RD Virtualization Host Server page, define the name of the
RD Virtualization Host server in the Server Name field, click the Add button, and
then click Next.
6. On the Configure Redirection Settings page, define the name of an RD Session Host
server running in Redirection mode in the Server Name field, click the Add button,
and then click Next.
7. On the Specify an RD Web Access Server page, click Next.
8. On the next page, click Apply, ensure that the Assign Personal Virtual Desktop check
box is selected, and then click Finish.
9. Next, on the Assign Personal Virtual Desktop page, click Select User.
10. In the Enter the Object Name to Select box, enter the user’s account name and click
OK.
11. Next, in the Virtual Machine box, select the name of the virtual machine being
defined to the user, and click Next.
Deploying Remote Desktop Services
977
12. Now, confirm the information is correct, and click Assign.
13. Finally, clear the Assign Another Virtual Machine to Another User check box, and
then click Finish.
Configuring a Virtual Desktop Pool
A virtual desktop pool is a grouping of identically configured virtual machines that reside
on an RD Virtualization Host server. The following steps describe how to create a virtual
desktop pool using existing virtual machines that reside on an RD Virtualization Host
server. These steps should be carried out on the server that has the RD Connection Broker
role service installed and the Configure Virtual Desktops Wizard has not been executed:
1. Log on to the desired server with local administrator privileges.
2. Click Start, Administrative Tools, Remote Desktop Services, Remote Desktop
Connection Manager.
3. Next, in the Actions pane click the Configure Virtual Desktops Wizard option.
4. Once the wizard has loaded, click Next.
5. Now, on the Specify an RD Virtualization Host Server page, define the name of the
25
RD Virtualization Host server in the Server Name field, click the Add button, and
then click Next.
ptg
6. On the Configure Redirection Settings page, define the name of an RD Session Host
server running in Redirection mode in the Server Name field, click the Add button,
and then click Next.
7. On the Specify an RD Web Access Server page, click Next.
8. On the next page, click Apply, clear the Assign Personal Virtual Desktop check box,
and then click Finish.
9. Next, in the Actions pane of the Remote Desktop Connection Manager, click the
Create Virtual Desktop Pool option.
10. On the Welcome page, click Next.
11. Now, select all of the virtual machines that will be part of the virtual desktop pool,
and then click Next.
12. On the Set Pool Properties page, define the following and then click Next:
.
Display Name box—
Define the name for the virtual desktop pool.
.
Pool ID box—
Define the ID used for the virtual desktop pool.
13. Lastly, click Finish.
Deploying RD Licensing
RD Licensing is a required component of any Remote Desktop Services deployment. To
deploy RD Licensing, the following tasks must be completed:
1. Determine the type of RDS CALs that will be used.
2. Install the RD Licensing role service.
3. Activate the RD licensing server.
978
CHAPTER 25
Remote Desktop Services
4. Install RDS client access licenses (RDS CALs) on the RD licensing server.
5. Configure the RD Session Host servers to use the licensing server.
Installing the RD Licensing Role Service
To use the RD Licensing service, the RD Licensing role service needs to be installed on the
system. To install the RD Licensing role service, do the following:
1. Log on to the desired server with local administrator privileges.
2. Click Start, and then click Run.
3. In the Run dialog box, type in ServerManager.msc and click OK.
4. Under Roles Summary, select the Remote Desktop Services option.
5. Under Role Services, select the Add Role Services task.
6. On the Select Role Services page, select the Remote Desktop Licensing role service.
7. On the Configure Discovery Scope for RD Licensing page, do not choose a scope
option and click Next.
8. On the Confirm Installation Selections page, verify the settings, and then click Install.
9. On the Installation Results page, confirm that the installation was successful, and
then click Close.
ptg
Activating the RD Licensing Server
An RD licensing server can be activated automatically if the server has Internet access,
through a web page from any computer with Internet access, or by the administrator
calling a Microsoft Clearing House using an 800 number. The licensing server is activated
by contacting the Microsoft Clearing House server that will send the RD licensing server a
digital certificate. To activate an RD licensing server, follow these steps:
1. Click Start, Administrative Tools, Remote Desktop Services, Remote Desktop
Licensing Manager.
2. Right-click the RD licensing server and select Activate Server.
3. Click Next on the Welcome page.
4. Choose the proper connection method, and click Next.
. If you choose the Web Browser or Phone Connection method, follow the
instructions in the window to complete the activation. Click Finish when
you are done.
. If you choose Automatic Activation, enter the appropriate company informa-
tion to send to the Microsoft Clearing House, and click Next at each window.
5. After the server is activated, uncheck the Install Licenses Wizard Now check box,
and click Finish to return to the Remote Desktop Licensing Manager.
Installing Client Access Licenses
After the RD licensing server is activated, CALs must be installed using the following steps:
1. Click Start, Administrative Tools, Remote Desktop Services, Remote Desktop
Licensing Manager.
Securing Remote Desktop Services
979
2. Right-click the RD licensing server, and click Install Licenses.
3. Click Next on the Welcome page, and depending on the default connection method,
the CAL Installation Wizard will try to connect to the Microsoft activation server.
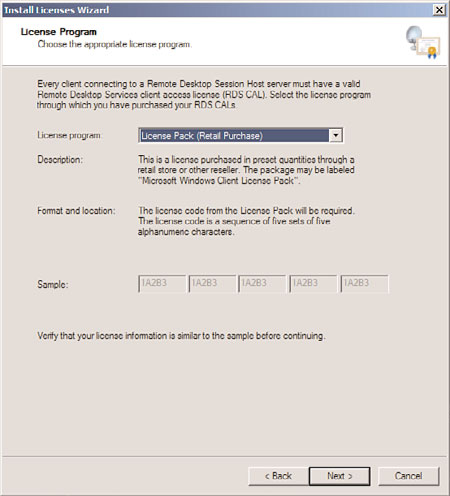
4. When the wizard connects to the activation server, choose the license program that
the organization participates in, and click Next. For example, select License Pack
(Retail Purchase), Open License, or Select License, as shown in Figure 25.19.
25
ptg
FIGURE 25.19
Choosing the license program.
5. On the Licensing Code page, enter the license number or agreement number for
your licensing pack, click the Add button, and then click Next.
6. After the licensing information is verified and the CALs are installed, click Finish to
close the CAL Installation Wizard.
Now that the licenses are installed, each RD Session Host server must be configured to use
the RD licensing server.
Securing Remote Desktop Services
Remote Desktop Services should be secured using standard security guidelines and policies
defined by an organization. In addition to an organization’s security standards and guide-
lines, it is advisable that administrators use recommended best practices compiled by
Microsoft, as well as the National Institute of Standards and Technologies (NIST) and the
980
CHAPTER 25
Remote Desktop Services
National Security Agency (NSA). Both NIST and NSA provide security lockdown configura-
tion standards and guidelines that can be downloaded from their websites (http://www.
nist.gov and http://www.nsa.gov, respectively).
Securely Building Remote Session Services
When building security into Remote Desktop Services, keep in mind that you are giving
users certain levels of access to a shared resource. Essentially, users are logging on to a
system and using the applications and services installed on that server or virtual machine.
With this in mind, it is important to strike a balance between a user’s productive capabil-
ity and what the user can do (intentionally or accidentally) to a system. Otherwise, a
single session can significantly affect other user sessions, as well as the entire RD Session
Host server or an individual shared virtual machine. Additionally, administrators should
also consider that depending on their deployment strategy, users might be accessing
Remote Desktop Services from external systems. Therefore, a comprehensive approach
around end-to-end security (from the client to RD Session Host/virtual machine) needs to
be implemented.
Segmenting Resources
RD Session Host server resources should be segmented in such a way that users can only
ptg
modify specific settings. This sounds simple, but requires careful planning. For instance,
partitioning the server’s disk subsystem can keep the operating system, logs, applications,
and profiles separated. Each of these partitions should also be formatted with NTFS so that
the proper permissions can be applied. This also makes it easier for administrators to
manage and lock down specific resources.
The profile partition should be given particular attention because of the nature of the
content it stores. For smaller installations, profiles can be stored on the local server on a
separate partition. For larger installations, temporary profiles should be kept on a separate
partition and folder redirection should be used for data that needs to roam with a user.
This not only improves security, but it can also significantly improve performance.
Typically, these temporary RDS profiles are stored under
%SystemDrive%\Users\%Username%, even if roaming profiles are used in the network
environment. To change the location to another partition, do the following:
1. Create a Users folder on the partition.
2. Modify HKEY_LOCAL_MACHINE\SOFTWARE\Microsoft\Windows NT\
CurrentVersion\ProfileList\ProfilesDirectory Reg_Sz to the new location.
3. Restart the server.
Securing Remote Desktop Services with GPOs
As mentioned later in the “Group Policy for RD Session Host Servers” section, GPOs can
and should be used to secure the Remote Desktop Services environment. For instance, if an
application or department working with sensitive information uses Remote Desktop
Services, the Remote Control setting can be disabled to ensure that only authorized users
Supporting Remote Desktop Services
981
can view these sessions. Group Policy can also be used to set disconnect timeout values
and allow reconnections from only the original client. For more complex security require-
ments, Group Policy can also be used to secure and customize a user’s session. For example:
. GPO can be used to create a secure desktop that gives users limited Windows func-
tionality based on their needs.
. Or, if supported, a GPO can be used to customize and restrict individual applica-
tion features.
Network Level Authentication
In RDP 6.0, a feature called Network Level Authentication was introduced. This feature
enhanced RDP security by providing an interface for user authentication earlier in the
connection process of a session (before a Remote Desktop connection and the logon
screen appears). The following are the benefits of configuring Remote Desktop Services to
require Network Level Authentication:
. Fewer resources are used validating users before presenting them with a full session.
25
. Remote computer authentication can be used to preauthenticate servers as well.
ptg
. It can reduce the risk of a denial-of-service attack.
Changing the RDP Port
As mentioned earlier, Remote Desktop Services securely communicates over TCP port 3389
using RDP. Organizations requiring even greater security can change the default port by
modifying the following Registry key:
HKEY_LOCAL_MACHINE\System\CurrentControlSet\Control\Terminal
Server\WinStations\RDP-Tcp\PortNumber
Or, if RemoteApp programs are being used, the RDP settings can be modified to specify a